
Overview
This Onboarding Guide walks you through configuring the Integration Cockpit to match your enterprise integration landscape. It covers all essential steps and best practices - from establishing system connections, setting up data sources, populating the inventory and customizing dashboards - ensuring a smooth and efficient start.
Prerequisites
Before starting, ensure the following:
-
Administrator access to all relevant systems (e.g. SAP Integration Suite, PI/PO, ABAP, Azure)
-
API credentials, service keys or certificates for connected platforms
-
Network/firewall access to allow outbound/inbound communication depending on your deployment model
-
Technical users are provisioned in all source systems
-
Access to SAP BTP cockpit (if using own subaccount)
Coordinate early with your network/security team to ensure all endpoints, ports and destinations are whitelisted and reachable.
Deployment Models
The Integration Cockpit supports two deployment models:
Hosted in Your Own BTP Subaccount
-
You own the BTP subaccount
-
WHINT deploys and configures the Integration Cockpit
-
All connectivity remains inside your landscape
-
You manage user roles and access in BTP
-
Connect your own PostgreSQL database instance
-
Best for: Data sovereignty with vendor-managed cockpit setup
-
Who sets it up: WHINT (with your BTP access)
-
Notes: You provide the BTP service instance and client credentials
SAP BTP Subaccount Configuration
Once the Integration Cockpit is deployed to SAP BTP Cloud Foundry, complete these essential configurations. These steps are required only once after your first deployment to ensure secure connectivity and proper authentication.
SAP Single Sign-On (SSO)
Enable SSO using SAP's XSUAA service for authentication.
Create XSUAA Service Instance
-
In your SAP BTP Cockpit, go to your subaccount
-
Navigate to Services → Service Marketplace
-
Search for Authorization and Trust Management Service
-
Click Create and select:
-
Service: Authorization and Trust Management Service
-
Plan: application (required for SSO functionality)
-
Instance Name: Choose a descriptive name (e.g.
whint_xsuaa_sso)
-
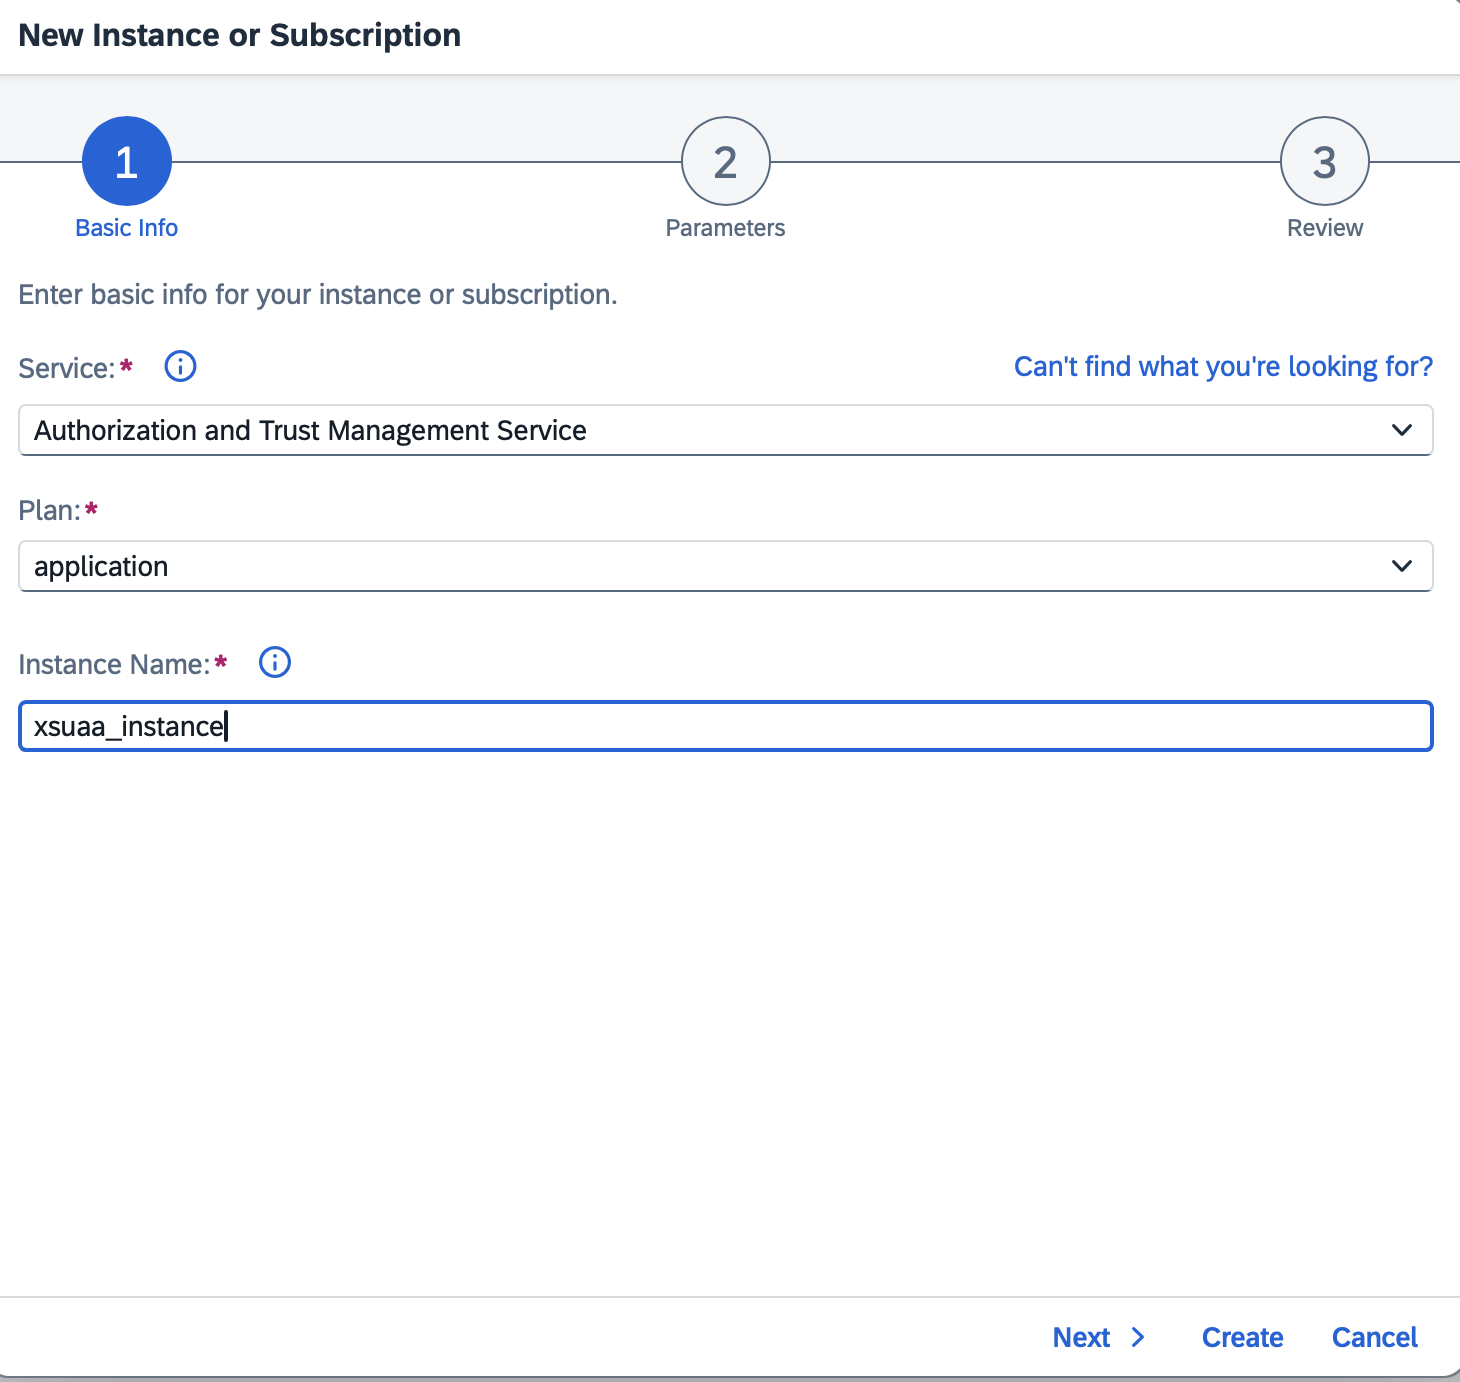
Configure the instance:
-
On the Parameters step, upload or paste your xs-security.json configuration file
-
This file defines the security scopes and role templates for your application
-
Click Next → Create
The XSUAA instance is now created and visible in your service instances list.
Note: Append the redirect-uris if you are using a custom identity provider instead of the SAP default IDP. For example:
...
      "redirect-uris": [
          "https://**.cfapps.eu10-004.hana.ondemand.com/**",
          "https://**.cfapps.eu10-004.hana.ondemand.com/user/login/callback**",
          "https://**.accounts.ondemand.com*",
          "https://login.microsoftonline.com*",
          "<more>..."
      ],
...
Bind to Application
Create the application binding to enable SSO:
-
In the same XSUAA service instance, navigate to Bound Applications tab
-
Click Create under the bound applications list
-
In the creation wizard:
-
Step 1 - Basic Info:
-
Application: Select whintic-<name> from the dropdown
-
Keep other defaults
-
-
Step 2 - Parameters:
-
Paste the same
xs-security.jsonconfiguration
-
-
Step 3 - Review:
-
Review your configuration
-
-
-
Click Create
The binding appears in the Bound Applications list with status Created.
Restart Application
For SSO to take effect:
-
Navigate to your WHINT Integration Cockpit application
-
Go to Overview
-
Click Restart
-
Wait for the application to fully restart (status changes to Started)
Users can now authenticate using SAP SSO when accessing the Integration Cockpit.
Microsoft Single Sign-On (SSO)
Enable users to authenticate with their Microsoft Azure AD credentials.
Update User-Provided Variables
-
In your SAP BTP Cockpit, navigate to your subaccount
-
Go to Cloud Foundry → Spaces → Select your space
-
Find your WHINT Integration Cockpit application
-
Click User-Provided Variables in the left menu
-
Select WHINTIC and click edit

-
Add or update the
auth_providerssection:
auth_providers:
  - name: "azureadv2"
    display_name: "Microsoft"
    client_id: "<your-azure-ad-client-id>"
    secret: "<your-azure-ad-client-secret>"
    callback_url: "<your-wic-route>/user/login/callback"
    scopes:
      - "https://graph.microsoft.com/.default"
    tenant: "<your-azure-ad-tenant-id>"
Replace the placeholders:
-
<your-azure-ad-client-id>: Your Azure AD application client ID -
<your-azure-ad-client-secret>: Your Azure AD application secret -
<your-wic-route>: Your WIC application URL (e.g.https://wic-app.cfapps.eu10.hana.ondemand.com) -
<your-azure-ad-tenant-id>: Your Microsoft tenant ID
-
Click Save
-
Restart the application for changes to take effect:
-
Go to Overview in the application menu
-
Click Restart
-
Find your WIC route under the application's Routes section in the BTP Cockpit. Copy the full URL including https://.
Test SSO Authentication
For Microsoft SSO:
-
Log out of the Integration Cockpit
-
On the login page, you should see a Microsoft login option
-
Click it and authenticate with Azure AD credentials
-
You should be redirected back to the Integration Cockpit dashboard
For SAP SSO:
-
Access the Integration Cockpit URL
-
SSO should automatically authenticate you based on your SAP session
-
If prompted, log in with your SAP credentials
If SSO isn't appearing, clear your browser cache and ensure you restarted the application after configuration changes.
SAP Cloud Connector
Create a connectivity service in the BTP Cockpit
Create a new “Connectivity Service” Instance.
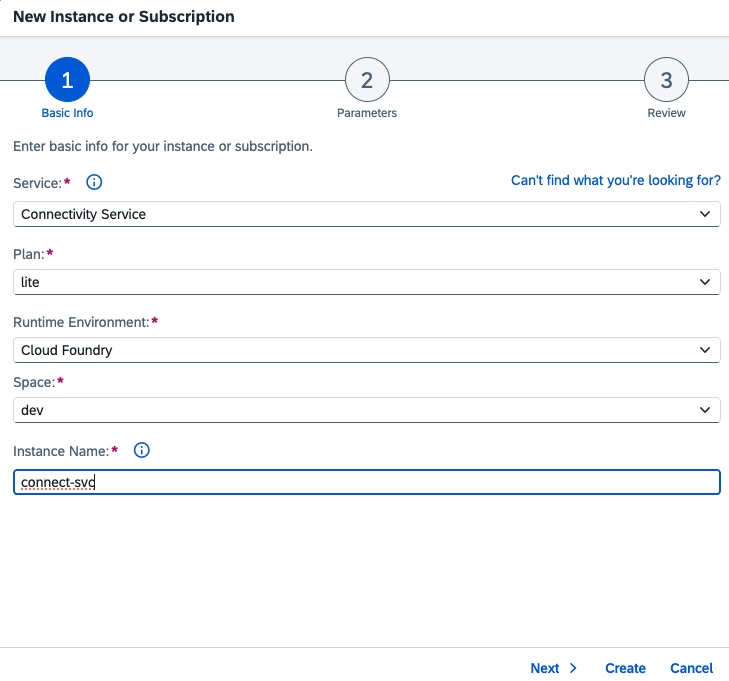
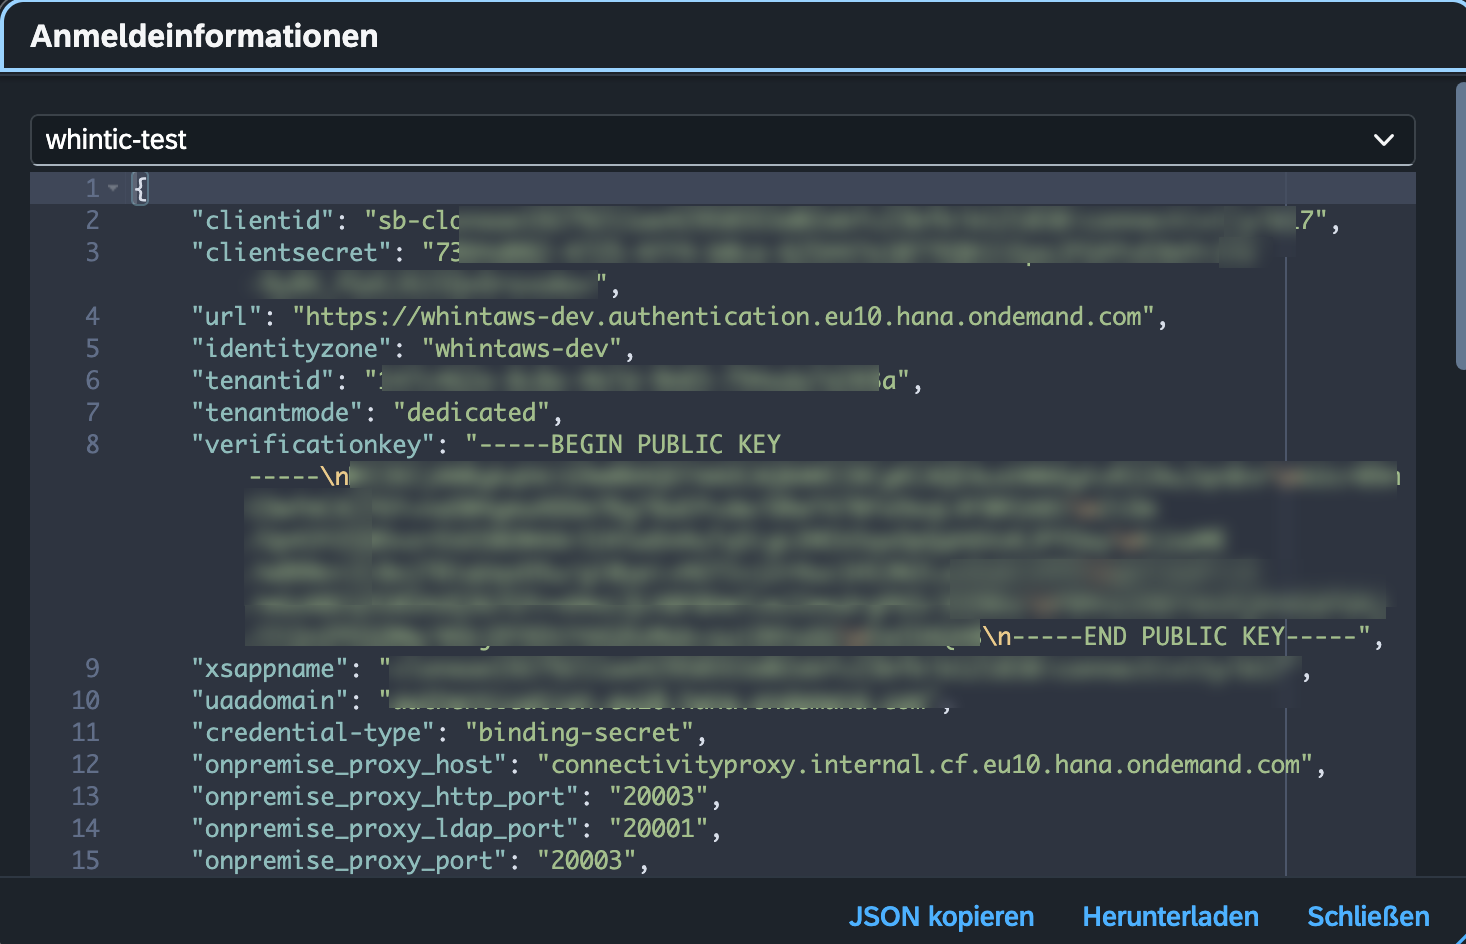
After creation select the new instance and create a new binding.

The information and credentials from this JSON file (e.g. clientid, clientsecret, url, onpremise_proxy_host+onpremise_proxy_port) are used to create a Proxy configuration in the Integration Cockpit.
For detailed instructions, see: Proxies - SAP Cloud Connector Integration
Step 0: Prepare Technical Users
Before configuring data sources, define technical users for each connected platform. These users are required for secure and read-optimized access.
This step is required before any integration monitoring or runtime data collection is possible.
General Best Practices
-
Use dedicated, non-personal users for system access and monitoring
-
Follow the principle of least privilege: only assign the authorizations required
-
Use consistent naming conventions, such as
WHINT,WHINT_IC(IC = Integration Cockpit), etc.
Recommendation
Use secret management tools (e.g. SAP BTP Secrets Manager, Azure Key Vault) to store sensitive credentials.
Platform-Specific User Setup
SAP Cloud Connector: Create User
SAP Cloud Connector: Create User
This step is only needed when you want to create your Cloud Connector as Data Source in the Integration Cockpit.
Create a named user with display-only rights before configuring the Cloud Connector as a data source.
Create User with Display-Only Rights
Option 1: Via LDAP (SAP Help Portal)
Option 2: Manually edit users.xml
Add a new user with username Display and role sccdisplay to grant read-only access.
Generate SHA256 password hash:
-
Use a SHA256 hash generator (SHA256 Generator or any SHA256 tool)
-
Convert your clear text password to SHA256 format
-
Paste the generated hash into the
passwordattribute
Edit users.xml File
File Location: <scc_installation_path>/config/users.xml
Example paths:
-
Linux:
/opt/sap/scc/config/users.xml -
Windows:
C:\SAP\scc\config\users.xml
Add the Display user entry:
<?xml version='1.0' encoding='utf-8'?>
<tomcat-users xmlns="http://tomcat.apache.org/xml"
              xmlns:xsi="http://www.w3.org/2001/XMLSchema-instance"
              xsi:schemaLocation="http://tomcat.apache.org/xml tomcat-users.xsd"
              version="1.0">
  <role rolename="admin"/>
  <group groupname="initial" roles=""/>
  <user username="Administrator" password="<EXISTING_SHA256_HASH>" groups="" roles="admin"/>
  <user username="Display" password="<YOUR_SHA256_HASH_HERE>" groups="" roles="sccdisplay"/>
</tomcat-users>
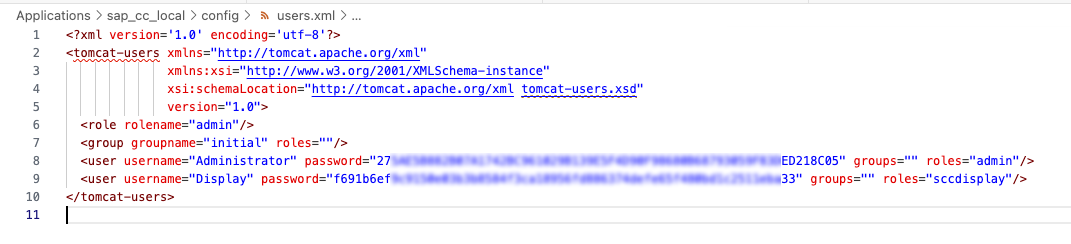
Important:
-
The
passwordattribute contains the SHA256 hash, not clear text -
Keep the Administrator user entry unchanged (pre-existing hashed password)
-
Only add or modify the Display user with your generated SHA256 hash
Next Step:
-
Customer Self-Managed: Use the
Displayusername and clear text password when configuring the data source -
WHINT-Hosted: Use service binding credentials from your SAP CPI tenant
SAP Cloud Connector: Expose SCC
SAP Cloud Connector: Expose SCC
This step is only needed when you want to create your Cloud Connector as Data Source in the Integration Cockpit.
Step 1: Add Entry (Mapping Virtual To Internal System)
-
In your SAP Cloud Connector, navigate to Access Control.
-
Click + to add a new entry mapping.
-
Enter the following values:
-
Back-end Type: Non-SAP System
-
Protocol: HTTPS
-
Internal Host:
localhost -
Internal Port:
8443 -
Virtual Host: e.g.
winwpo.scc(choose any name) -
Virtual Port:
8443
-
Click Save.
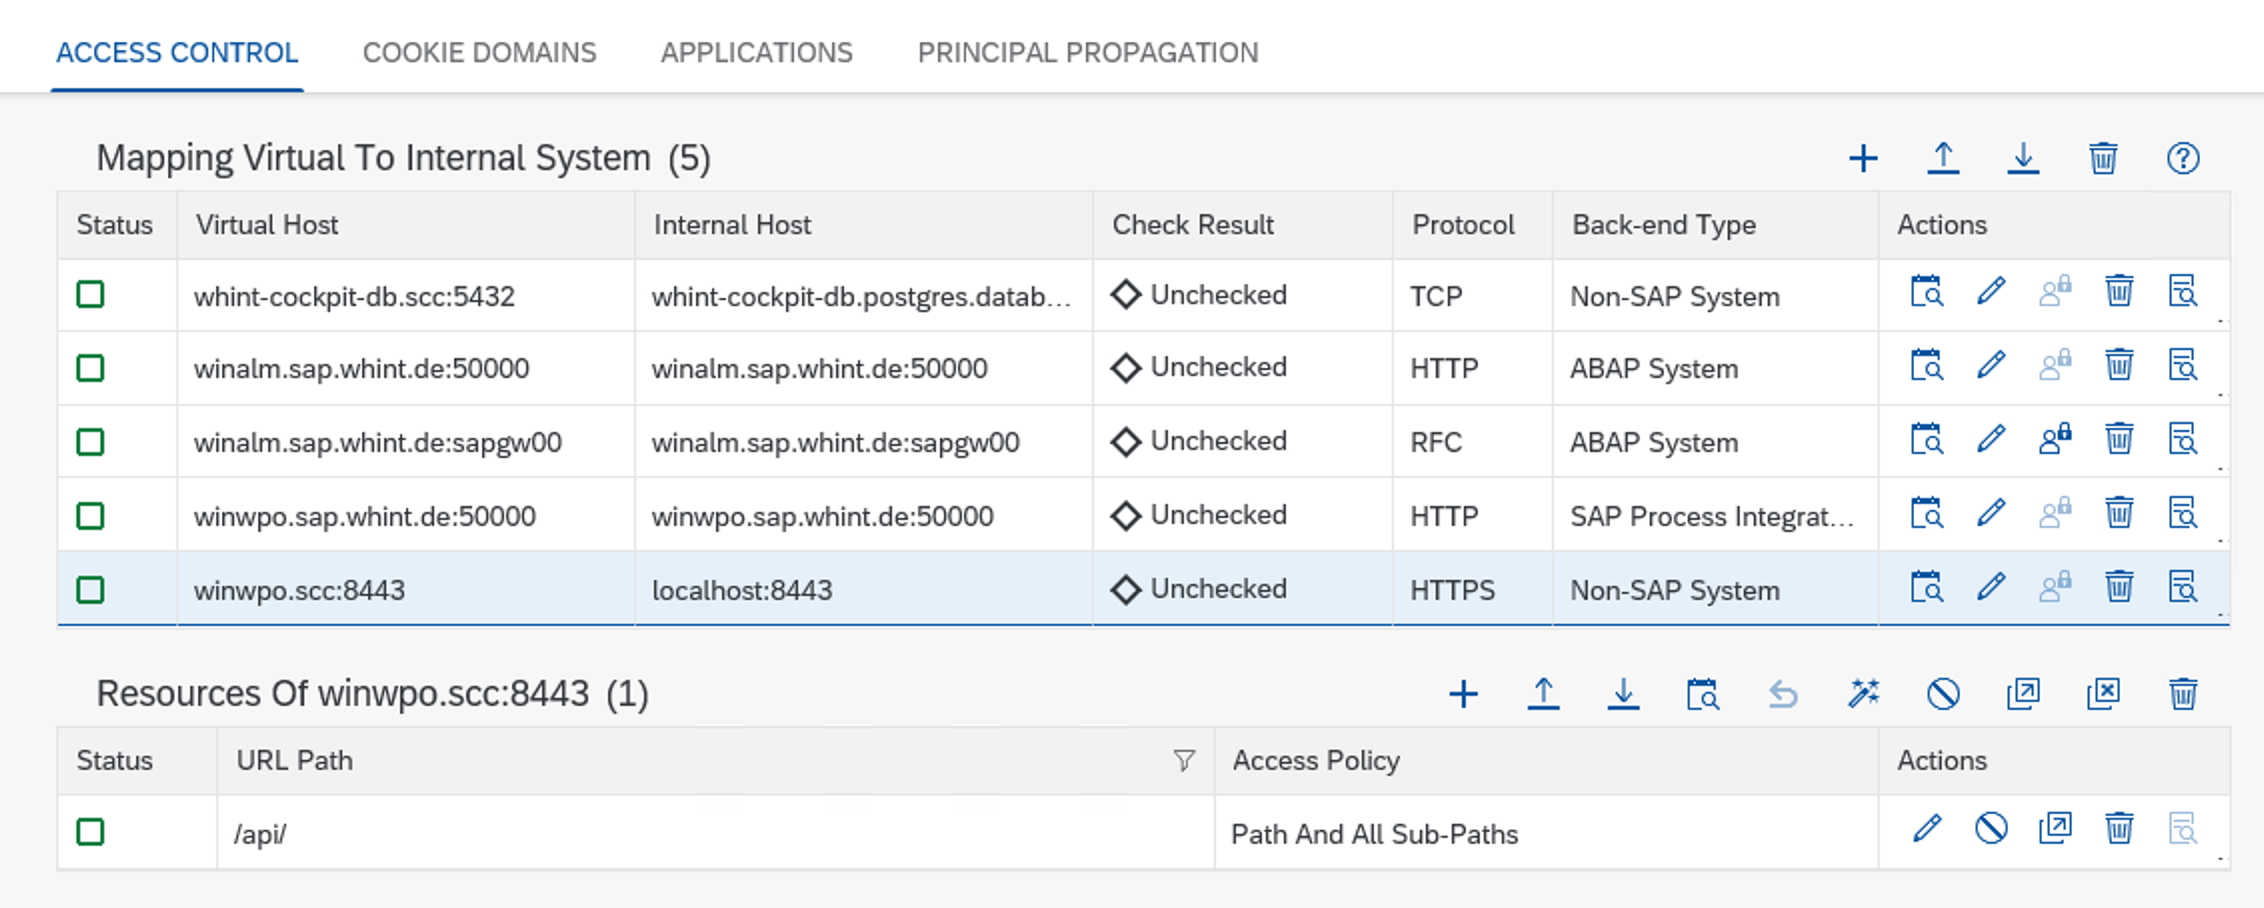
winwpo.scc:8443 mapped to localhost:8443
Step 2: Add Resource
Under Resources of <your-virtual-host>:<port>, click + and configure the allowed path.
Option A – Full API access
|
URL Path |
Access Policy |
|---|---|
|
|
Path And All Sub-Paths |
The access policy have to be set to “Path And All Sub-Paths”, to grant access for the connection from the WHINT Integration Cockpit.
Option B – Granular access (security best practice)
|
URL Path |
Access Policy |
Purpose |
|---|---|---|
|
|
Path And All Sub-Paths |
Runtime monitoring data |
|
|
Path And All Sub-Paths |
Configuration access |
Option B follows the principle of least privilege. Use it if your security policy requires granular path-level control over what BTP can access through the Cloud Connector.
SAP Cloud Integration (Neo Environment)
Assign the following role collections to your technical user (S-User):
-
IntegrationOperationServer.read -
AuthGroup.IntegrationDeveloper -
AuthGroup.Administrator
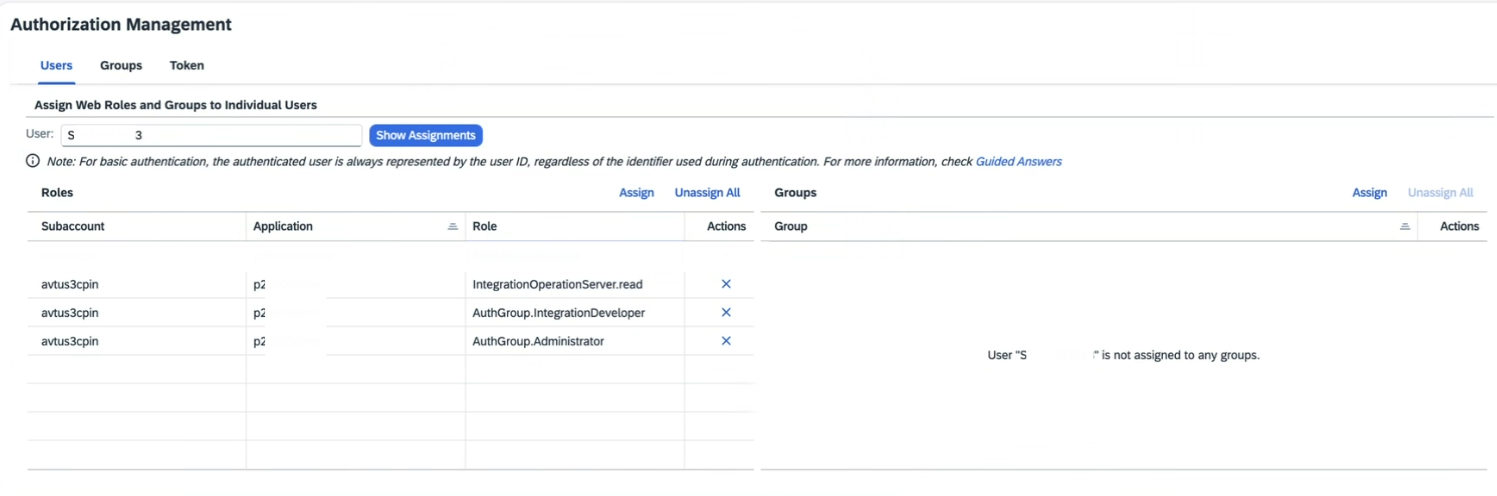
See the complete and up-to-date list of required roles:
Technical Users for WHINT® Interface Management Suite
Step 1: Create Data Sources & Schedule Tasks
→ This section follows after user roles and system access are ready.
This step guides you through setting up the systems that the Integration Cockpit will connect to, using either pull or push mechanisms.
You will first create Data Sources, then configure and schedule the relevant Tasks for each system.
For an overview of which Task Types are supported for each Data Source type, see:
Content & Task Combinations
To ensure a smooth setup, we strongly recommend reviewing the following general guides first:
-
Quick Guide: How to Create a Data Source
-
Schedule Tasks (Run & Monitor Tasks)
These guides explain how to create and validate Data Sources, run tasks and monitor execution - details not repeated in the platform-specific steps below.
Please read or skim them before continuing.
Quick Guide: How to Create a Data Source
This quick guide provides a general overview for setting up Data Sources when credentials (e.g. service keys or tokens) are already available.
In this example, it focuses primarily on SAP BTP services such as Cloud Integration, Event Mesh, and API Management.
For other platforms or if additional setup guidance is required, refer to the platform-specific instructions in the sections below.
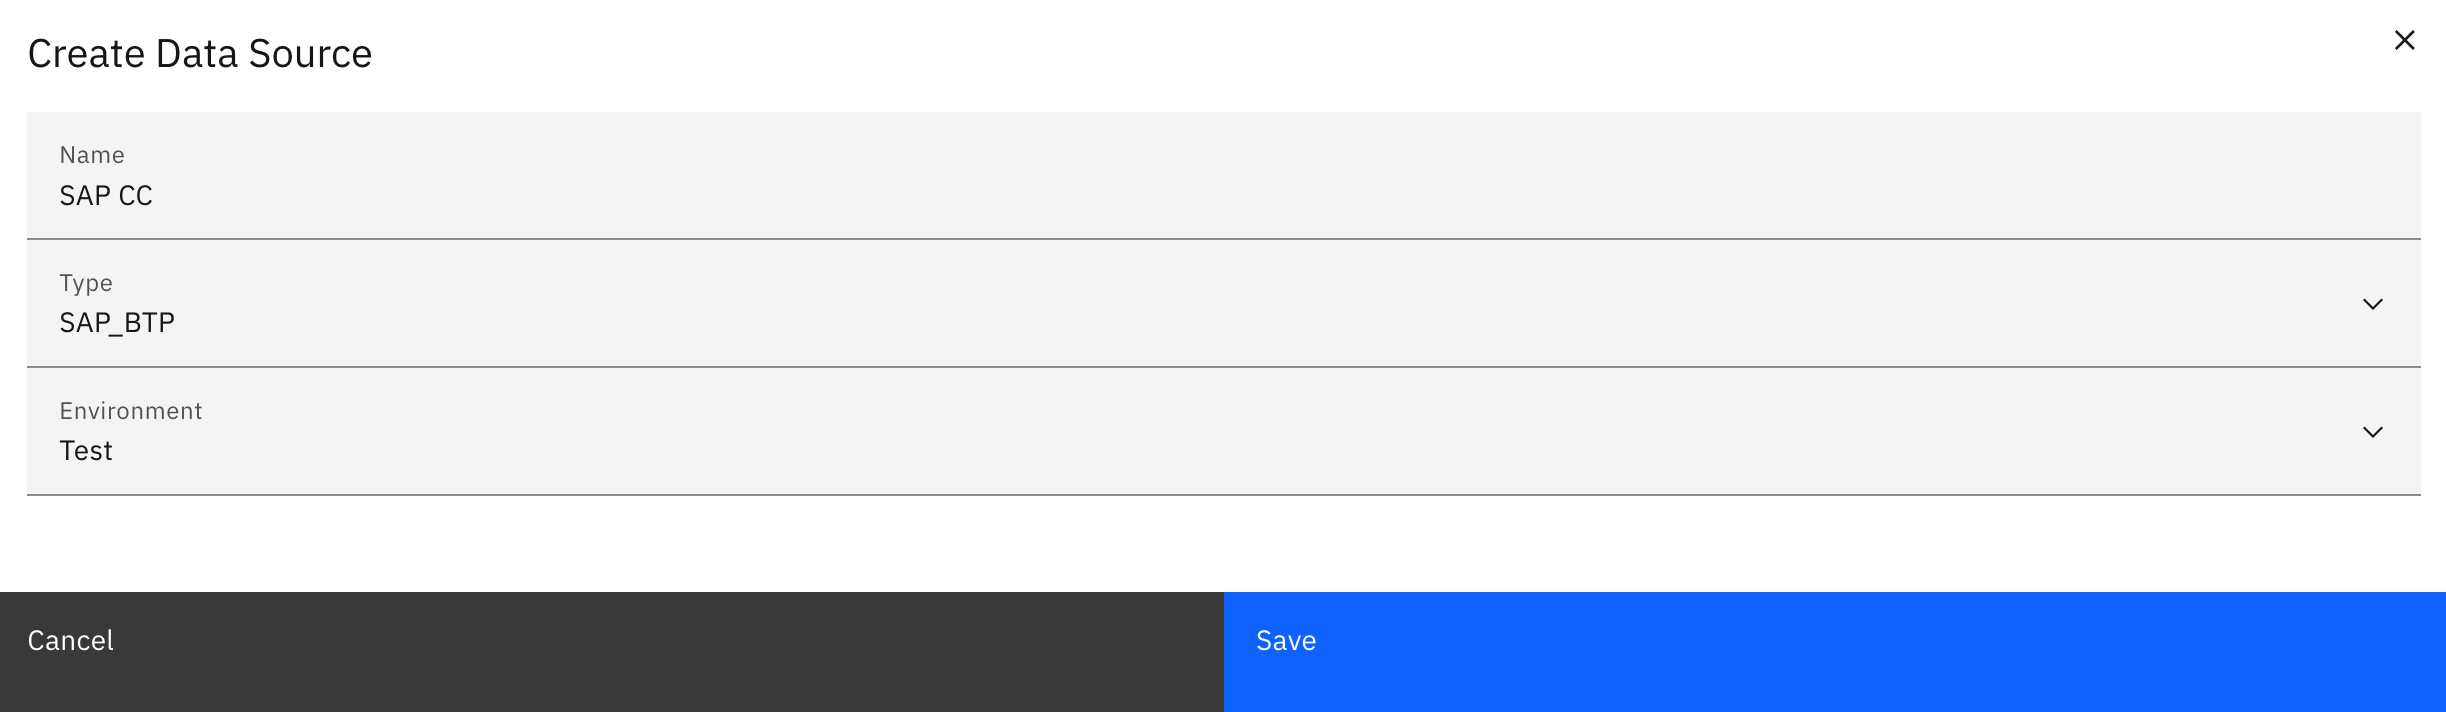
Step 1: Create Data Source
-
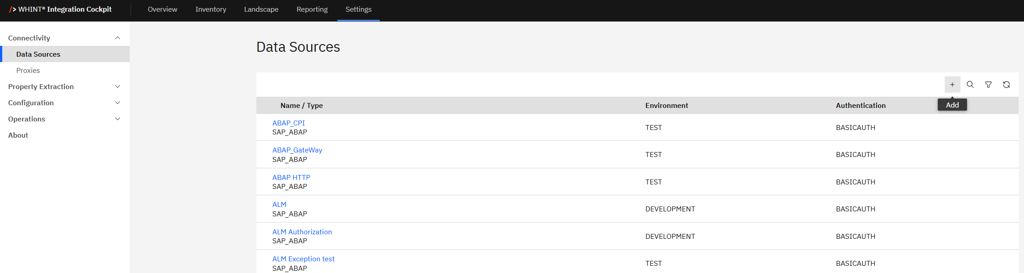
Navigate to Settings → Connectivity → Data Sources.
-
Click “+” Add.
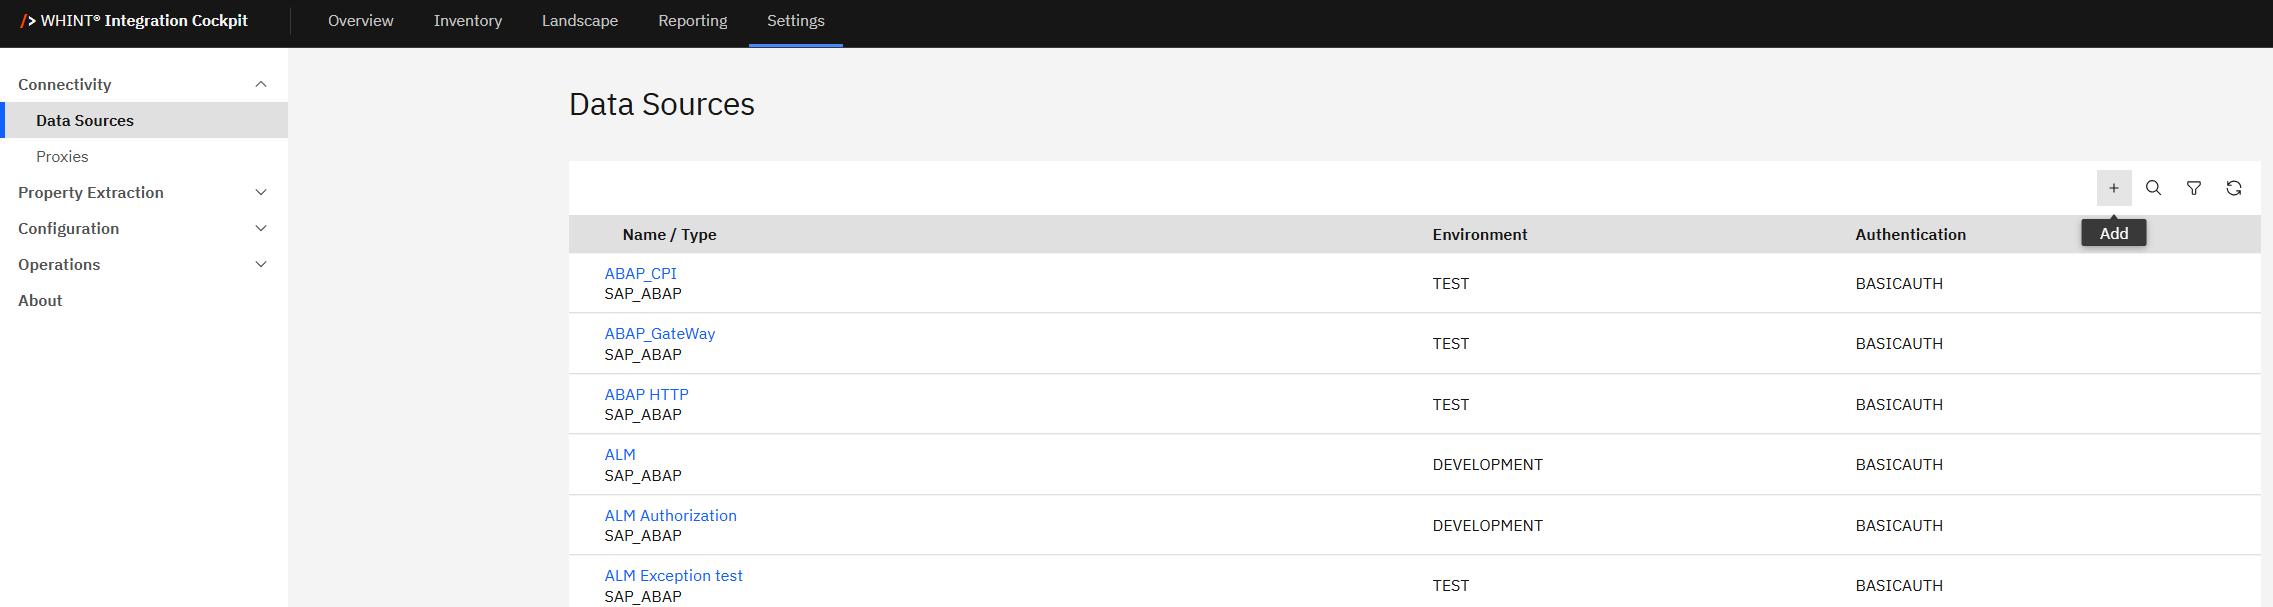
-
Enter the required values:
-
Name: Enter a clear identifier
(PLATFORM]_[REGION]→ e.g.CPI_EU) -
Type: Select the data source type:
-
e.g.
SAP_BTP(Cloud Integration),SAP_PO, etc.
-
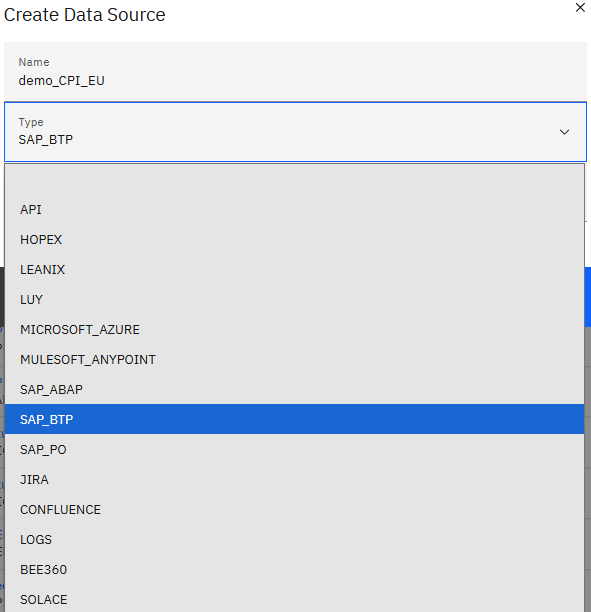
-
Environment: Choose the environment classification:
-
DEVELOPMENT,TEST,QUALITYorPRODUCTION
-
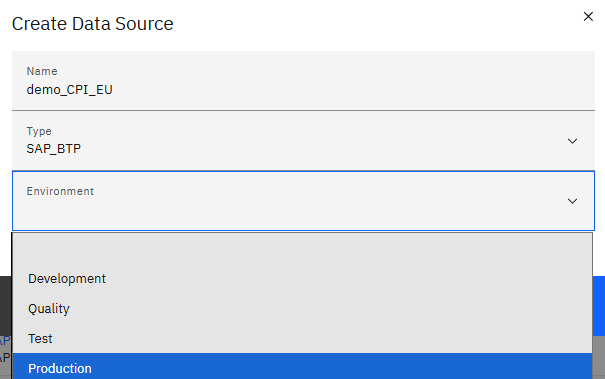
-
Click “Save”.
Step 2: Configure the Data Source
-
Configure the data source with your credentials:
-
Connection Details:
-
Features: Select one or more:
Complexity,Adapter,Authentication,Last Traffic, etc. -
Product: Select one or more:
API MANAGEMENT,CLOUDINTEGRATION,EVENTMESH,INTEGRATIONASSESSMENT
-
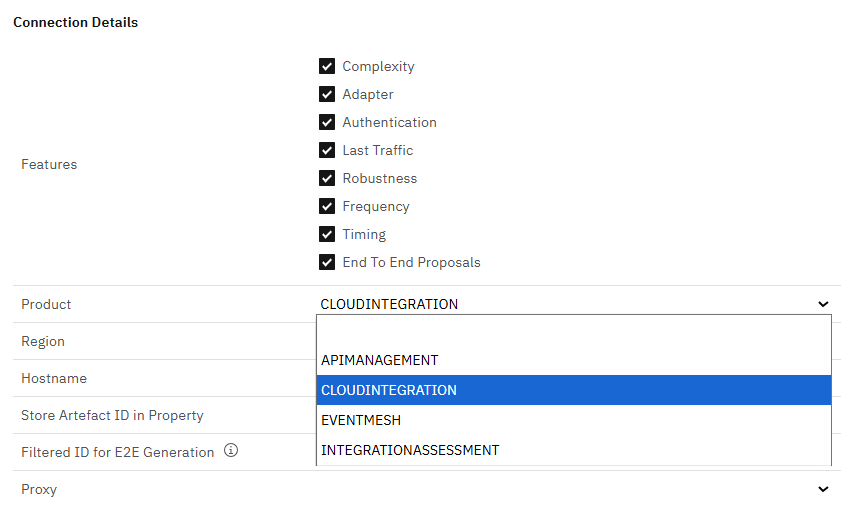
-
Region: Example:
EU10 -
Hostname: without
http(s)://
Example:wxxxx.it-cpixxx.cfapps.euxx-xxx.hana.ondemand.com
Authentication
-
Type: Choose from:
ACCESSTOKEN,APIKEY,BASICAUTH,OAUTH2and enter your credentials
-
Click “Save” to complete data source creation.
This example is specific to SAP BTP.
Fields like Region, Token URL or Product may not apply to other systems such as Jira, ABAP or Azure.
Always follow the system-specific instructions provided below.
Schedule Tasks (Run & Monitor Tasks)
Step 1: Add Scheduled Tasks
To schedule jobs for a Data Source:
-
Open the Data Source.
-
Click “+” Add Task.

-
Choose the Task Type and set the recurrence:
|
Task |
Purpose |
Recommended Job Recurrence |
|---|---|---|
|
Configuration |
Reads raw data from the Source via API. |
Daily |
|
Inventory |
Converts raw data to structured interface records; Reporting KPIs are calculated and End-To-End proposals are generated in this task |
Daily |
|
Runtime |
Reads data from API (message traffic) |
Hourly |
|
Update |
Sends data to external tools (e.g. EAM, Documentation) |
Daily |
Important
Ensure a delay of at least 2–3 hours between CONFIGURATION and INVENTORY to prevent process overlap. Note that the CONFIGURATION task may require additional runtime.
-
Click “Save” to confirm.
Quick Task Setup Overview
-
SAP_BTP, ABAP, Azure → Use Configuration + Inventory + Runtime
-
Jira → Use Configuration only
-
Confluence → Use Update only
Step 2: Run Tasks Manually
You can manually execute any task to validate access, credentials and data structure before scheduling regular runs.
-
Select the checkbox next to the task you want to run.
-
Click “Start Task” to trigger immediate execution.
-
Use the “Logs” section to monitor execution details or troubleshoot errors.

-
Use the “Job Monitor” section to verify successful completion of each Task.
Sequential Task Execution with Completion Check
Execute each task one after the other in the specified order.
After each task, use the Job Monitor to confirm it has successfully finished before continuing.
Example Order:
-
SAP_BTP -
Configuration→ Check Job Monitor -
Inventory→ Check again -
Runtime
For further clarification on, see Step 3: Job Monitor below.
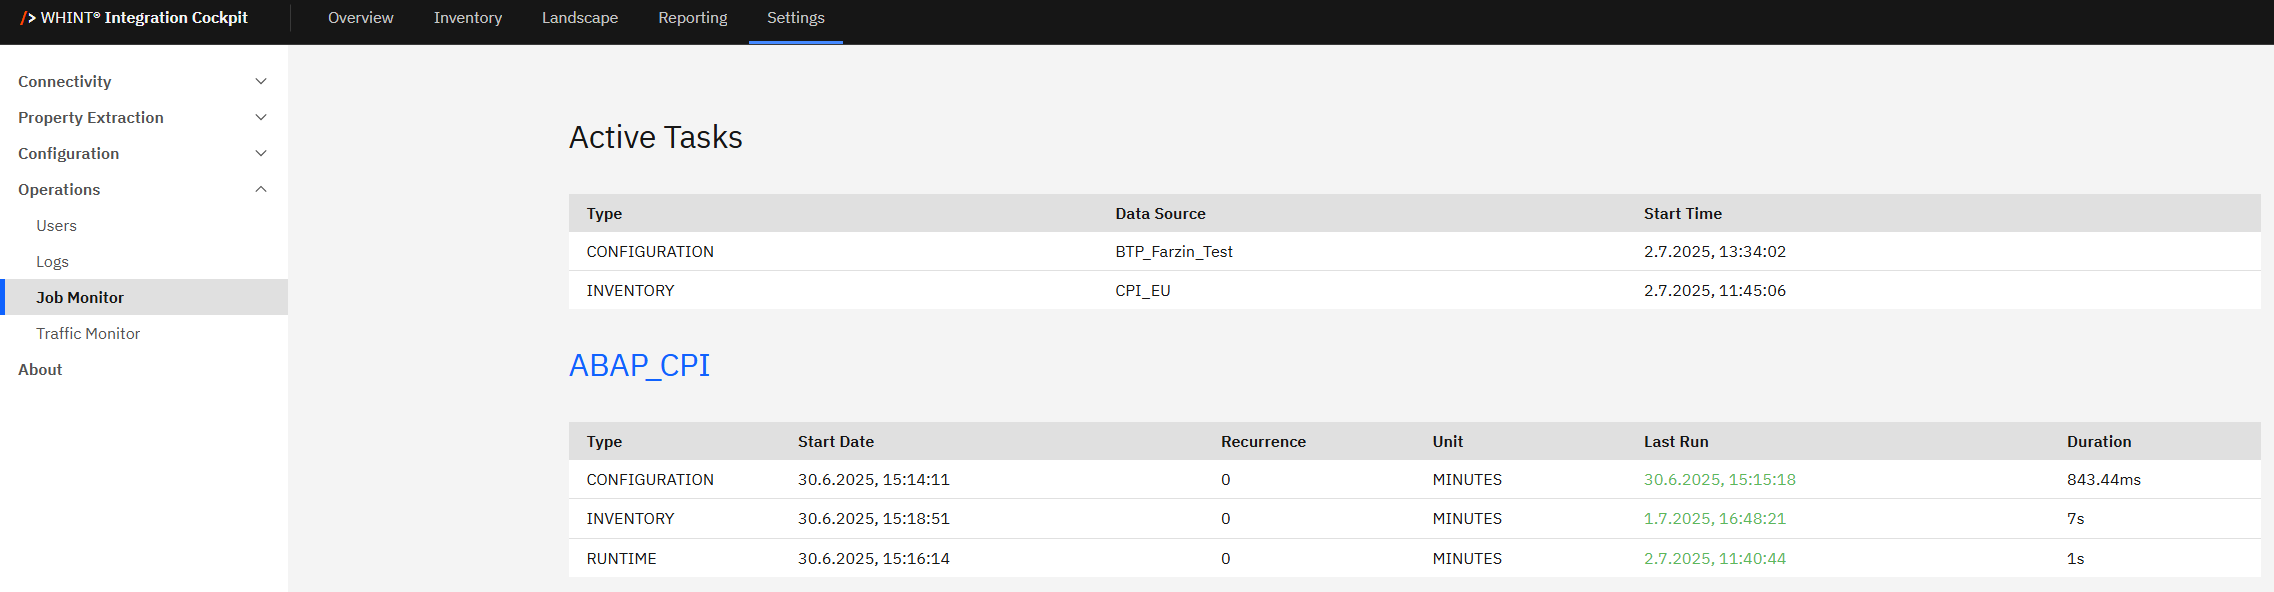
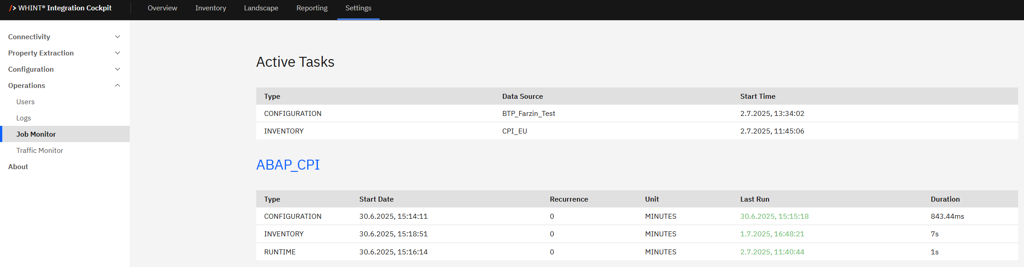
Step 3: Job Monitor
Check “Job Monitor” for execution results:
-
Green – Success (see “Last Run”)
-
Red – Failure (check “Logs”)
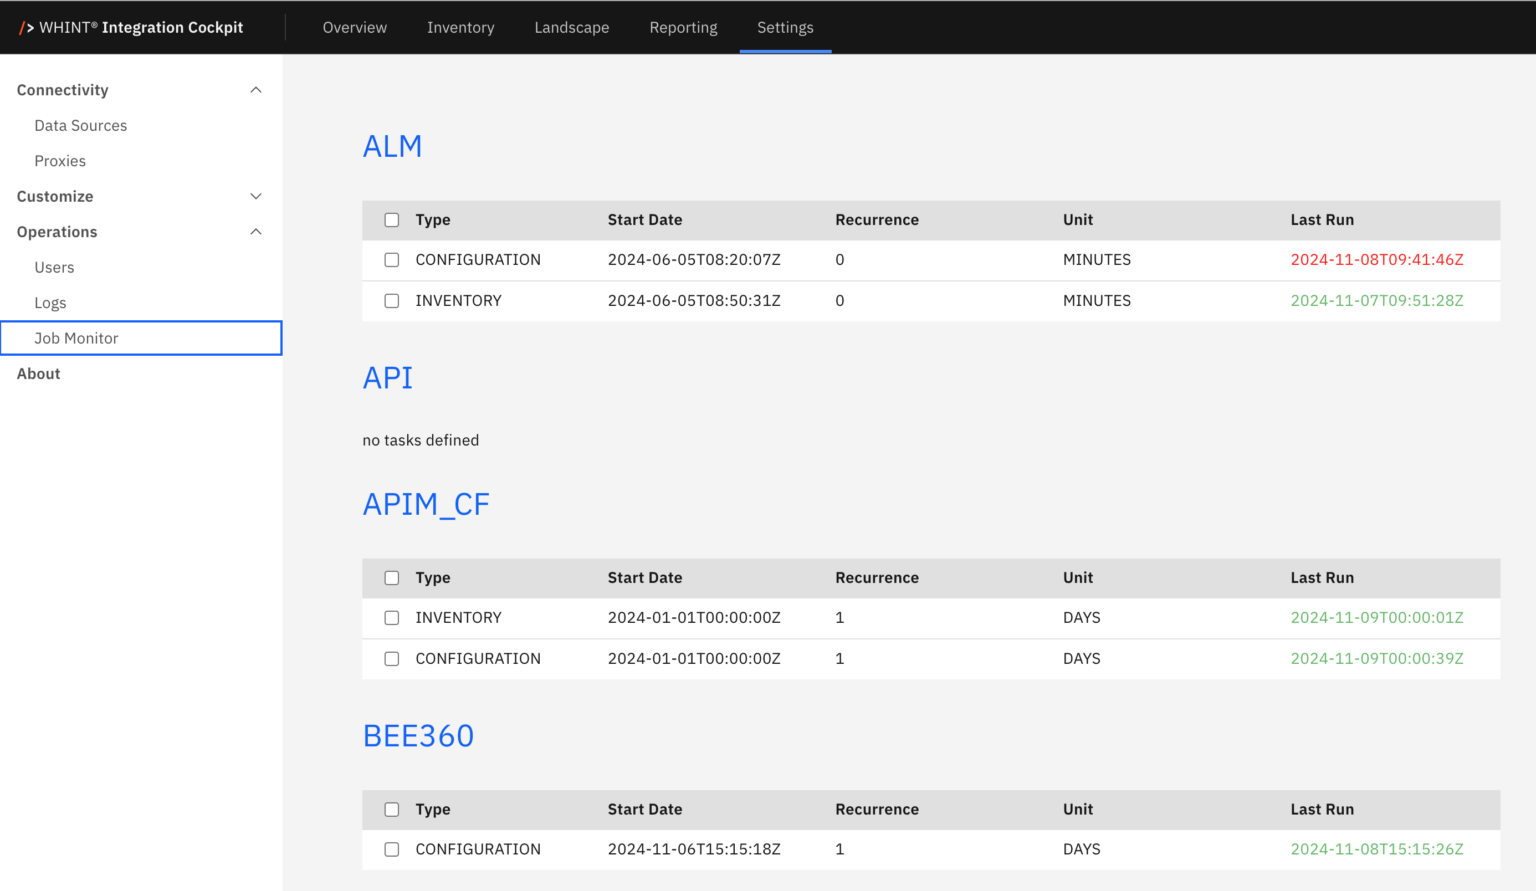
If you have running tasks you see them under “Active Tasks”:
1.1 Integration Layer
Configure each platform your organization uses. Skip the platforms that are not relevant to your landscape.
1.1.1 SAP Integration Suite
1.1.1.1 API Management
Service Key Retrieval
Before retrieving your service key, ensure that API Management, API Portal is available as an entitlement in your SAP BTP Subaccount.
If not, follow the steps below before continuing.
Step 1: Check Service Entitlements
-
Open your SAP BTP Subaccount.
-
Navigate to Entitlements.
-
Ensure the following service is added:
-
Service:
API Management, API Portal -
Plan:
apiportal-apiaccess
-
→ If missing, click “Add Service Plan” and assign it before proceeding.
Step 2: Check the Service Marketplace
-
In your BTP Subaccount, go to Service Marketplace.
-
Search for:
-
Service:
API Management, API Portal -
Plan:
apiportal-apiaccess
-
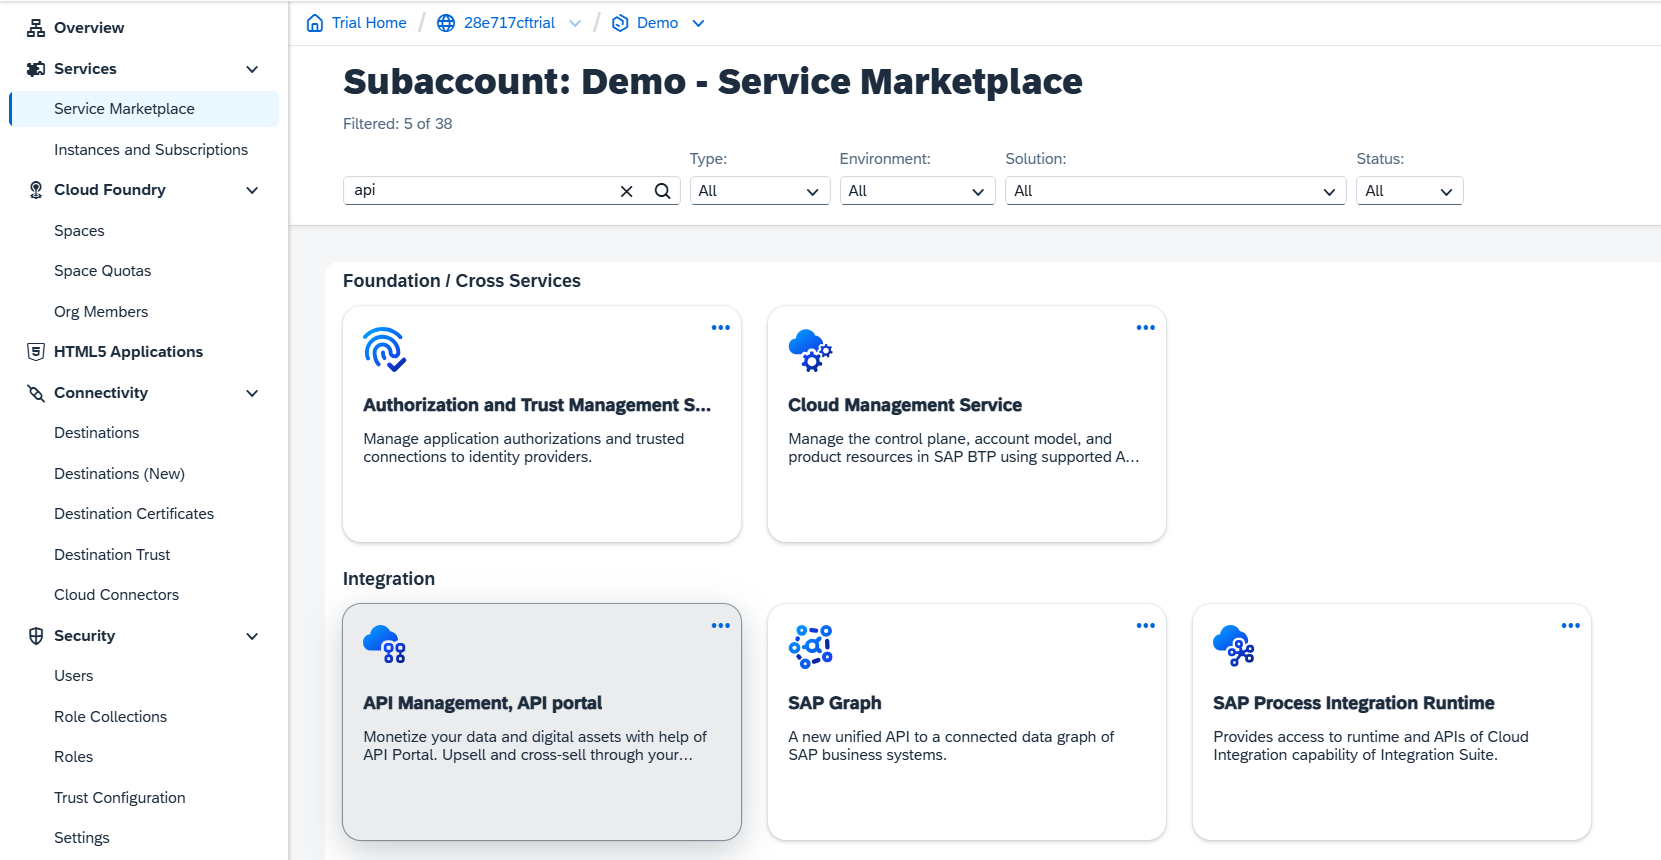
→ If already available, proceed to Step 3.
→ If not, ensure the entitlement (Step 1) was added.
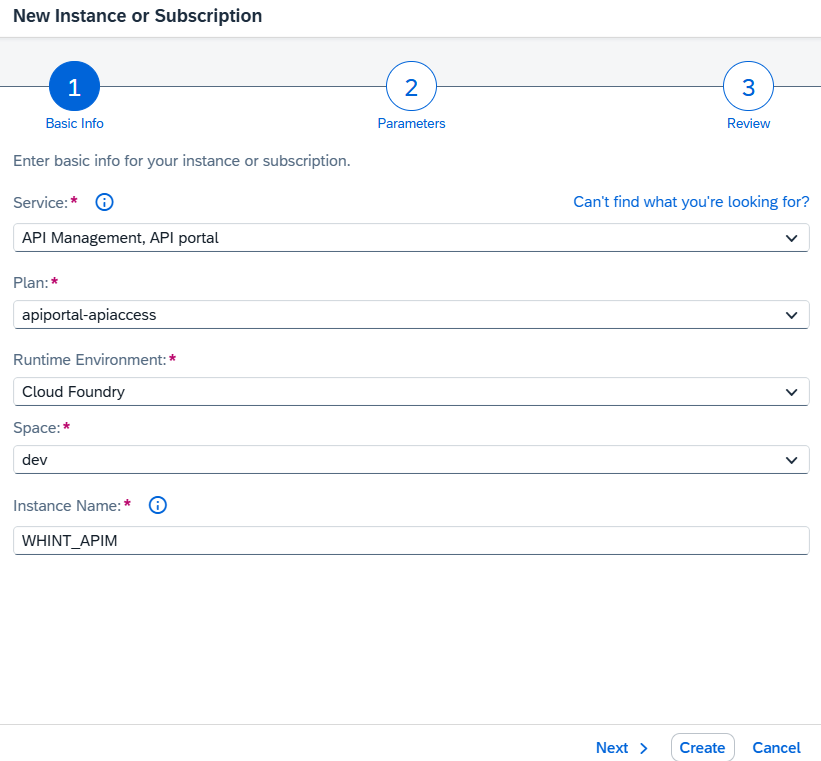
Step 3: Create a New Service Instance
-
Select API Management, API Portal in the Service Marketplace.
-
Click “Create” (instance).
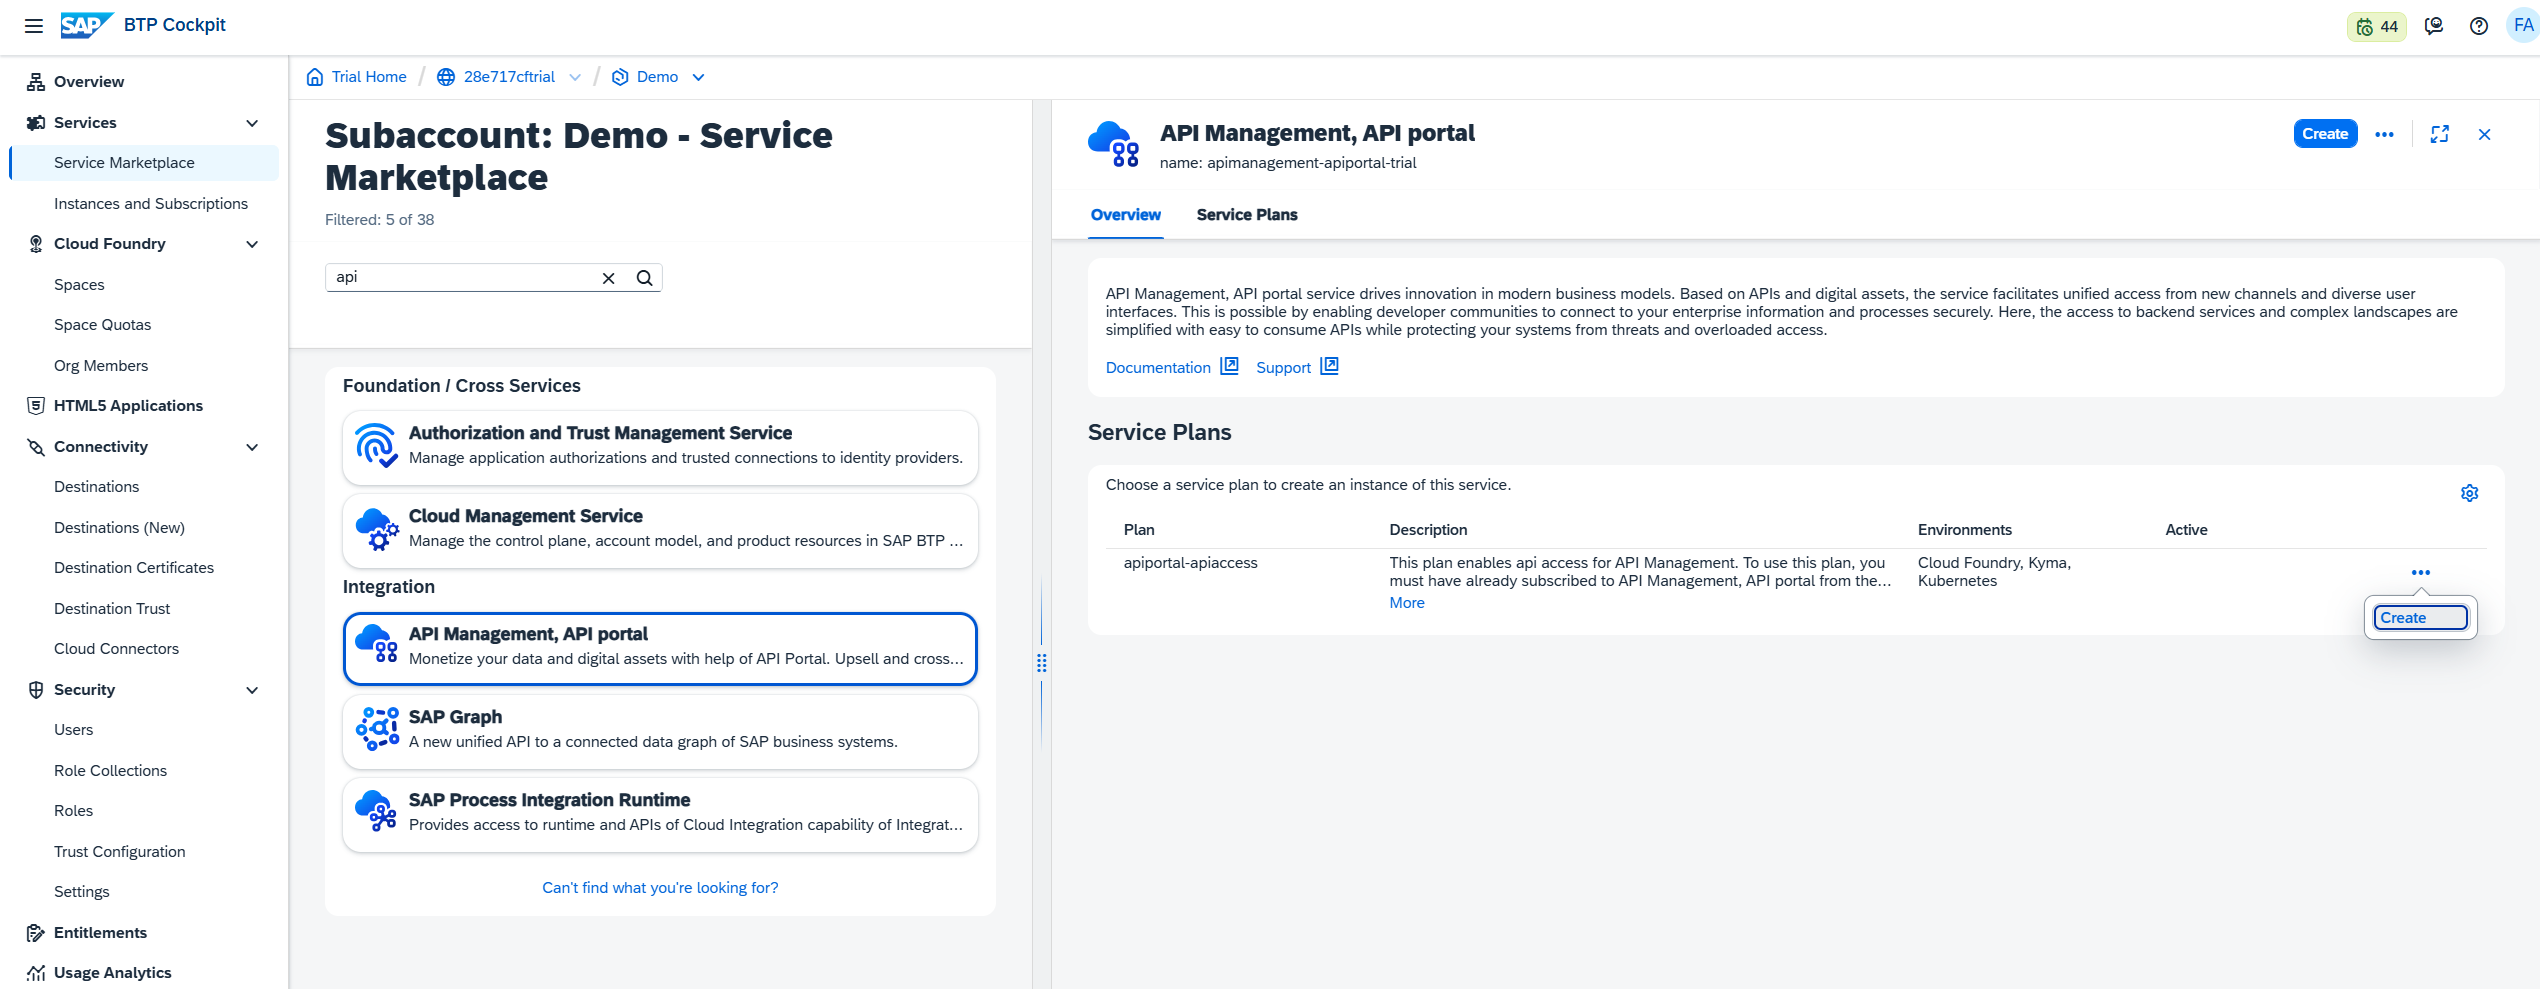
-
Configure the instance:
-
Plan:
apiportal-apiaccess -
Space: e.g.
dev -
Instance Name: e.g.
WHINT_APIM
-
-
Confirm with “Create”
Step 4: Create and Retrieve the Service Key
-
Select your newly created API Management instance.
-
Click “Create Service Key”.
-
Enter a name, e.g.
WHINT_APIM_KEYand confirm. -
Click “View” to display the credentials.
Extract the following OAuth2 values for later use:
-
clientid -
clientsecret -
url -
tokenurl
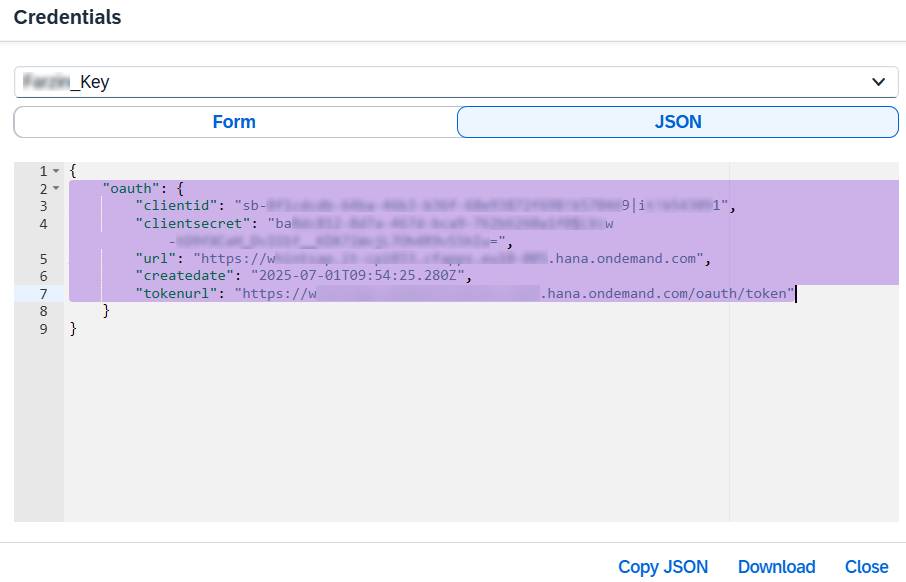
→ Continue to Data Source setup below.
Data Source Setup
Step 1: Create Data Source
-
Navigate to Settings → Connectivity → Data Sources.
-
Click “+” Add.

-
Enter the required values:
-
Name: e.g.
WHINT API Management -
Type:
SAP_BTP -
Category: e.g.
DEVELOPMENT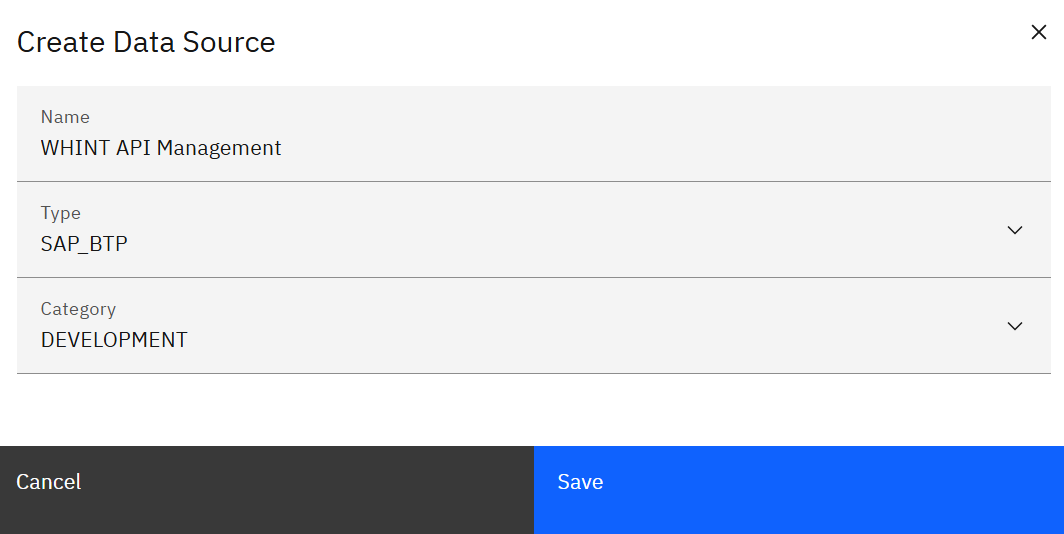
-
-
Click “Save”.
Step 2: Configure the Data Source
-
Configure the data source with the credentials obtained earlier:
Connection Details
-
Features: Check all applicable (e.g. Complexity, Adapter, Authentication, Timing, etc.)
-
Product: Select
APIMANAGEMENT -
Region: e.g.
EU10 -
Proxy: not required
Authentication
-
Type: Select
OAUTH2and enter the credentials from the Service Key-
Client ID: Enter from the Service Key →
clientid -
Client Secret: Enter from the Service Key →
clientsecret -
Token URL: Enter from the Service Key →
tokenurl -
Scope: not required
-
-
In the Tasks section, click the “+” icon (top right of the table) to add the following tasks:
-
Configuration
-
Inventory
-
Runtime
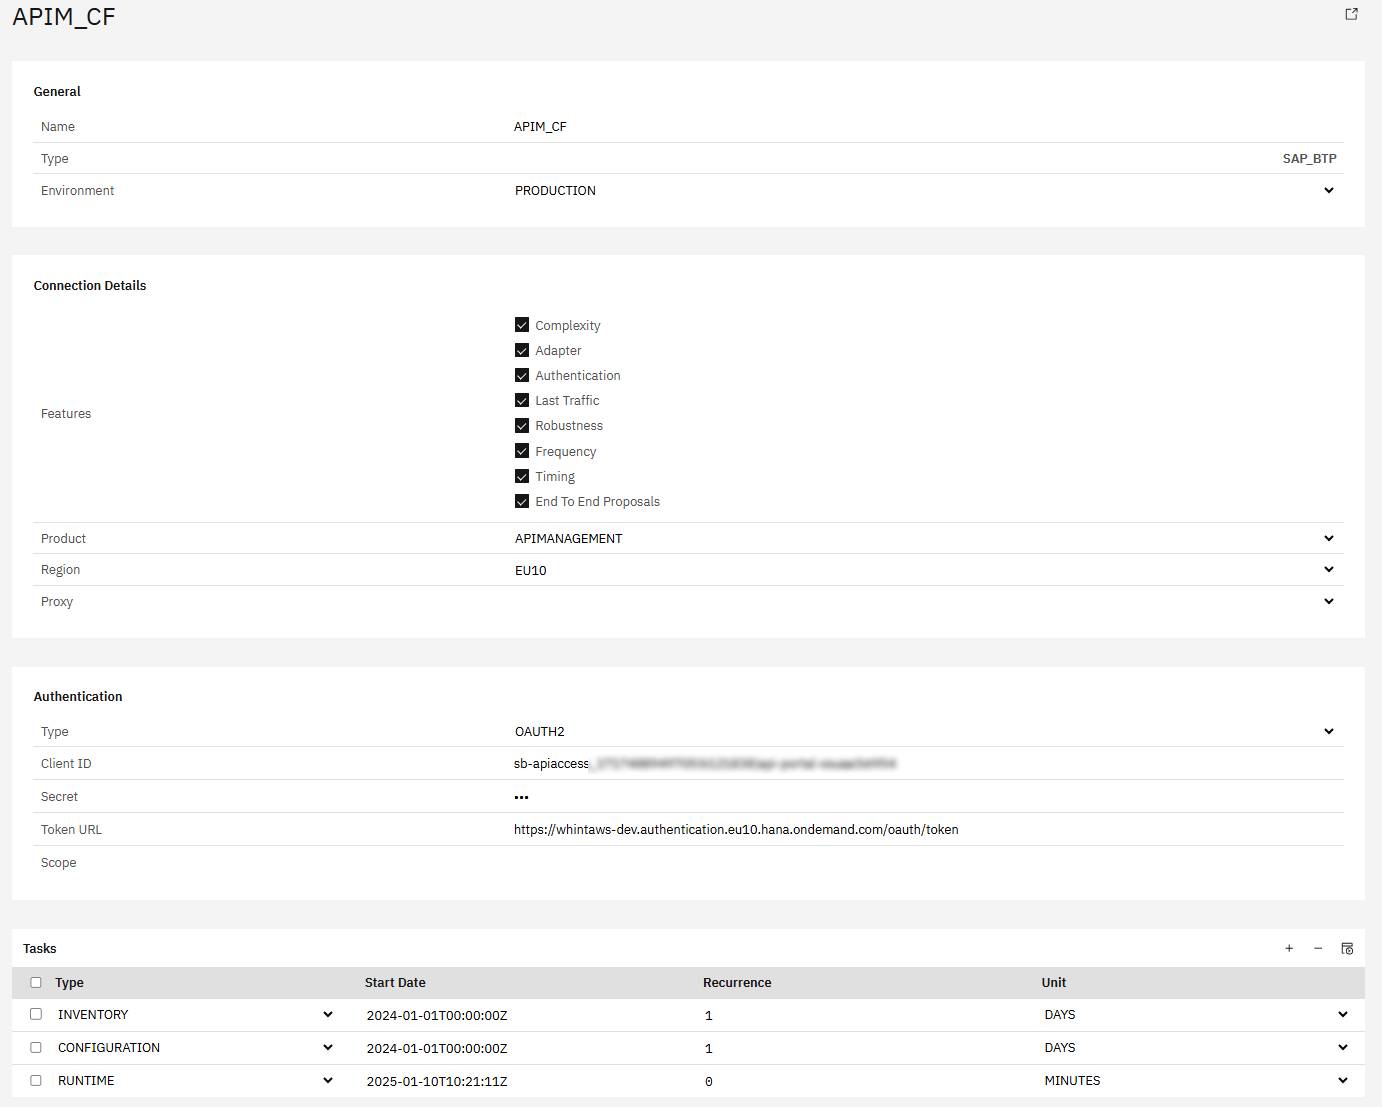
-
-
Click “Save” to complete data source creation.
Step 3: Task Configuration
-
Start the task “CONFIGURATION” by selecting the checkbox next to it and clicking the “Start Task” icon.

Execute the following tasks in the specified order:
-
CONFIGURATION - Reads all raw data into the database
-
RUNTIME - Reads traffic information from the tenant
-
INVENTORY - Pushes the raw data into the inventory
Run tasks one at a time and monitor each task completion in the Job Monitor before proceeding to the next step.
-
Check your “Job Monitor” if the task is done or is still running under “Active Tasks”.

Recommended Task Schedule
|
Task |
Recommended Job Recurrence |
|---|---|
|
CONFIGURATION |
Every 1 day |
|
INVENTORY |
Every 1 day |
|
RUNTIME |
Every 2–5 hours |
Important
Ensure a delay of at least 2–3 hours between CONFIGURATION and INVENTORY to prevent overlapping. CONFIGURATION may take longer to complete.
Result
Your data source is now configured and ready for use.
Monitor task execution regularly through the Job Monitor.
1.1.1.2 Cloud Integration
Instance Creation And Service Key Retrieval (Cloud Foundry)
Before retrieving your Service Key, ensure that a SAP Process Integration Runtime service instance with the api plan exists in your SAP BTP Subaccount.
If not, follow the steps below before continuing with Step 4: Create and Retrieve the OAuth2 Service Key.
Step 1: Check the Service Marketplace
-
Open your SAP BTP Subaccount.
-
Navigate to Service Marketplace.
-
Search for:
Service: SAP Process Integration Runtime
Plan:api
→ If the service instance already exists, proceed to Step 3.
→ If not, continue with Step 2 to create it.
Step 2: Create a New Service Instance
-
In Service Marketplace, select SAP Process Integration Runtime.
-
Click “Create” (to create an instance).
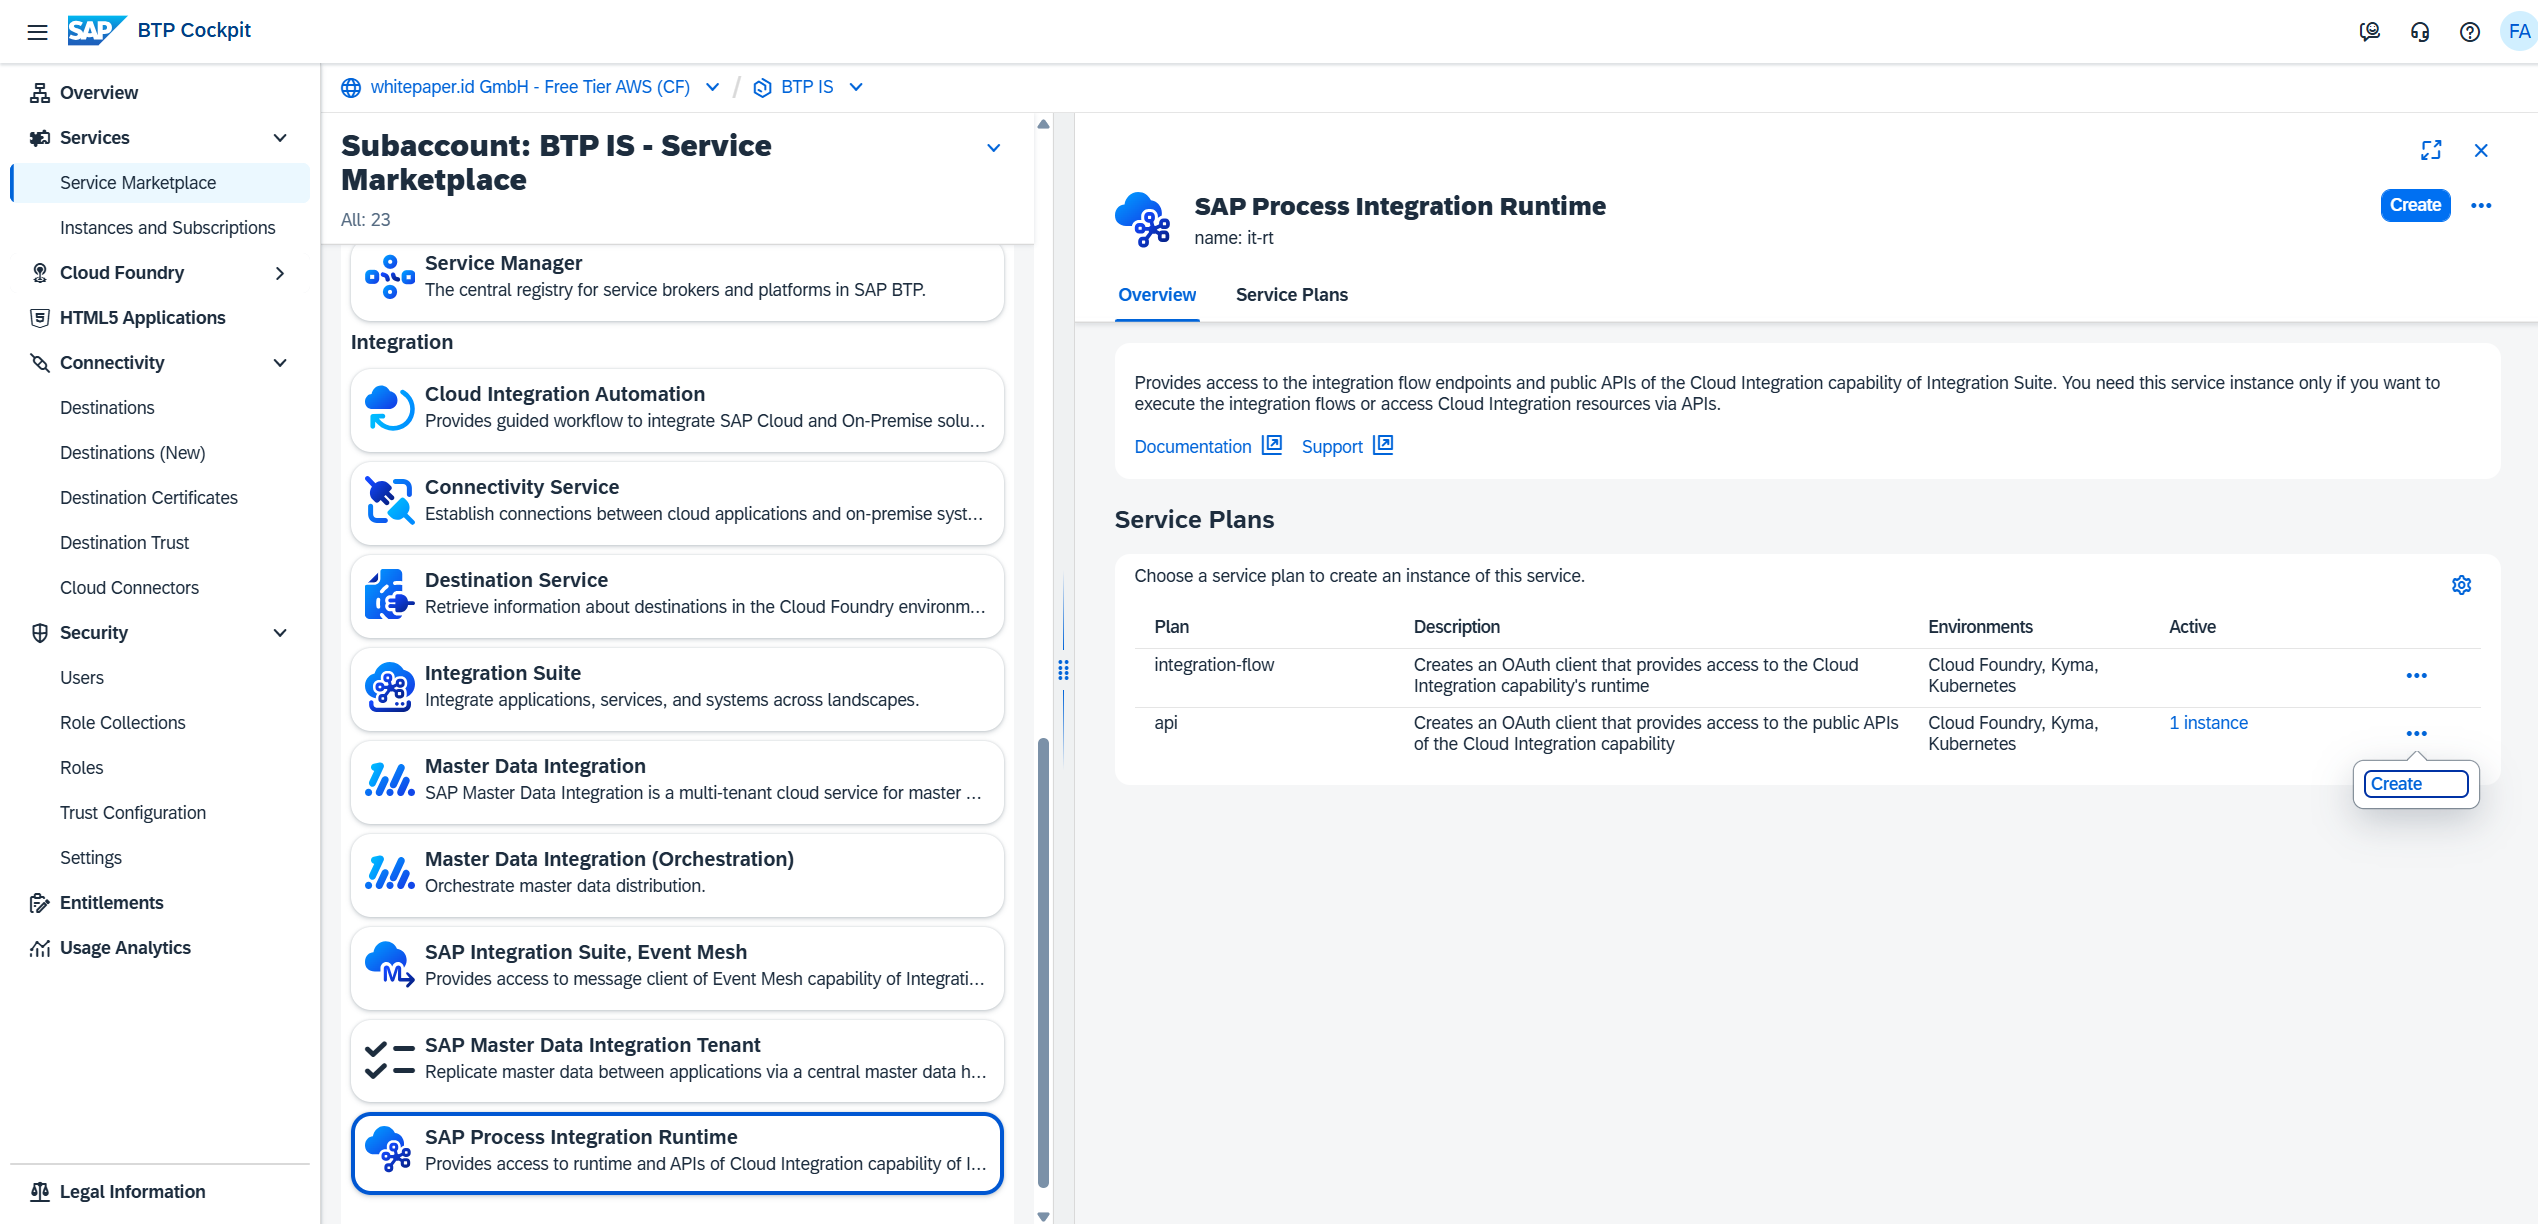
-
Configure as follows:
-
Plan:
api -
Space: e.g.
dev -
Instance Name: e.g.
WHINT_CLOUD_INT
-
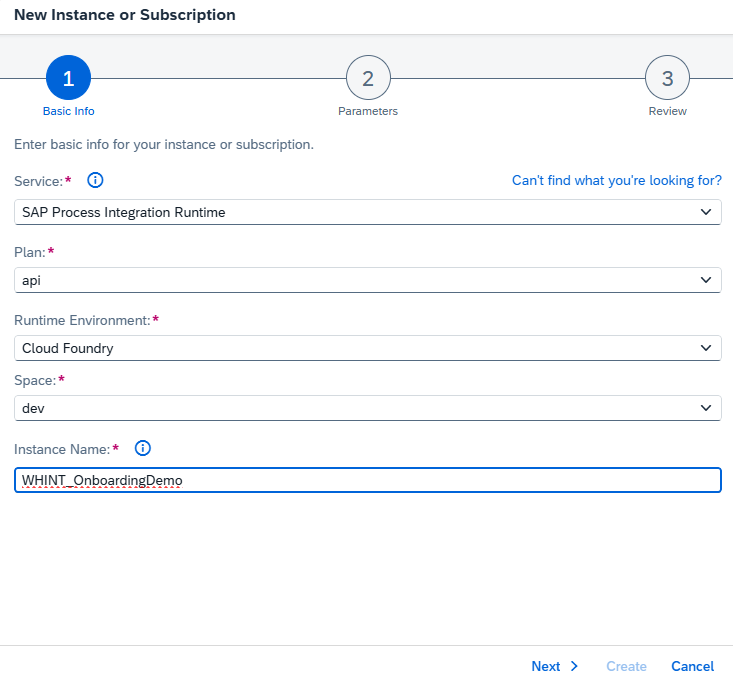
Step 3: Assign Roles
-
In the Roles section, select the following authorizations:
-
AuthGroup_Administrator -
AuthGroup_IntegrationDeveloper -
AuthGroup_BusinessExpert
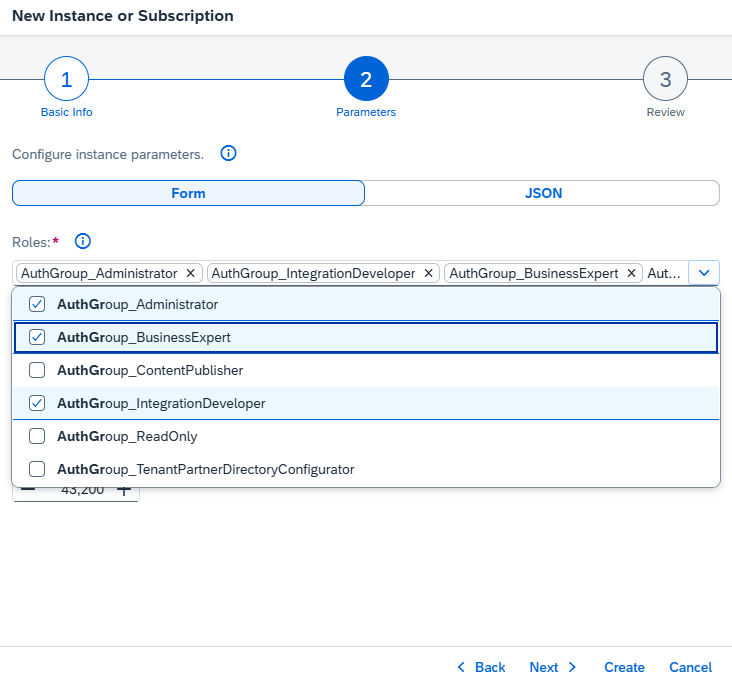
-
Click “Create” to finalize the instance.
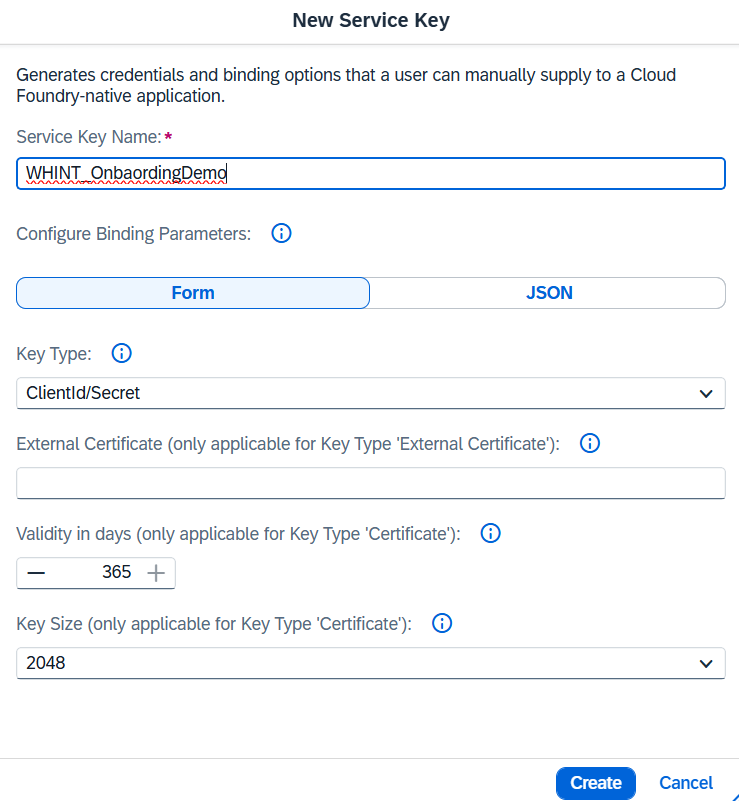
4. Create And Retrieve Service Key
-
In your created service instance, select “Create Service Key”.
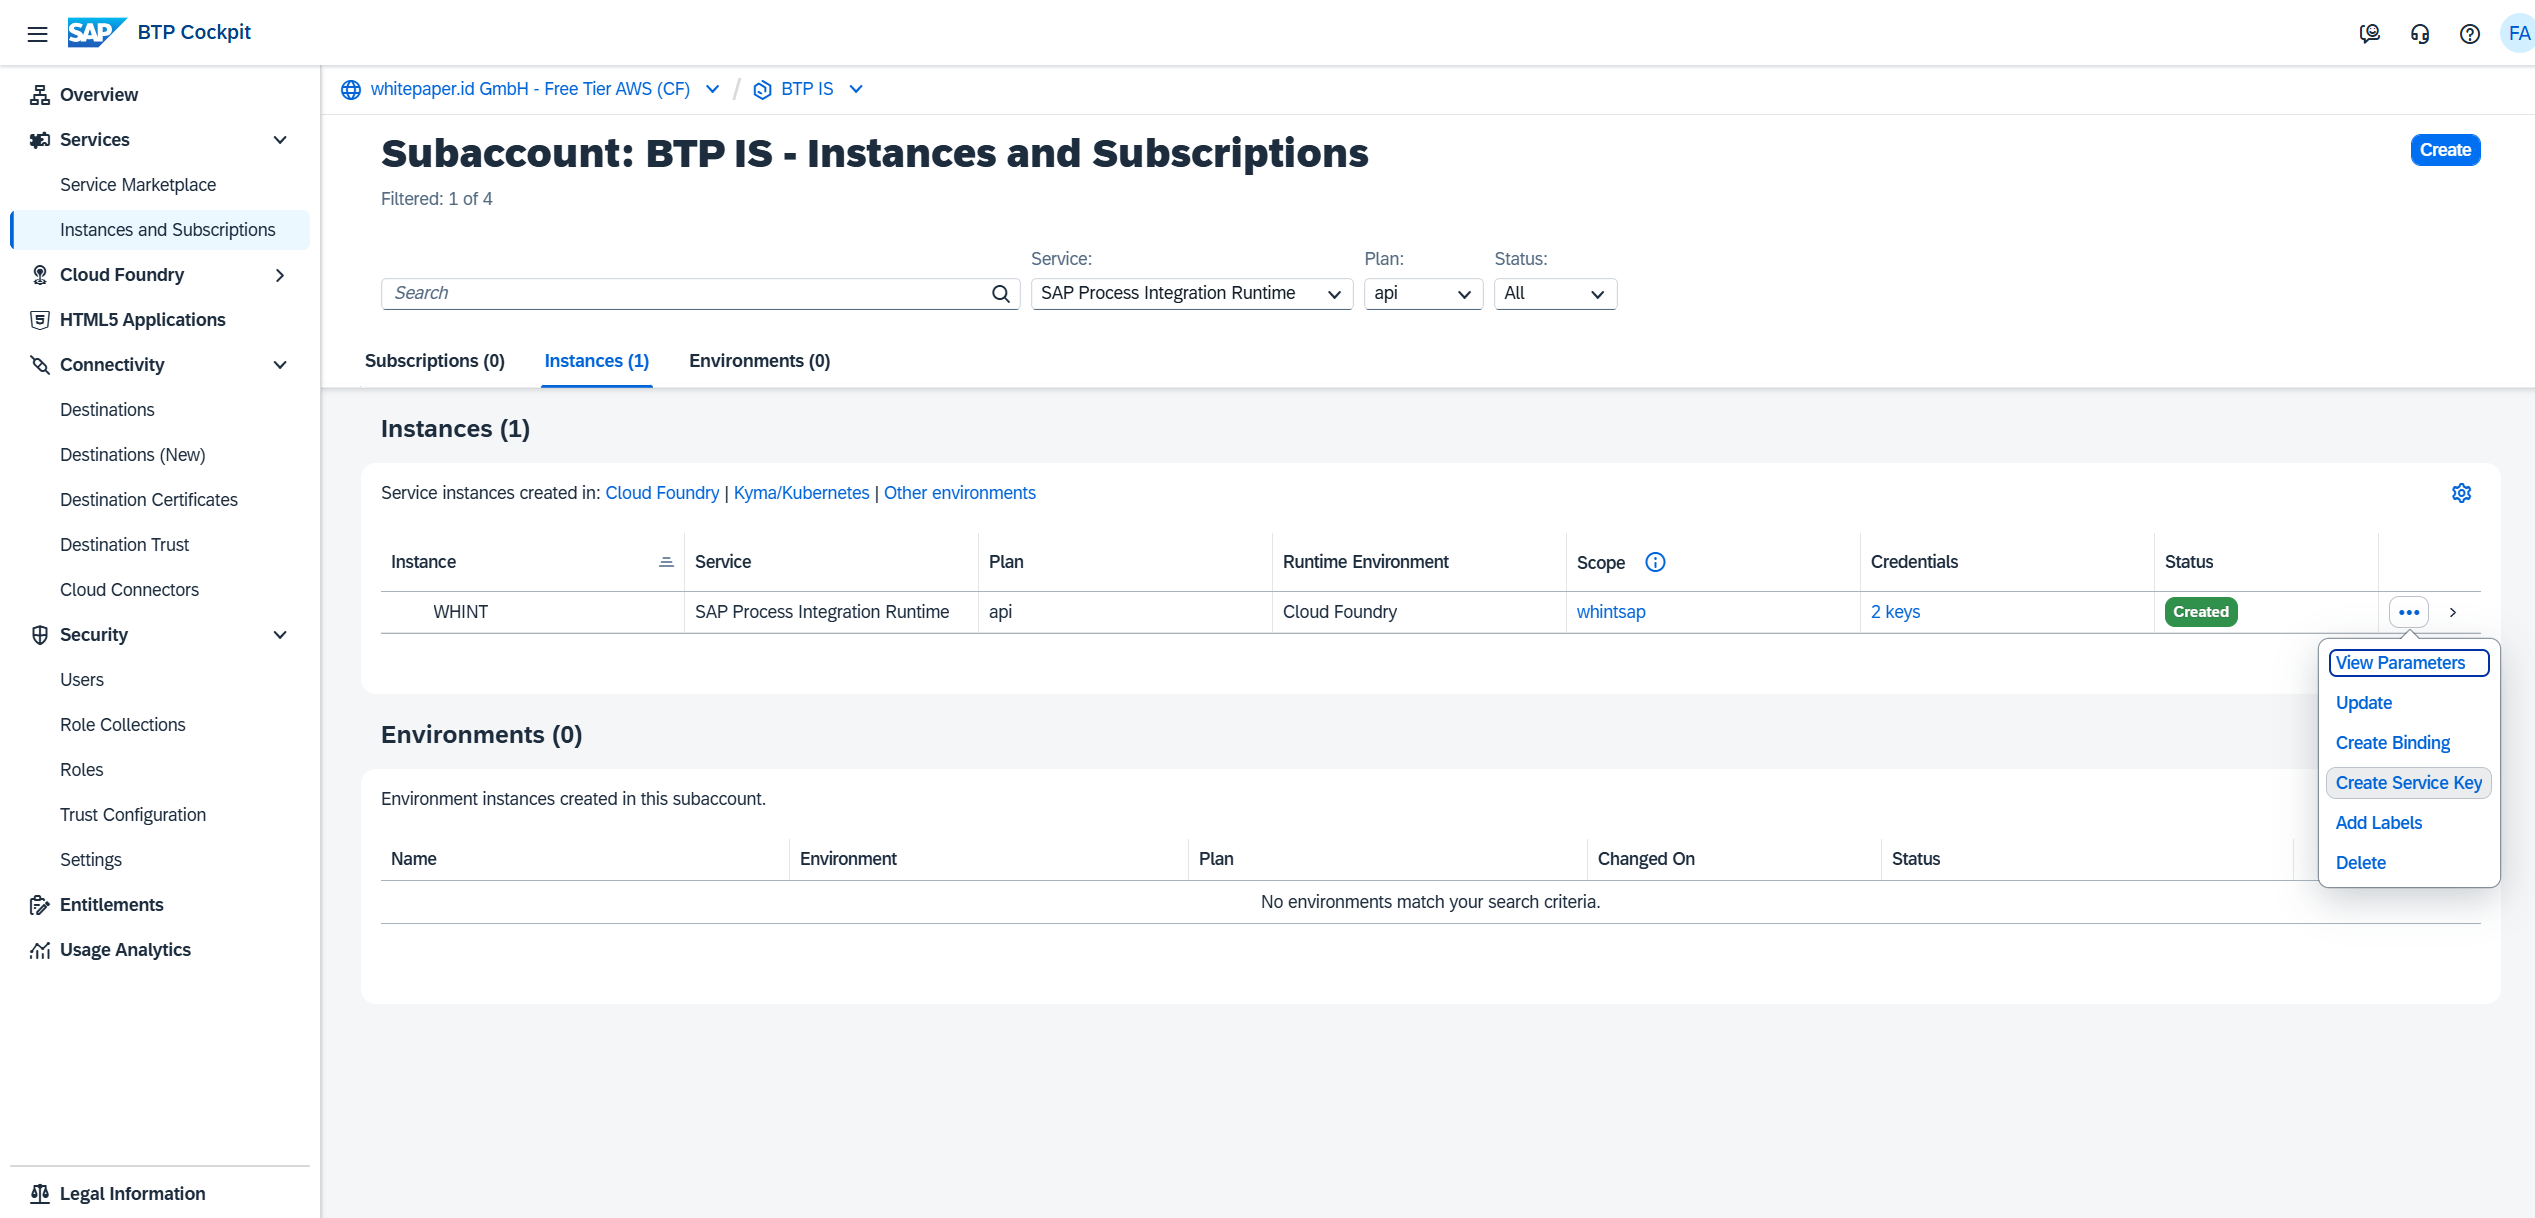
-
Enter a name (e.g.
WHINT_CLOUD_KEY) and confirm.
-
After creation, click “View” to display the credentials.
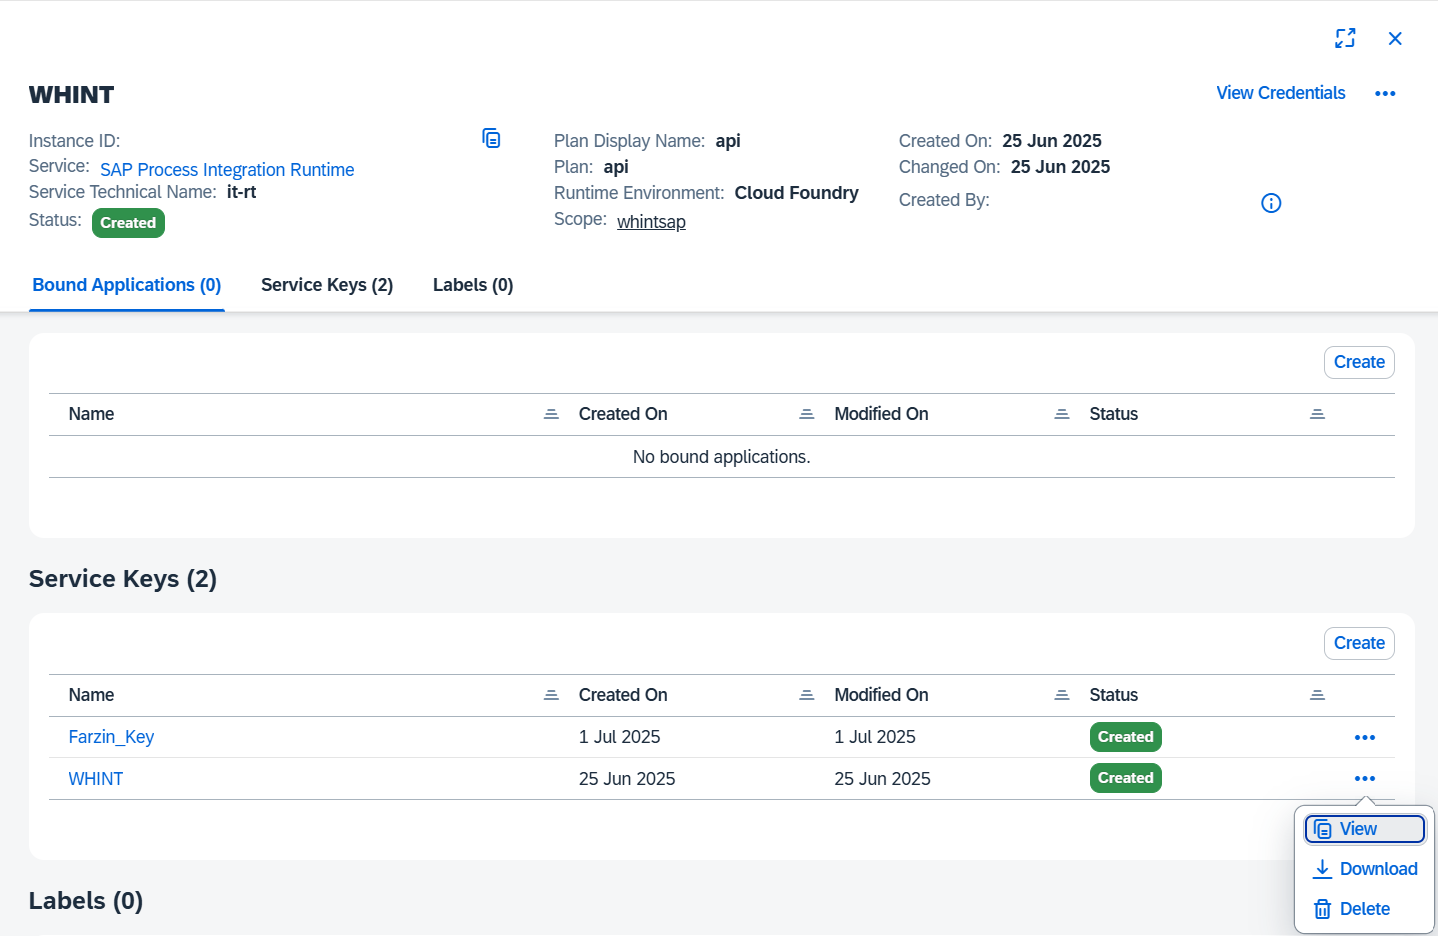
-
Extract the following OAuth2 values for later use:
-
clientid -
clientsecret -
url -
tokenurl
→ Continue to Data Source setup below.
Data Source Setup (Clound Foundry)
Step 1: Create Data Source
-
Navigate to Settings → Connectivity → Data Sources.
-
Click “+” Add.

-
Enter the required values:
-
Name: e.g.
CPI_CF -
Type:
SAP_BTP -
Environment: e.g.
Production
-
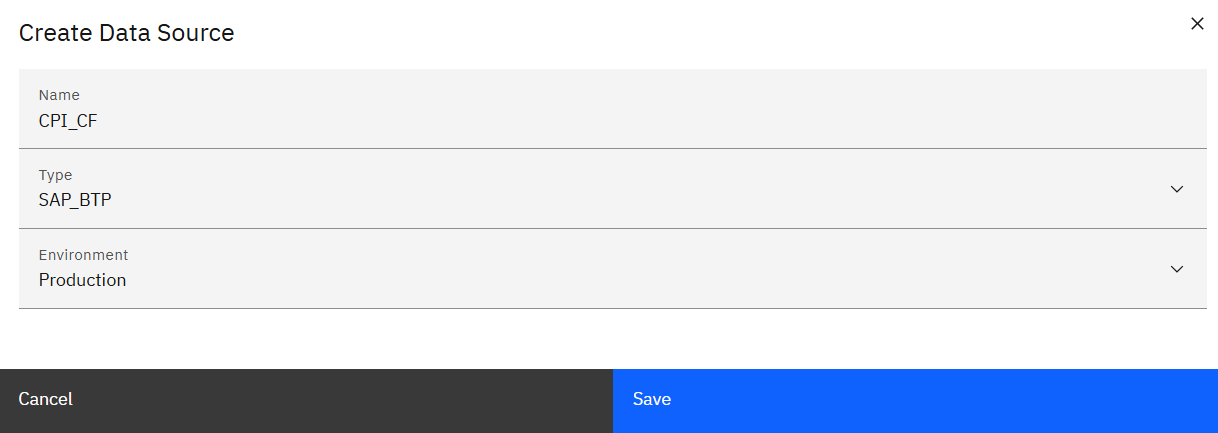
-
Click “Save”.
Step 2: Configure the Data Source
-
Configure the data source with the credentials obtained earlier:
-
Features: Check all applicable (e.g. Complexity, Adapter, Authentication, Timing, etc.)
-
Product: Select
CLOUDINTEGRATION -
Region: e.g.
EU10 -
Hostname: from Service Key
urlwithouthttp(s):// -
Optional:
-
Store Artefact ID in Property:
-
Filtered ID for E2E Generation: e.g.
Generic_EOIO_Receiver|de.whint.wic.alert -
Proxy: not required
-
Authentication
-
Type: Select
OAUTH2(recommended) and enter the credentials from the Service Key-
Client ID: Enter from the Service Key →
clientid -
Secret: Enter from the Service Key →
clientsecret -
Token URL: Enter from the Service Key →
tokenurl -
Scope: not required
-
-
In the Tasks section, click the “+” icon (top right of the table) to add the following tasks:
-
Configuration
-
Inventory
-
Runtime
-
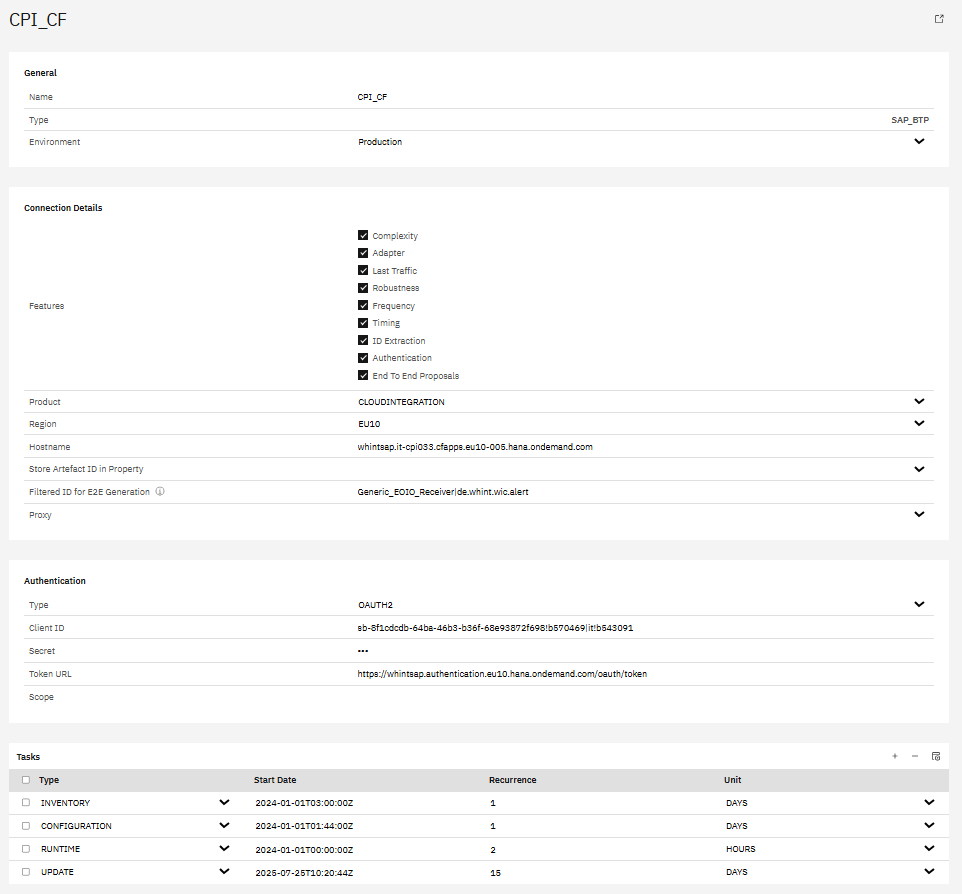
-
Click “Save” to complete data source creation.
Step 3: Task Configuration
-
Start the task “CONFIGURATION” by selecting the checkbox next to it and clicking the “Start Task” icon.

Execute the following tasks in the specified order:
-
CONFIGURATION - Reads all raw data into the database
-
INVENTORY - Pushes the raw data into the inventory
-
RUNTIME - Reads traffic information from the tenant
Run tasks one at a time and monitor each task completion in the Job Monitor before proceeding to the next step.
-
Check your “Job Monitor” if the task is done or is still running under “Active Tasks”.

Recommended Task Schedule
|
Task |
Recommended Job Recurrence |
|---|---|
|
CONFIGURATION |
Every 1 day |
|
INVENTORY |
Every 1 day |
|
RUNTIME |
Every 2–5 hours |
Important
Ensure a delay of at least 2–3 hours between CONFIGURATION and INVENTORY to prevent overlapping. CONFIGURATION may take longer to complete.
Result
Your data source is now configured and ready for use.
Monitor task execution regularly through the Job Monitor.
Data Source Setup (Neo)
Step 1: Create Data Source
-
Navigate to Settings → Connectivity → Data Sources.
-
Click “+” Add.

-
Enter the required values:
-
Name: e.g.
CPI_EU -
Type:
SAP_BTP -
Environment: e.g.
DEVELOPMENT
-

-
Click “Save”.
Step 2: Configure the Data Source
-
Configure the data source with the credentials obtained earlier:
-
Features: Check all applicable (e.g. Complexity, Adapter, Authentication, Timing, etc.)
-
Product: Select
CLOUDINTEGRATION -
Region: e.g.
EU10 -
Hostname: from Service Key
urlwithouthttp(s):// -
Optional:
-
Store Artefact ID in Property: e.g.
LeanIX External ID -
Filtered ID for E2E Generation: e.g.
Demo_trigger_1|de.whint.ims.test.trigger -
Proxy: not required
-
Authentication
-
Type: Select
OAUTH2(recommended) orBASICAUTHand enter the credentials from the Service Key-
Client ID: Enter from the Service Key →
clientid -
Client Secret: Enter from the Service Key →
clientsecret -
Token URL: Enter from the Service Key →
tokenurl -
Scope: not required
-
-
In the Tasks section, click the “+” icon (top right of the table) to add the following tasks:
-
Configuration
-
Inventory
-
Runtime
-
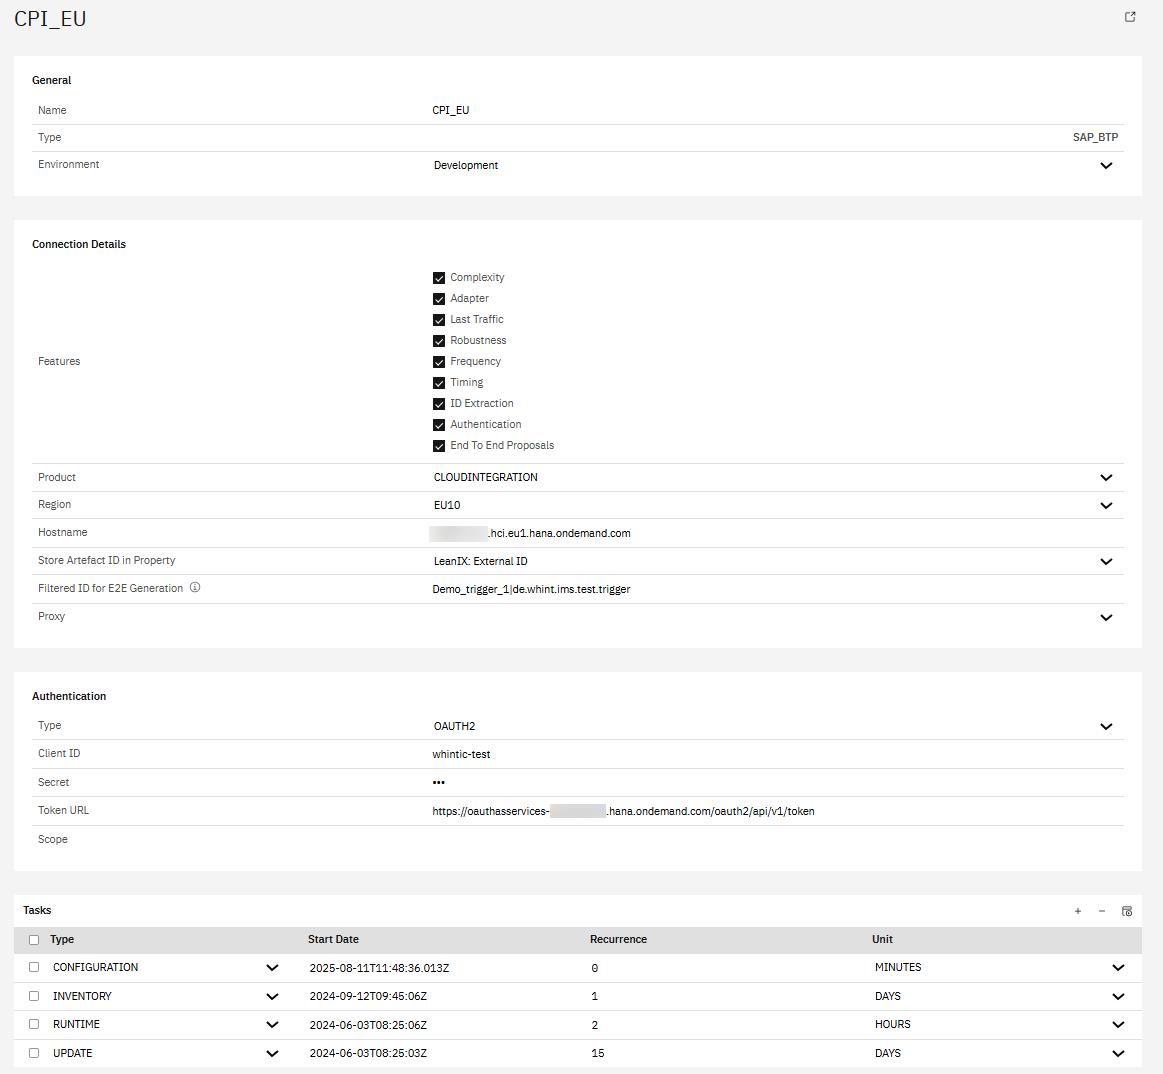
-
Click “Save” to complete data source creation.
Step 3: Task Configuration
-
Start the task “CONFIGURATION” by selecting the checkbox next to it and clicking the “Start Task” icon.
Execute the following tasks in the specified order:
-
CONFIGURATION - Reads all raw data into the database
-
INVENTORY - Pushes the raw data into the inventory
-
RUNTIME - Reads traffic information from the tenant
Run tasks one at a time and monitor each task completion in the Job Monitor before proceeding to the next step.
-
Check your “Job Monitor” if the task is done or is still running under “Active Tasks”.
Recommended Task Schedule
|
Task |
Recommended Job Recurrence |
|---|---|
|
CONFIGURATION |
Every 1 day |
|
INVENTORY |
Every 1 day |
|
RUNTIME |
Every 2–5 hours |
Important
Ensure a delay of at least 2–3 hours between CONFIGURATION and INVENTORY to prevent overlapping. CONFIGURATION may take longer to complete.
Result
Your data source is now configured and ready for use.
Monitor task execution regularly through the Job Monitor.
1.1.1.3 Integration Assessment
Instance Creation And Service Key Retrieval
Before retrieving your Service Key, ensure that the Integration Assessment service is entitled and available in your SAP BTP subaccount. ㅤㅤㅤ
If not, follow the steps below before continuing with Service Key retrieval.
Step 1: Check Service Entitlements
-
Open your SAP BTP Subaccount.
-
Navigate to Entitlements.
-
Confirm that the following service is added:
-
Service: Integration Assessment
-
Plan: default
-
→ If not present, click “Add Service Plan” and assign the entitlement.
Step 2: Check the Service Marketplace
-
In your BTP Subaccount, go to Service Marketplace.
-
Search for:
-
Service:
Integration Assessment -
Plan:
default
-
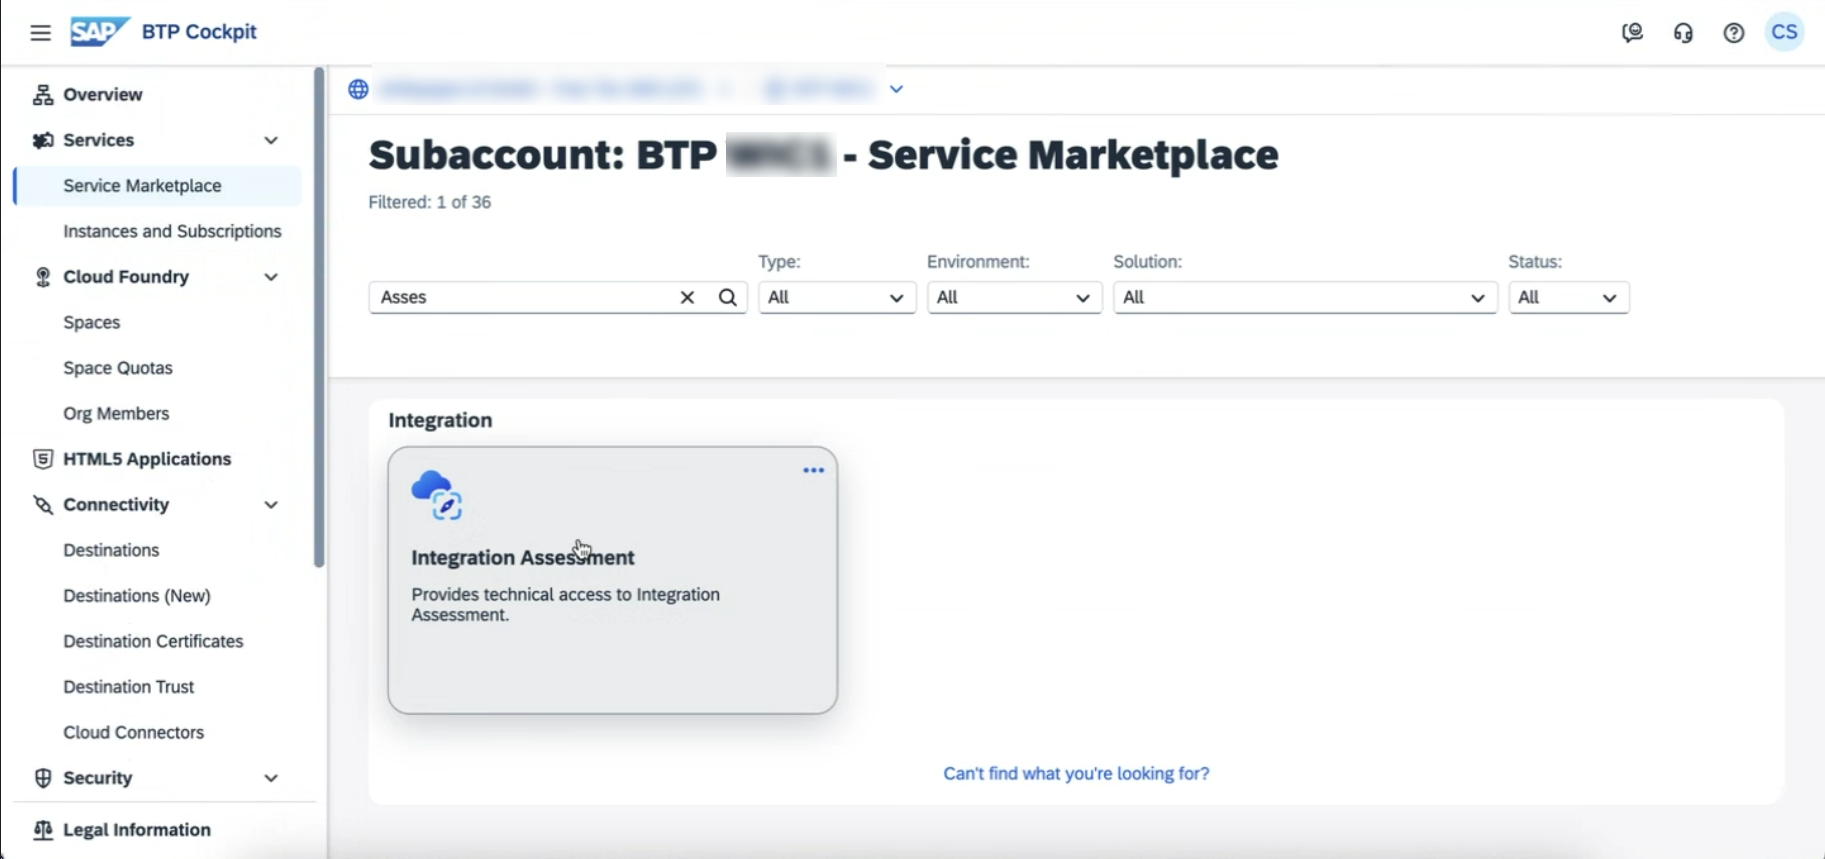
If the service is not visible, double-check that the entitlement was added in Step 1.
Step 3: Create a Service Instance
-
Click “Create” (instance).
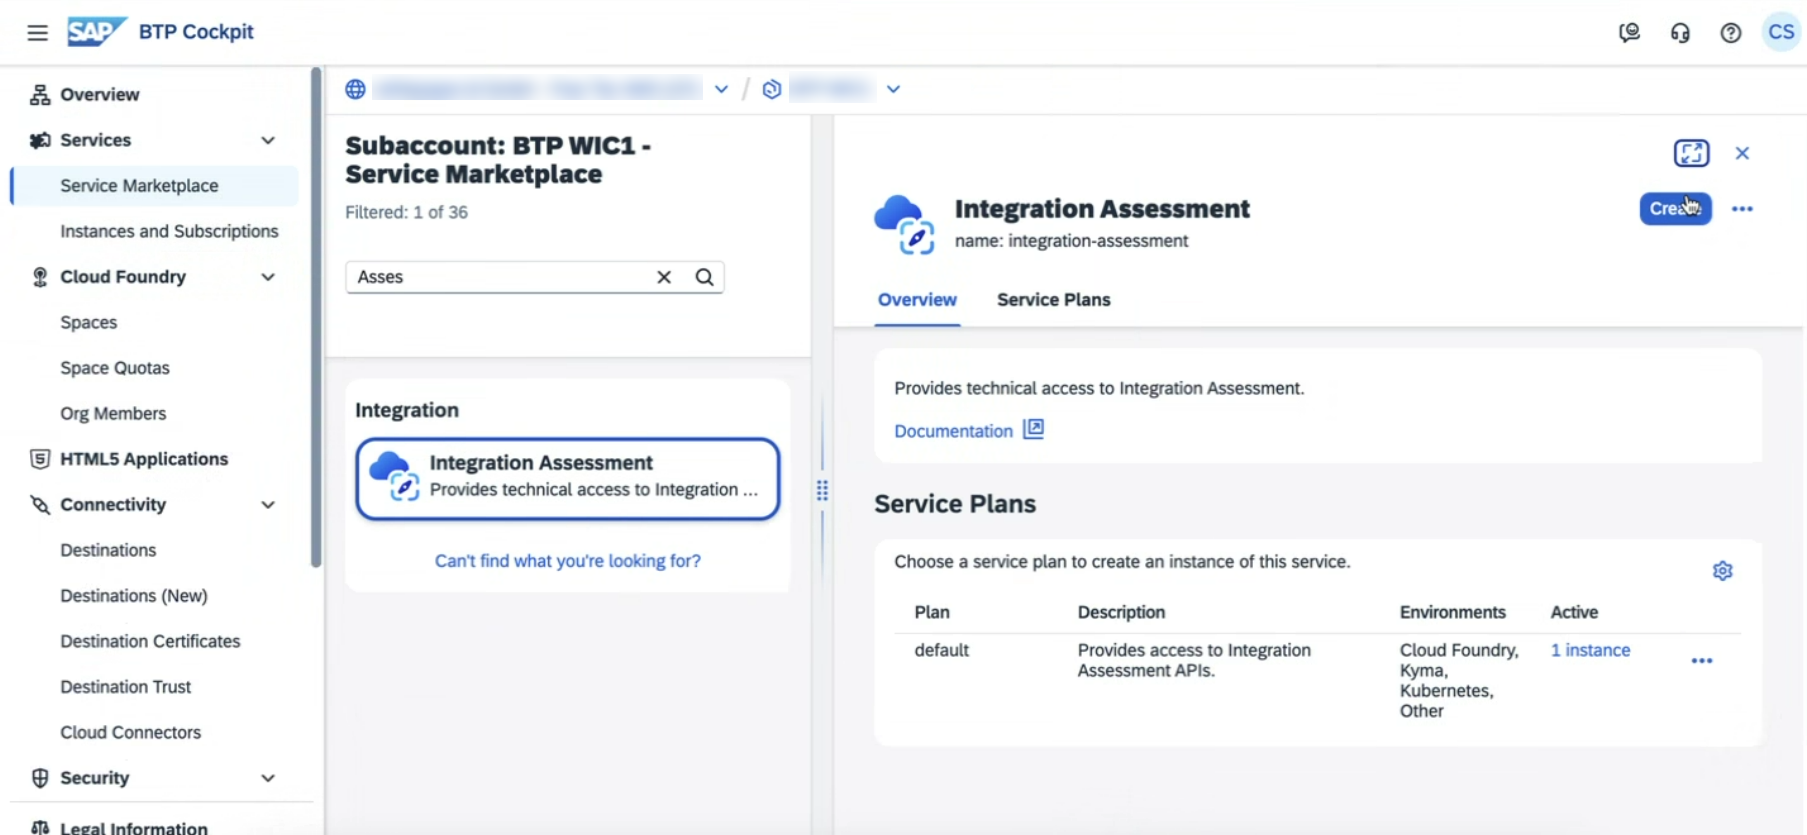
-
Use the following settings:
-
Plan:
default -
Space: e.g.
dev -
Instance Name: e.g.
WHINT_IA
-
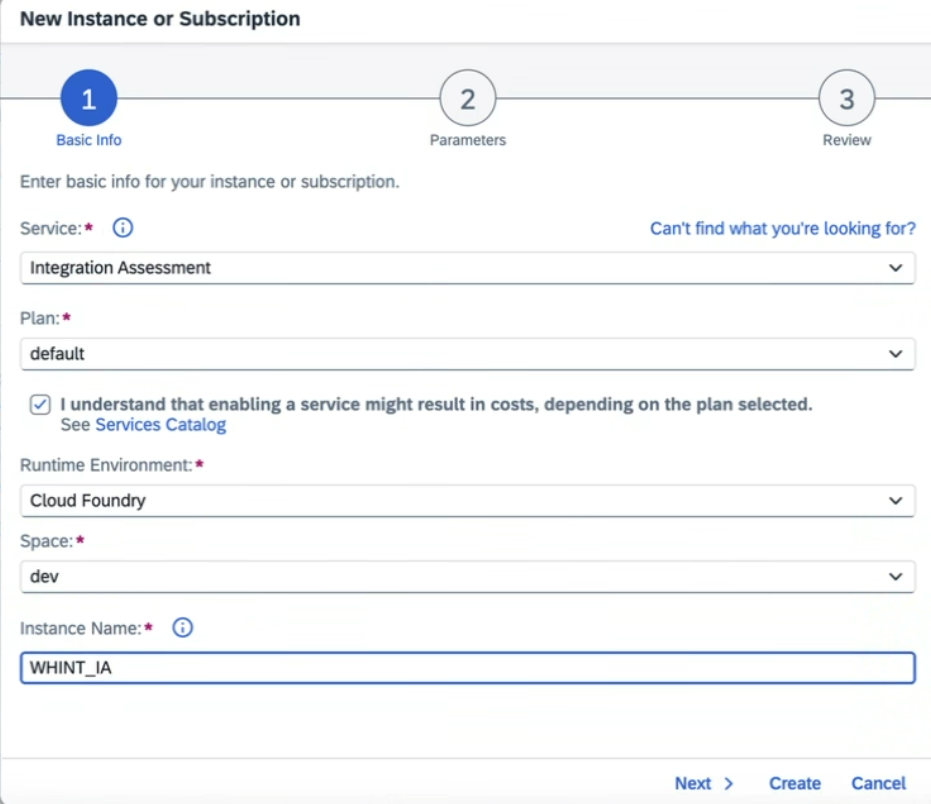
-
Click “Create” to finalize the instance
Step 4: Create and Retrieve the OAuth2 Service Key
-
After the instance is created, open it and select “Create Service Key”.
-
Enter a name, e.g.
WHINT_IA_KEYand confirm. -
Click “View” and extract the following values:
-
clientid -
clientsecret -
tokenurl -
url
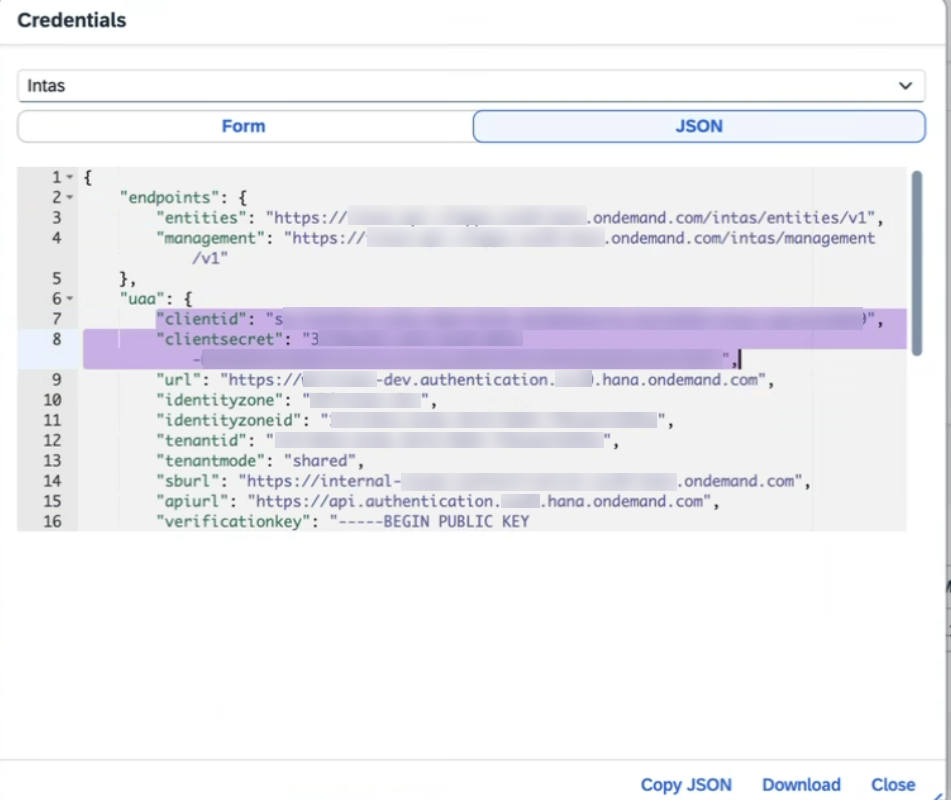
→ Continue to Data Source setup below.
Data Source Setup
Step 1: Create Data Source
-
Navigate to Settings → Connectivity → Data Sources.
-
Click “+” Add.
-
Enter the required values:
-
Name: e.g.
SAP IntegrationAssessment -
Type:
SAP_BTP -
Category: e.g.
DEVELOPMENT
-
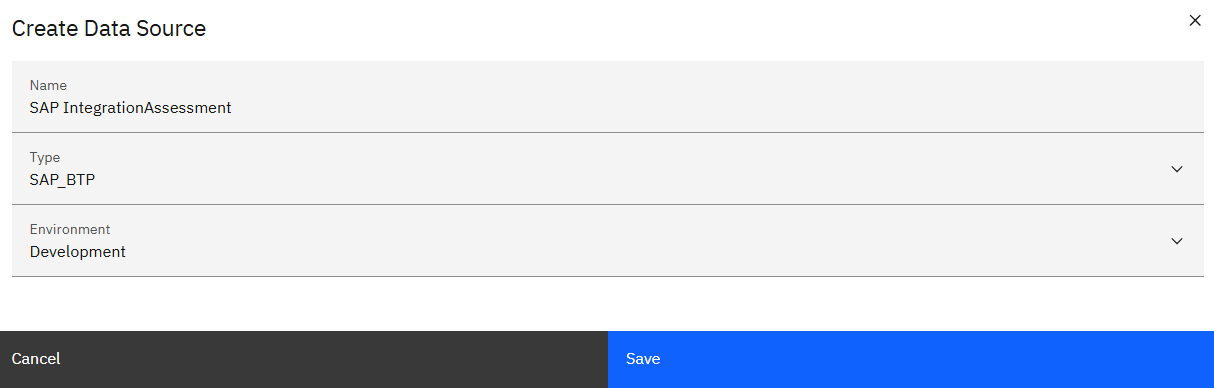
-
Click “Save”.
Step 2: Configure the Data Source
-
Configure the data source with the credentials obtained earlier:
Connection Details
-
Features: Check all applicable (e.g. Complexity, Adapter, Authentication, Timing, etc.)
-
Product: Select
INTEGRATIONASSESSMENT -
Region: e.g.
EU10 -
Proxy: not required
Authentication
-
Type: Select
OAUTH2and enter the credentials from the Service Key-
Client ID: Enter from the Service Key →
clientid -
Client Secret: Enter from the Service Key →
clientsecret -
Token URL: Enter from the Service Key →
tokenurl -
Scope: not required
-
-
In the Tasks section, click the “+” icon (top right of the table) to add the following tasks:
-
Configuration
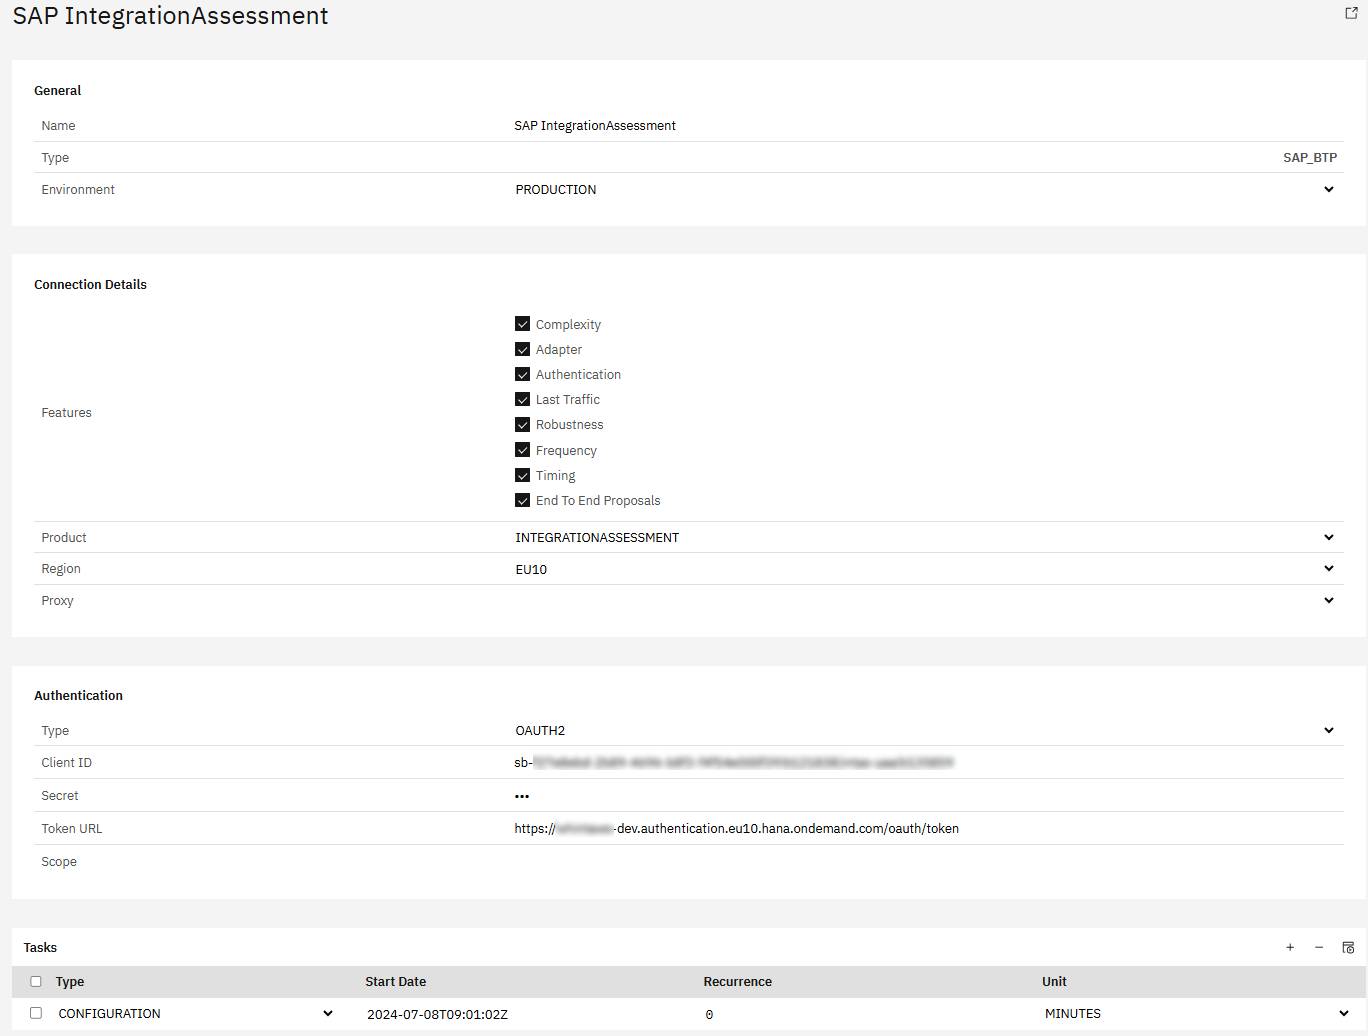
-
-
Click “Save” to complete data source creation.
Step 3: Task Configuration
-
Start the task “CONFIGURATION” by selecting the checkbox next to it and clicking the “Start Task” icon.

-
Check your “Job Monitor” if the task is done or is still running under “Active Tasks”.

Recommended Task Schedule
|
Task |
Recommended Job Recurrence |
|---|---|
|
CONFIGURATION |
Every 1 day |
Result
Your data source is now configured and ready for use.
Monitor task execution regularly through the Job Monitor.
1.1.2 SAP Event Mesh
Instance Creation And Service Key Retrieval
Before retrieving your Service Key, ensure that a (SAP) Event Mesh service instance with the default plan exists in your SAP BTP Subaccount.
-20250710-072134.jpg?cb=2c22dc8fc3d84aadd79e99977183e835)
If not, follow the steps below before continuing with Service Key Retrieval.
Step 1: Check the Service Marketplace
-
Open your SAP BTP Subaccount.
-
Navigate to Service Marketplace.
-
Search for:
-
Service: Event Mesh
-
Plan:
default
-
→ If not, continue with Step 2 to create it
Step 2: Create a New Service Instance
-
In Service Marketplace, select Event Mesh.
-
Click “Create” (to create an instance).
-
Configure the instance with the following:
-
Plan:
default -
Space: e.g.
dev -
Instance Name: e.g.
WHINT_EM

-
In the Parameters section, insert the following JSON:
{
"options": {
"management": true,
"messagingrest": true,
"messaging": true
},
"namespace": "whint/em/test",
"rules": {
"topicRules": {
"publishFilter": [
"${namespace}/"
],
"subscribeFilter": [
"${namespace}/"
]
},
"queueRules": {
"publishFilter": [
"${namespace}/"
],
"subscribeFilter": [
"${namespace}/"
]
}
},
"version": "1.1.0",
"emname": "embroker"
}
Replace "whint/em/test" with your actual namespace if needed.
4. Retrieve the Service Key
-
Select your newly created (SAP) Event Mesh instance.
-
Click Create Service Key.
-
Enter a name, e.g.
WHINT_EM_KEYand confirm. -
After creation, click “View” to display the credentials.
-
Extract the following values for later use:
-
clientid -
clientsecret -
tokenendpoint -
uri
-
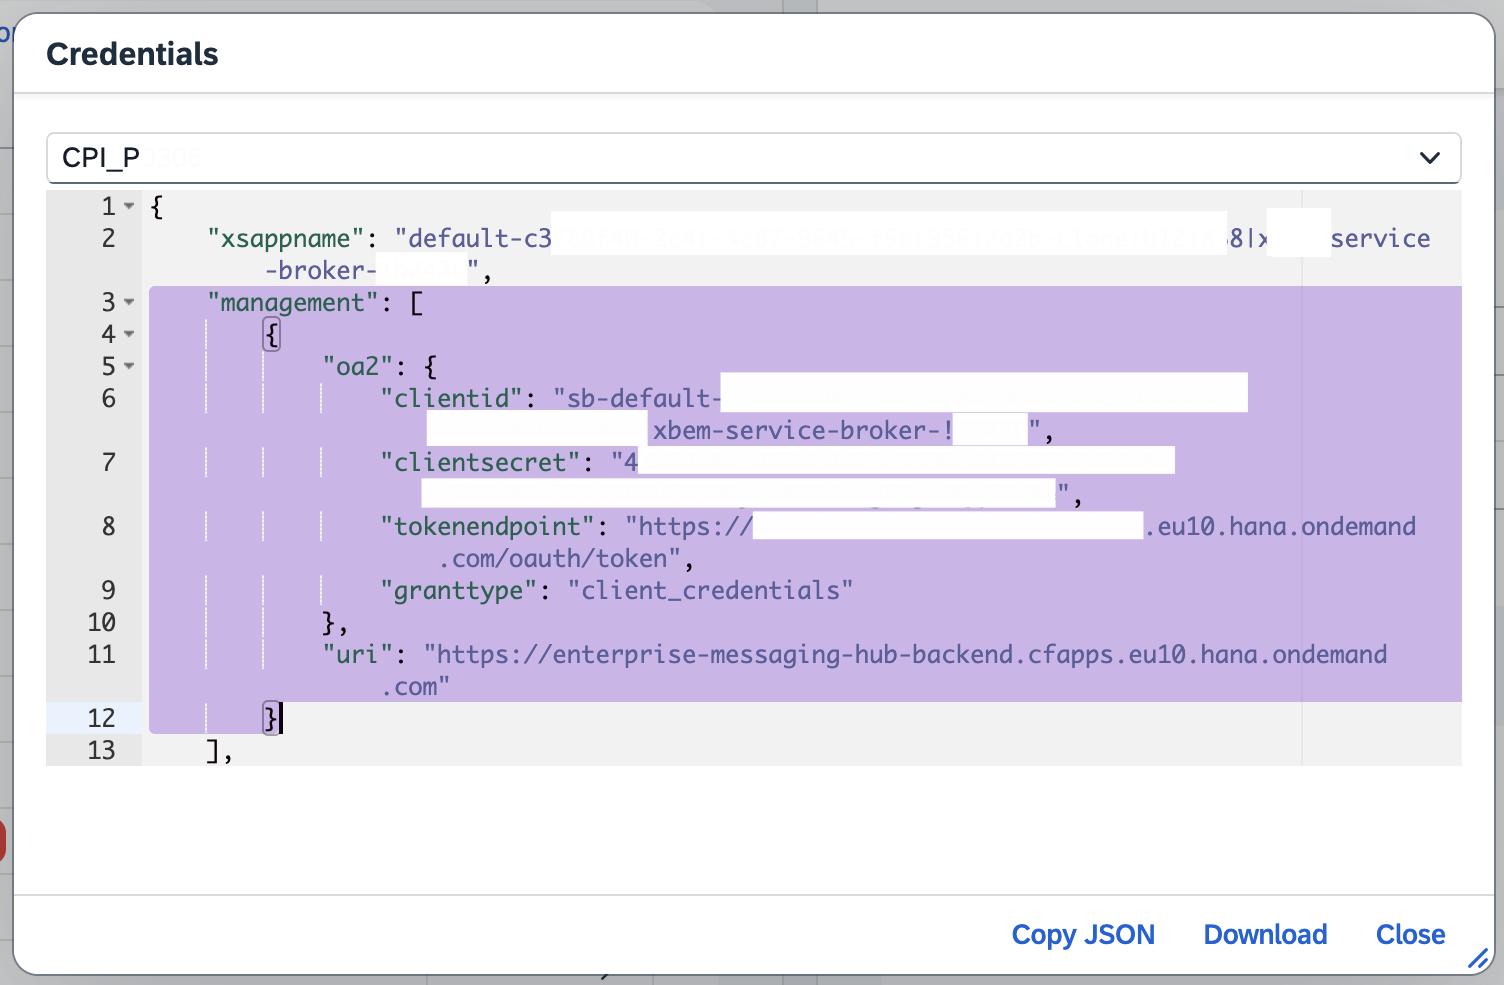
→ Now continue to the Data Source setup below.
Data Source Setup
Step 1: Create Data Source
-
Navigate to Settings → Connectivity → Data Sources.
-
Click “+” Add.

-
Enter the required values:
-
Name: e.g.
SAP EVENT MESH -
Type:
SAP_BTP -
Category: e.g.
DEVELOPMENT
-
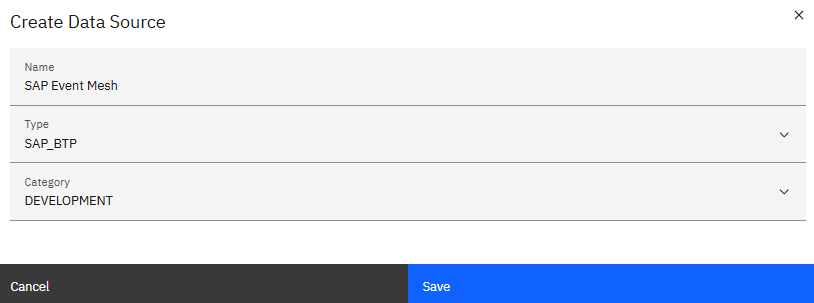
-
Click “Save”.
Step 2: Configure the Data Source
-
Configure the data source with the credentials obtained earlier:
Connection Details
-
Features: Check all applicable (e.g. Complexity, Adapter, Authentication, Timing, etc.)
-
Product: Select
EVENTMESH -
Region: e.g.
EU10 -
Hostname: without
http(s)://(e.g.xxxxx.it-cpi0xx.cfapps.eu10-005.hana.ondemand.com) -
Proxy: not required
Authentication
-
Type: Select
OAUTH2and enter the credentials from the Service Key-
Client ID: Enter from the Service Key →
clientid -
Client Secret: Enter from the Service Key →
clientsecret -
Token URL: Enter from the Service Key →
tokenurl -
Scope: not required
-
-
In the Tasks section, click the “+” icon (top right of the table) to add the following tasks:
-
Configuration
-
Inventory
-
Runtime
-
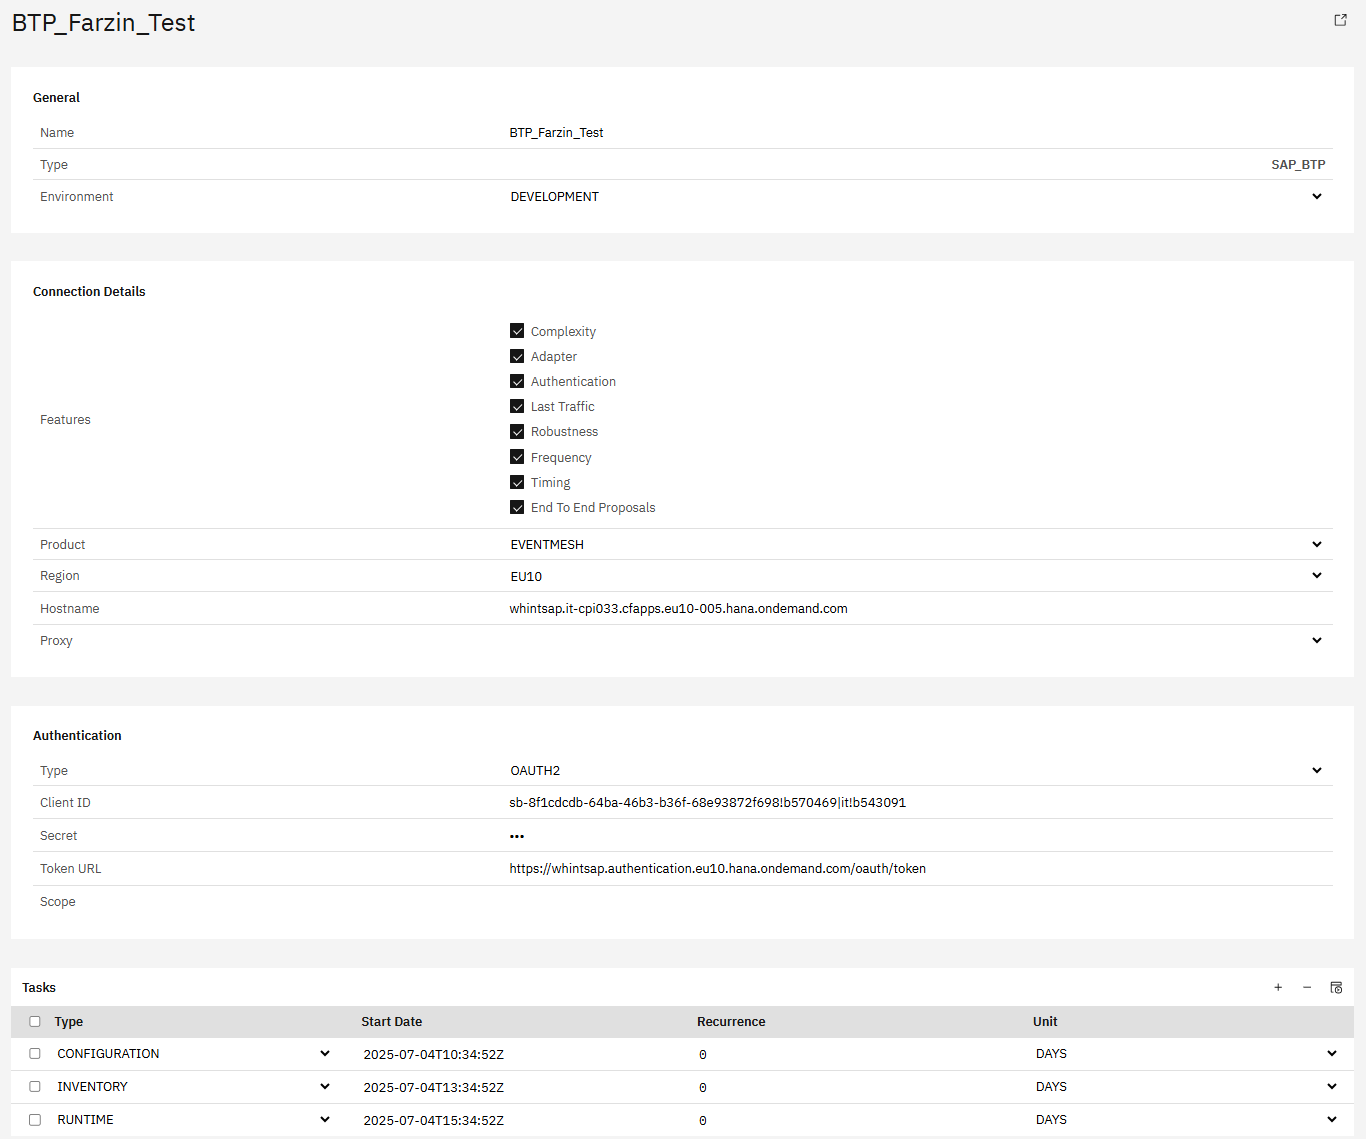
Step 3: Task Configuration
-
Start the task “CONFIGURATION” by selecting the checkbox next to it and clicking the “Start Task” icon.

Execute the following tasks in the specified order:
-
CONFIGURATION - Reads all raw data into the database
-
INVENTORY - Pushes the raw data into the inventory
Run tasks one at a time and monitor each task completion in the Job Monitor before proceeding to the next step.
-
Check your “Job Monitor” if the task is done or is still running under “Active Tasks”.
Recommended Task Schedule
|
Task |
Recommended Job Recurrence |
|---|---|
|
CONFIGURATION |
Every 1 day |
|
INVENTORY |
Every 1 day |
Important
Ensure a delay of at least 2–3 hours between CONFIGURATION and INVENTORY to prevent overlapping. CONFIGURATION may take longer to complete.
1.1.3 SAP Cloud Connector
Data Source Setup
Prerequisites: Complete the Connectivity via Basic Authentication section above before proceeding with data source configuration.
Note: The configuration varies depending on your deployment model:
-
a) WHINT-Hosted: Connection through WHINT-provided Integration Flow gateway (SAP Cloud Integration)
-
b) Customer Self-Managed: Direct connection to your Cloud Connector
Step 1: Create Data Source
-
Navigate to Settings → Connectivity → Data Sources.
-
Click "+" Add.

-
Enter the required values:
-
Name: e.g.
SCC CC -
Type:
SAP_BTP -
Environment: e.g.
TEST
-
-
Click "Save".
Step 2: Configure the Data Source
-
Configure the data source with the credentials obtained earlier:
Connection Details
a) For WHINT-Hosted (Gateway Connection):
-
Product:
CLOUDCONNECTOR -
URL:
https://<btp-region>.hana.ondemand.com/http/whint/wic/scc(from your SAP Cloud Integration Flow) -
Proxy: Leave blank (gateway handles routing)
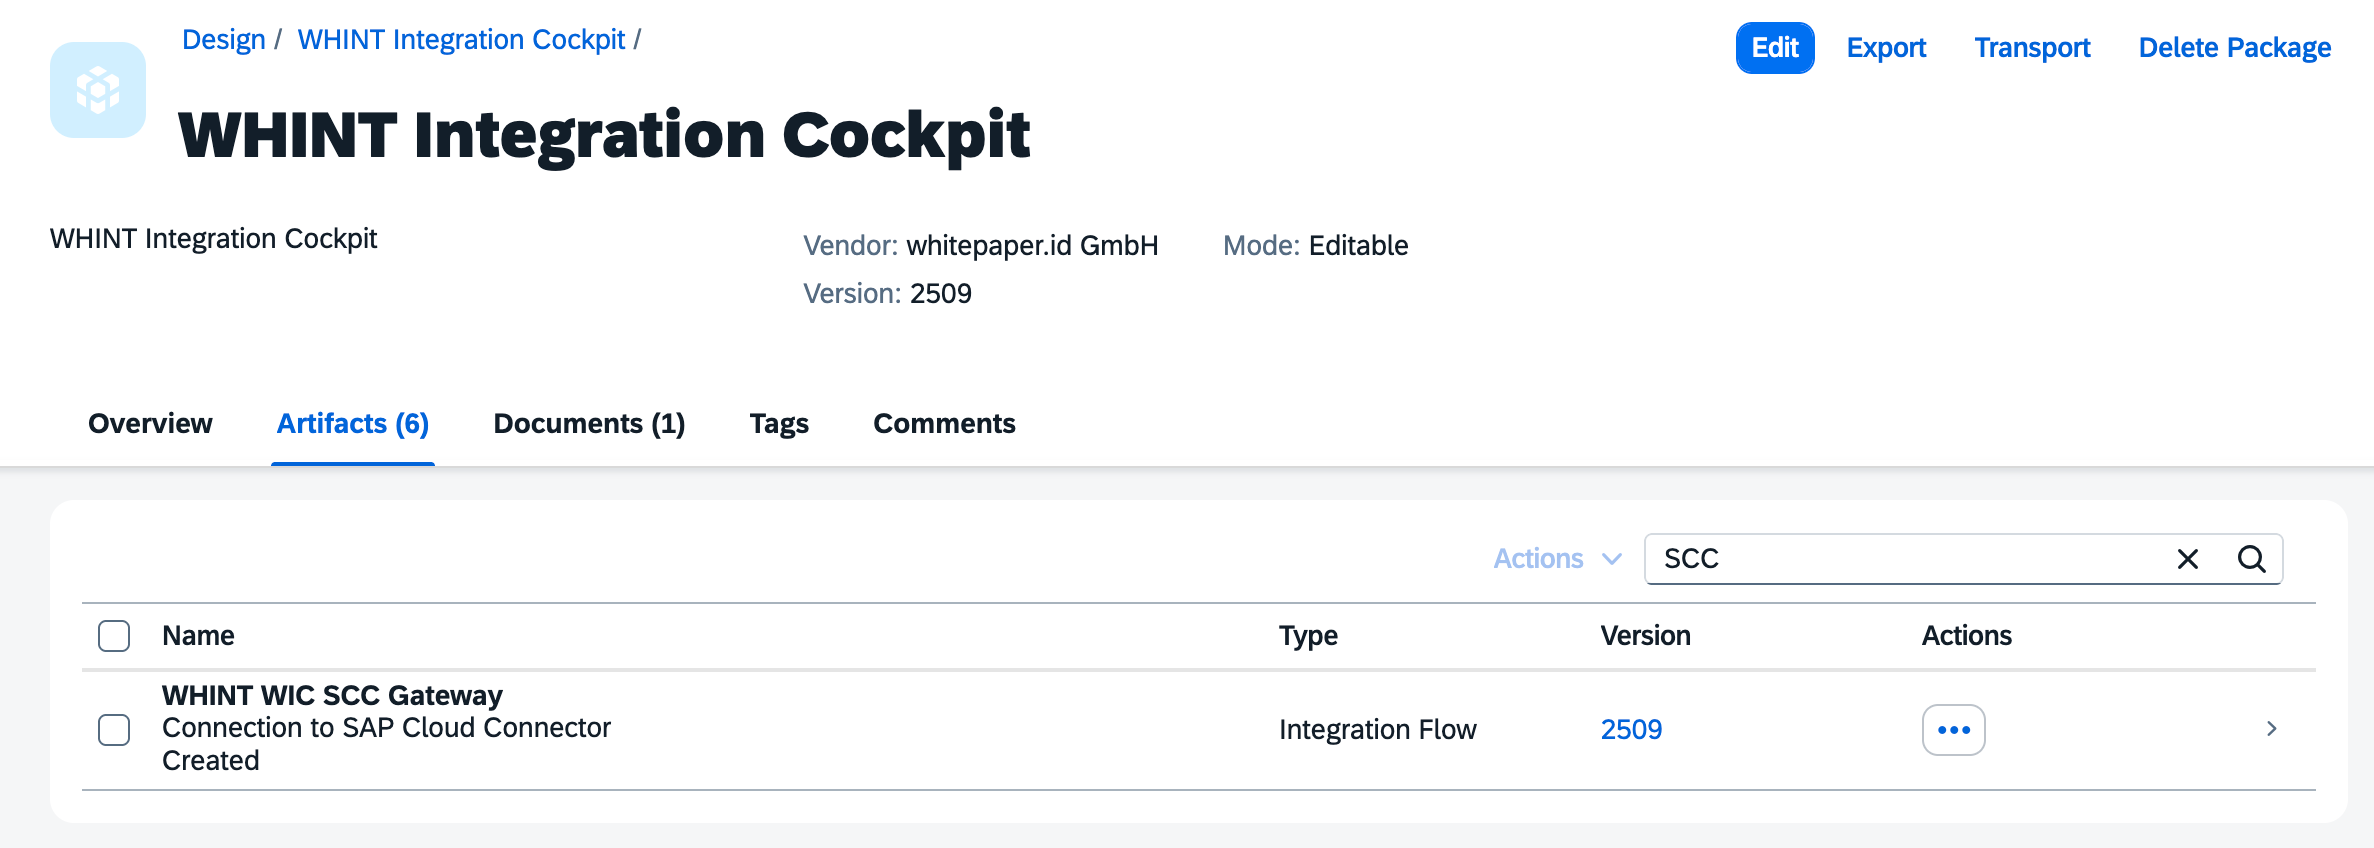
Note: For WHINT-hosted deployments, the gateway Integration Flow (WHINT WIC SCC Gateway) is provided as part of the WHINT Integration Package.
Here you configure your URL to your Cloud Connector.
b) For Customer Self-Managed (Direct Connection):
-
Product:
CLOUDCONNECTOR -
URL:
http://<your-scc-host>:<port>
(e.g.http://winwpo.scc:8443) -
Proxy: Select your configured proxy from the dropdown
(e.g.SAP CloudConnector CSCC)
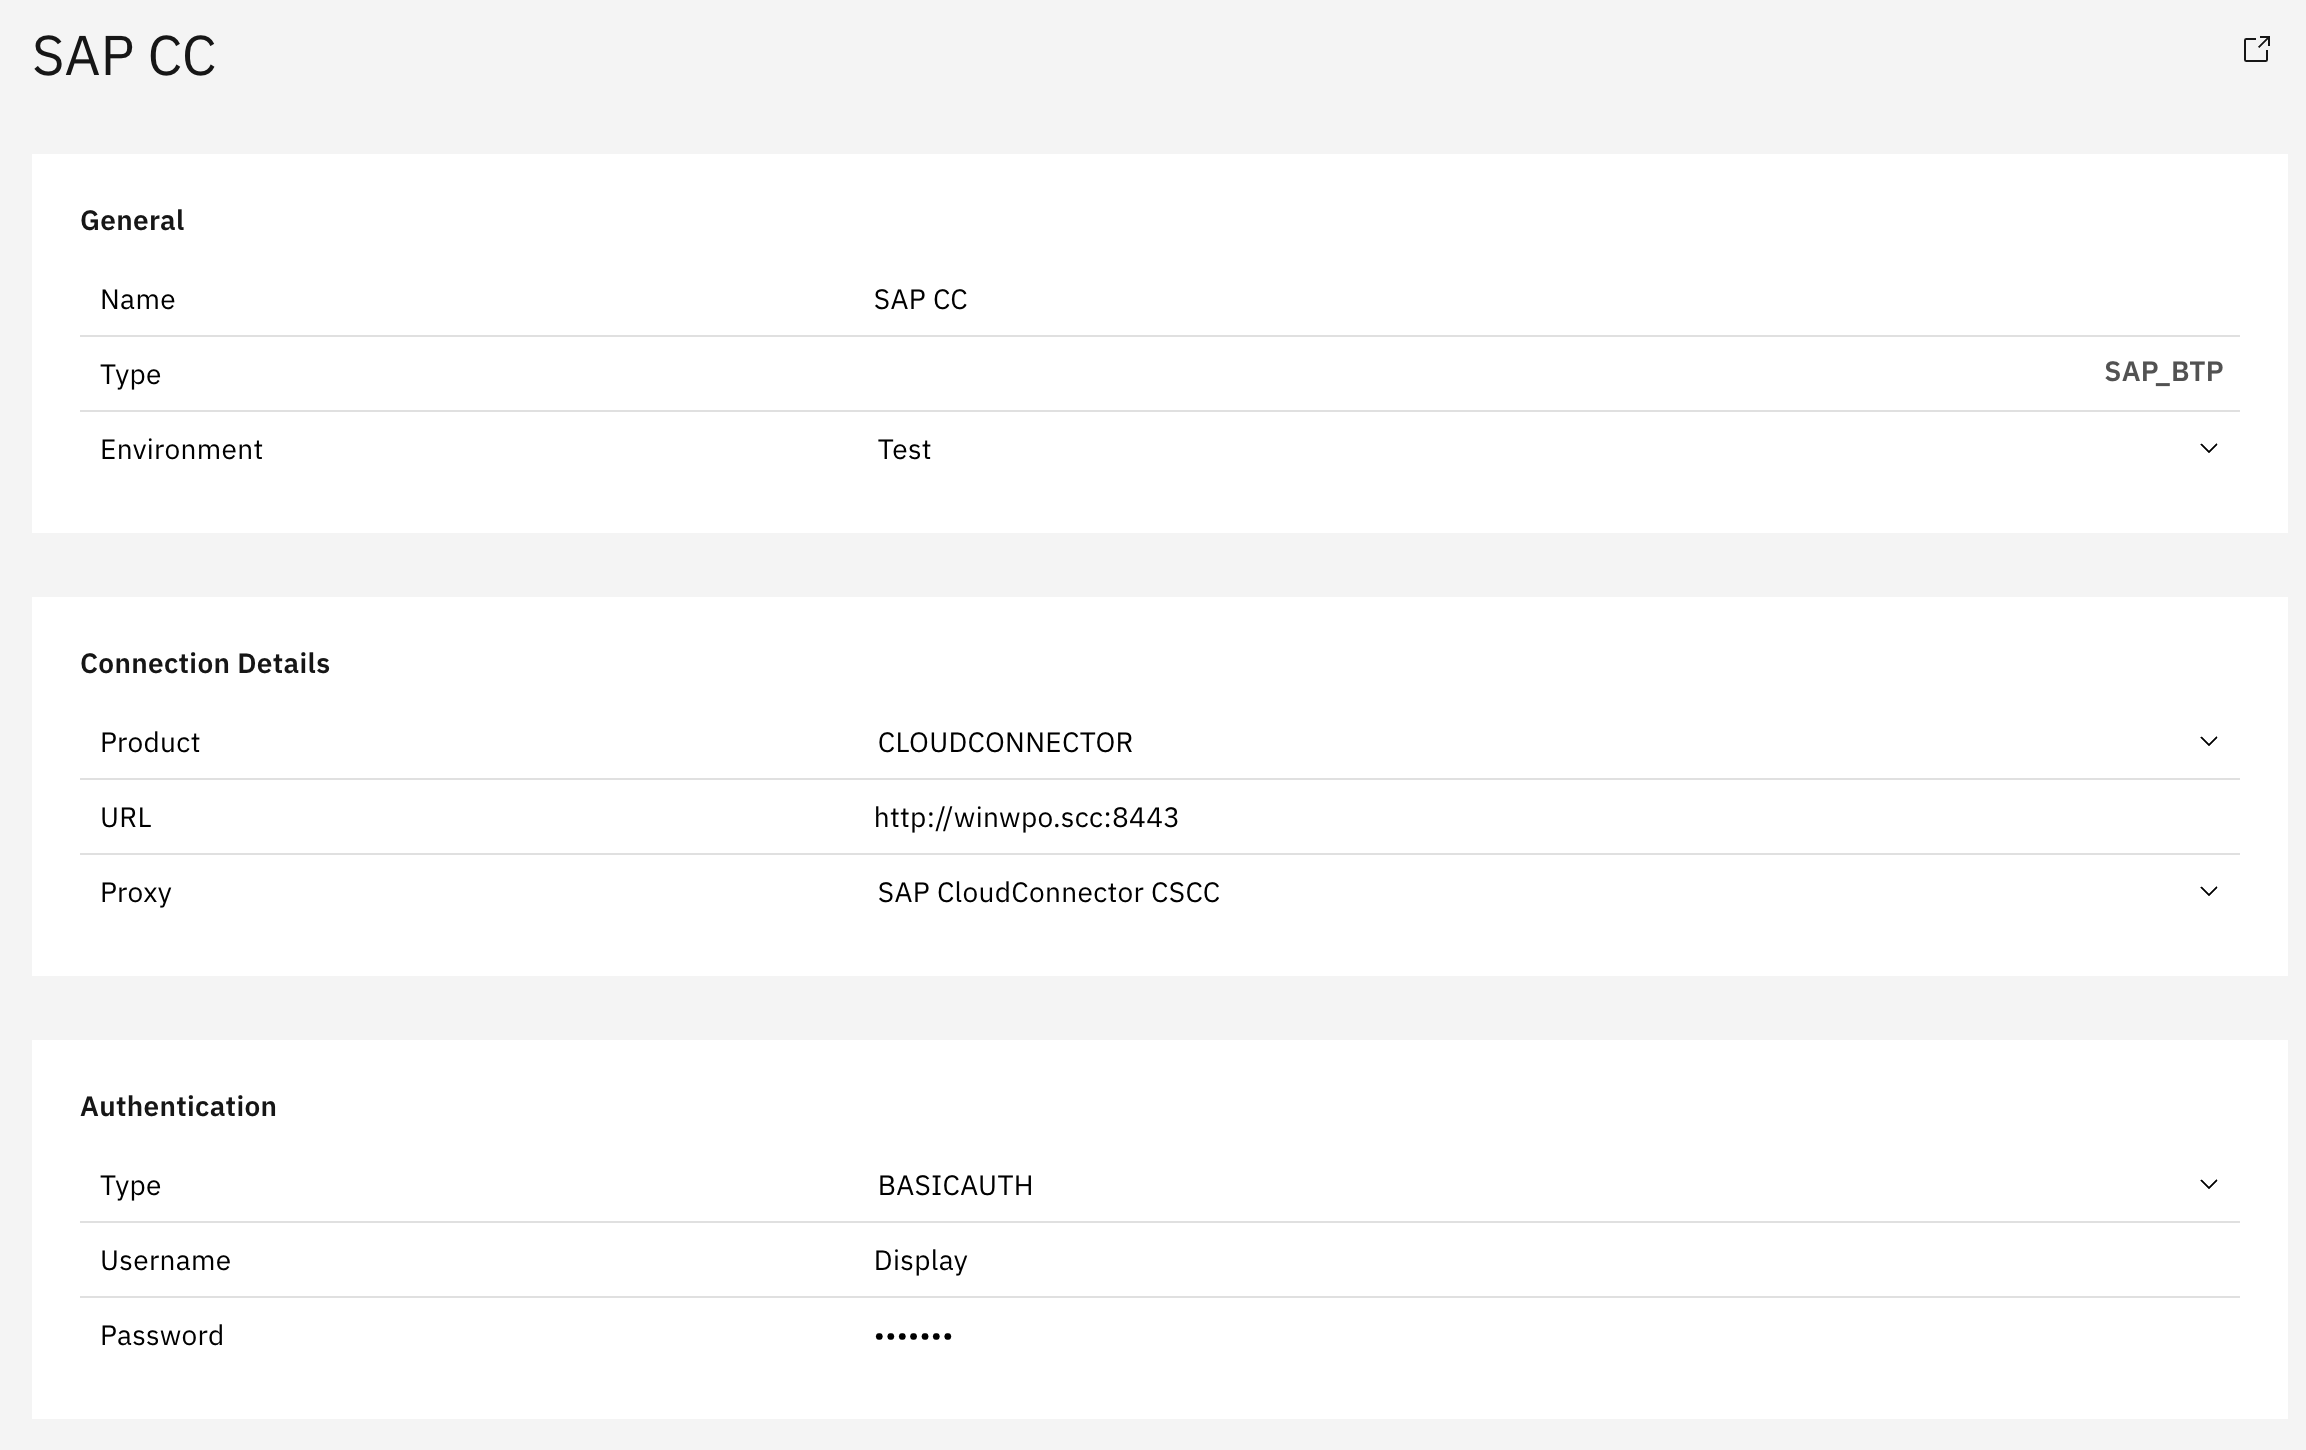
Note: For customer self-managed deployments, Proxy must be configured in
Settings → Connectivity → Proxies before they can be selected here.
Authentication
a) WHINT-Hosted:
-
Type: Select
BASICAUTHorOAuth2 -
Username: Service binding username (from your SAP CPI tenant)
-
Password: Service binding password (from your SAP CPI tenant)
b) Customer Self-Managed:
-
Type: Select
BASICAUTH -
Username: Enter your Cloud Connector username (e.g.
Display) -
Password: Enter the corresponding clear text password
-
In the Tasks section, click the "+" icon (top right of the table) to add the following tasks:
-
Configuration
-
-
Click "Save" to complete data source creation.
Step 3: Task Configuration
-
Start the task "CONFIGURATION" by selecting the checkbox next to it and clicking the "Start Task" icon.

-
Check your "Job Monitor" if the task is done or is still running under "Active Tasks".

Recommended Task Schedule
|
Task |
Recommended Job Recurrence |
|---|---|
|
CONFIGURATION |
Every 1 day |
Result
Your data source is now configured and ready for use.
Monitor task execution regularly through the Job Monitor.
1.1.4 SAP PI/PO
Configuration Guide SAP PI/PO
Configuration Scenario in PO System
Set up the configration scenario in SAP PI/PO.
After the import of the files to the directory, go to the scenario “WHINT_Integration Cokpit”.
Copy all objects from the component “SAP_PO” to your own PI/PO component or create “SAP_PO” as component if no other exists.
Then start the configuration with the channels before configuring the ICOs.
Communication Channels
Sender Channel
These are used to start the process for both ICOs
Both can be used, and select the right one for your preferences.
SOAP_S
No Configuration needed
SOAP_S_BE
No Configuration needed
Receiver Channel
The different receiver channels are used for reading for collecting the data and send it our to the WIC.
SOAP_R
This is a dynamic channel and will be used and set dynamically during the data collection.
-
Configure “http://” or “https://” for Target URL:
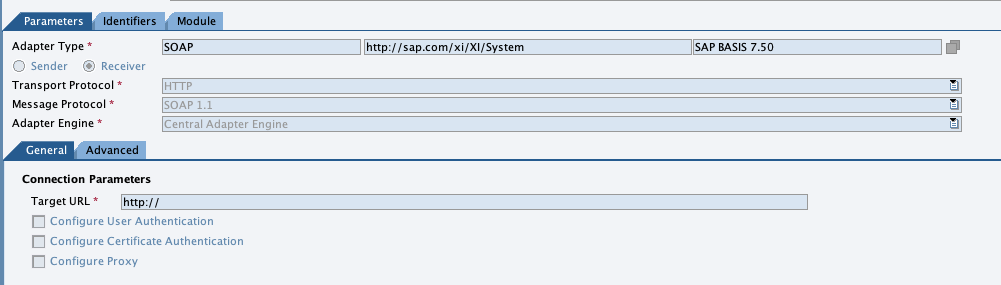
-
Set up user and passwort at “Parameters → Advances” in the first key-value pair.
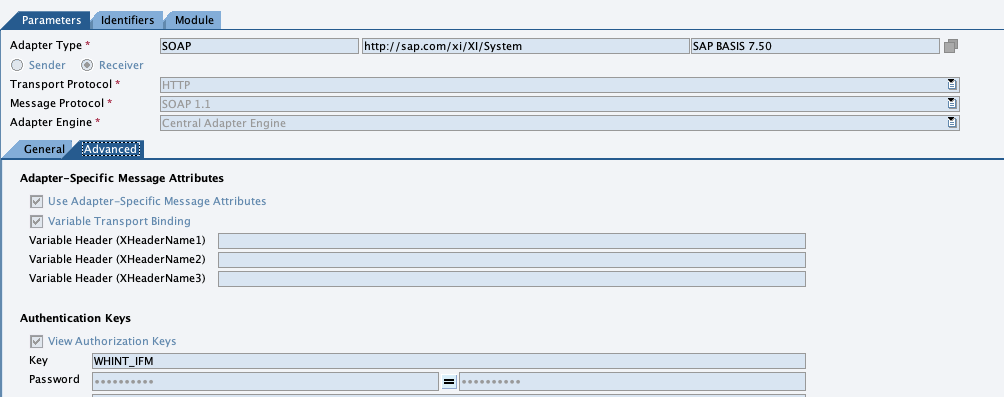
-
In the tab “Module”, set the values as shown in the picture
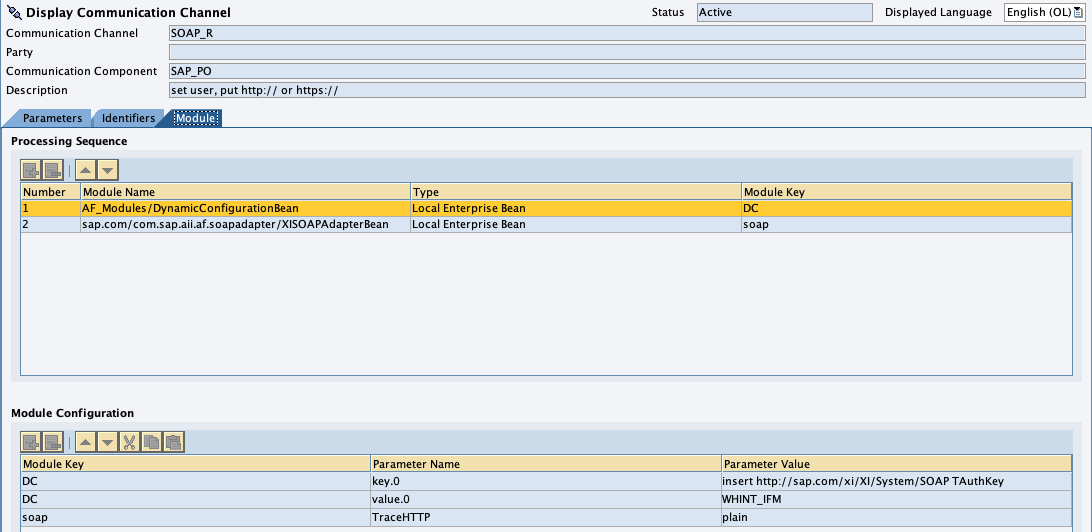
Please change the value of the 2nd line in the lower table from”WHINT_IFM” to the user name which is used for authorization.
SOAP_R_Access
-
Set Target URL and Authentication in the tab “General”
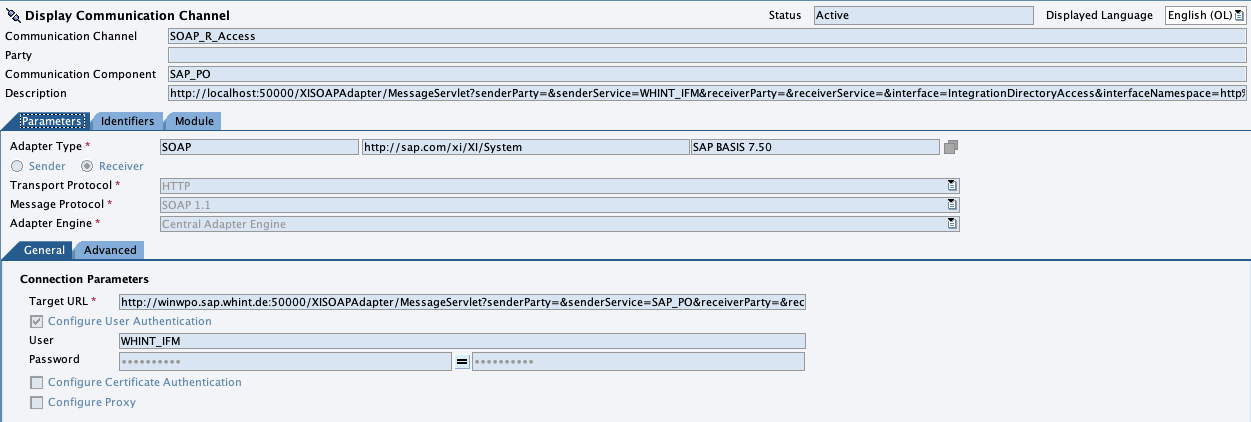
For the target url, the url from the description can be used.
You have to replace “http://localhost:50000” with your host and port.
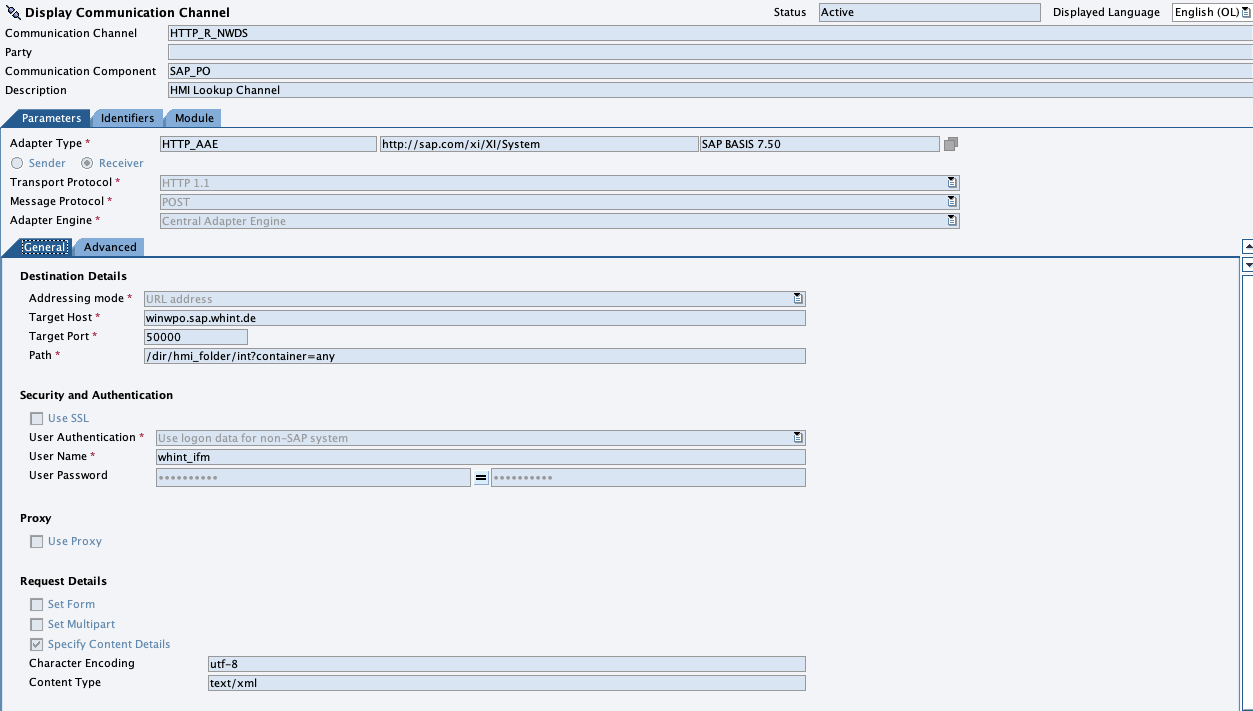
HTTP_R_NWDS (optional)
This channel is optional and only used to export the NWDS Folders for the WIC.
-
Configure Destination Details, Authentication and Request Details
WHINT | IntegrationCockpit | HTTP_R
-
Configure destination details and authentication
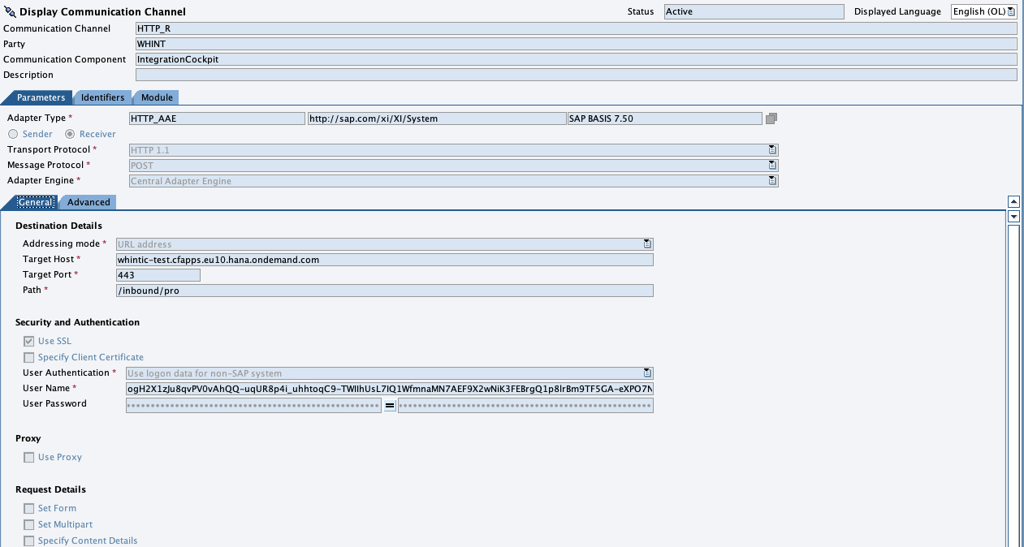
-
Destination details:
Use the URL from the WIC data source to set up the details. -
Authentication
Use the username and password you generated in the data source of the cockpit.
-
Integrated Configurations
IntegrationDirectoryAccess
Configure the parameter in the tab “Receiver Interfaces”
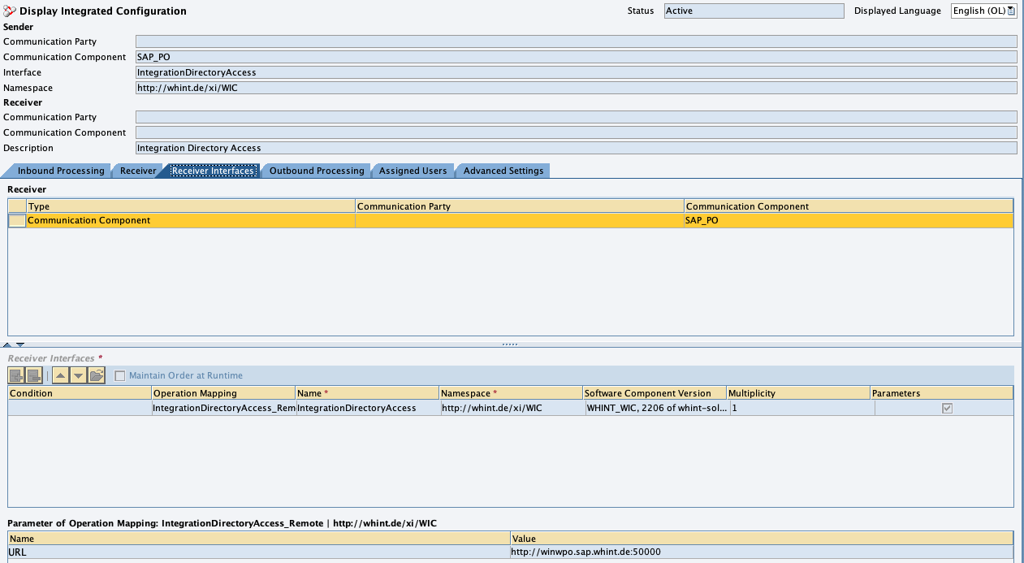
Parameter:
-
URL: Hosturl
MessageTriggerRequest_Out || IntegrationDirectory
For sender channel, use one of the SOAP_S Channels above.

Set up the parameters of the Operation Mappings in the tab “Receiver Interfaces”.
Parameter:
-
SOAP_ICO: | SAP_PO | SOAP_R_Access
-
HTTP_HMI: SAP_PO:HTTP_R_NWDS
If you don’t use NWDS you can set “IGNORE” for HTTP_HMI parameter. Then this will be ignored.
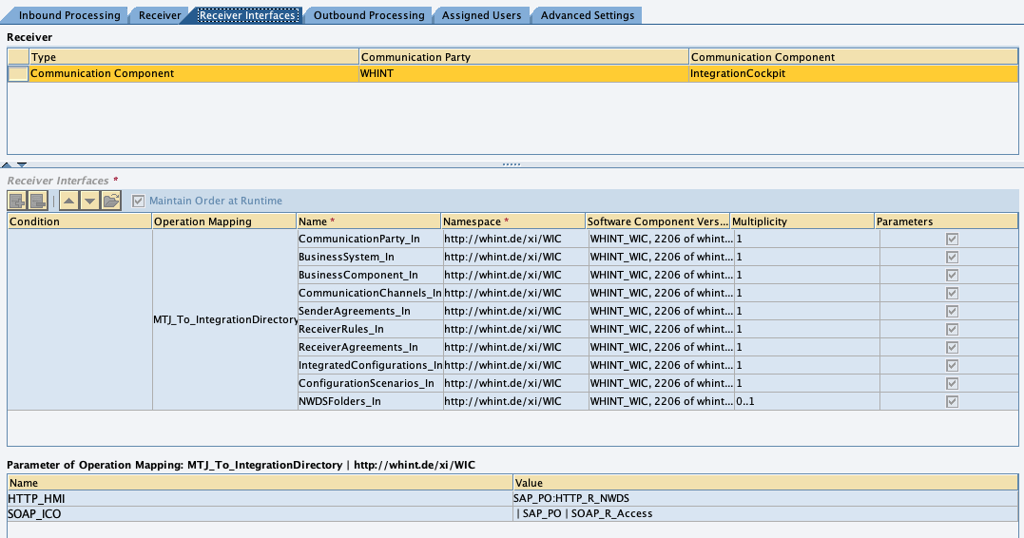
In Outbound Processing set the Receiver Channel to HTTP_R for all.
-20250811-102530.png?cb=009083d7e0ce4988e47e896dbb321431)
MessageTriggerRequest_Out || PerformanceMonitoring
For Inbound and Outbound Processing set the same channels as in the ICO for Integration Directory.
-
Sender: SOAP_S
-
Receiver: HTTP_R
Set up the parameters of the Operation Mappings in the tab “Receiver Interfaces”.
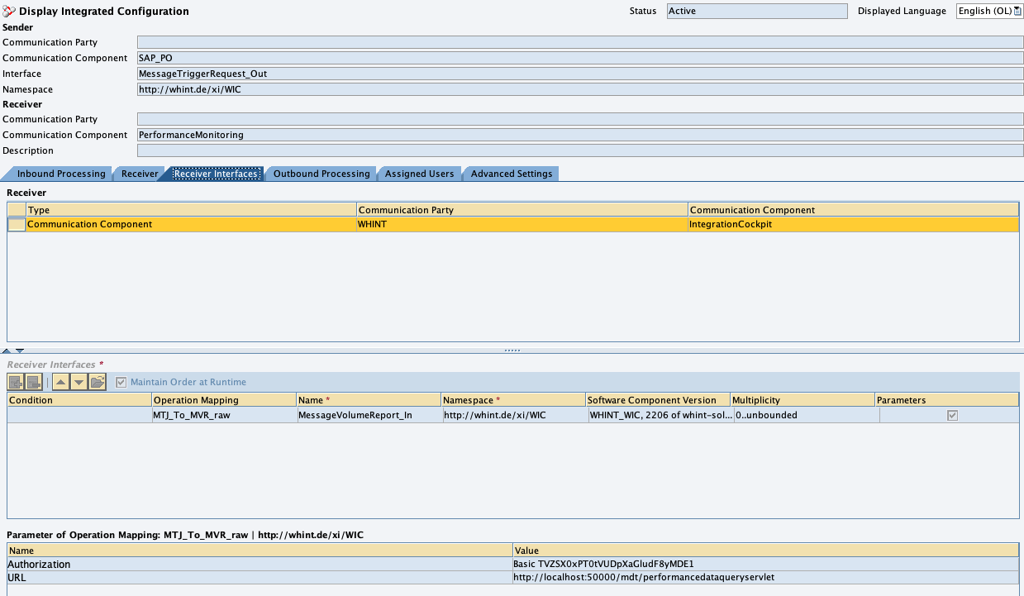
Parameter:
-
Authroization: Basic Auth Header
-
URL: Hosturl + “/mdt/performancedataqueryservlet”
MessageTriggerRequest_Out || ESRObjects
For Inbound and Outbound Processing set the same channels as in the ICO for Integration Directory.
-
Sender: SOAP_S
-
Receiver: HTTP_R
Set up the parameters of the Operation Mappings in the tab “Receiver Interfaces”.
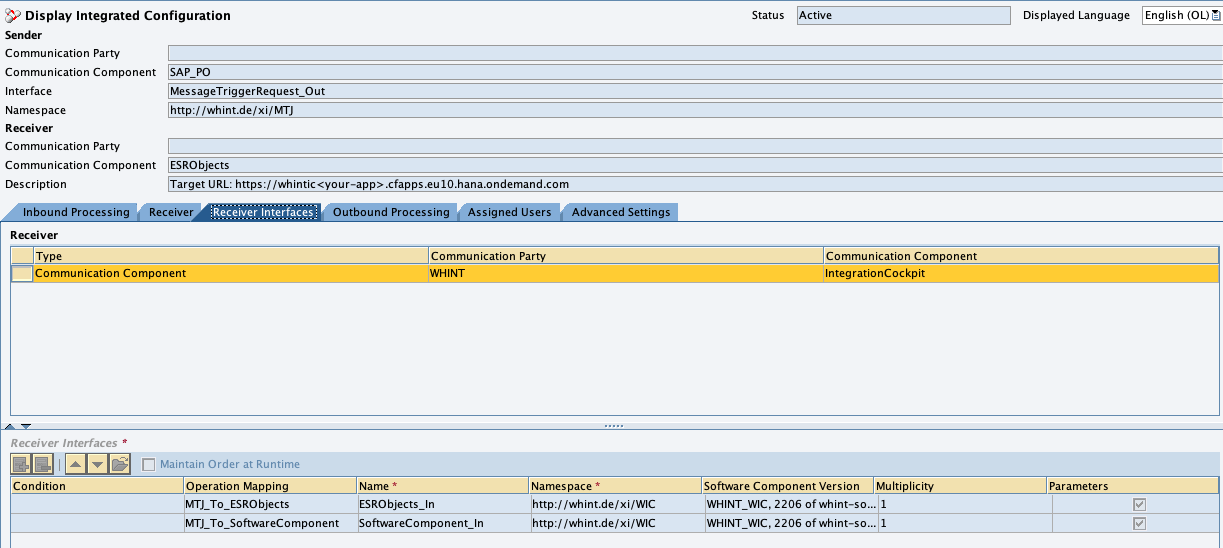
ESRObjects
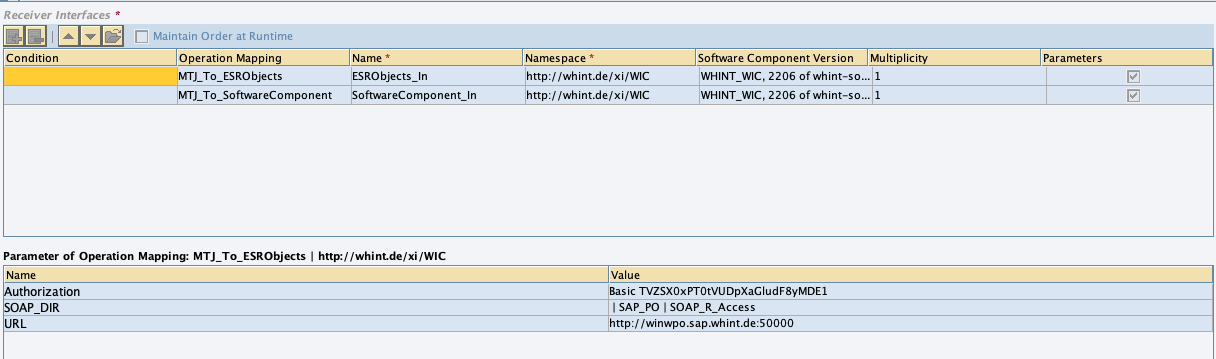
Parameter:
-
Authroization: Basic Auth Header
-
SOAP_DIR: | SAP_PO | SOAP_R_Access
-
URL: HostURL
SoftwareComponents
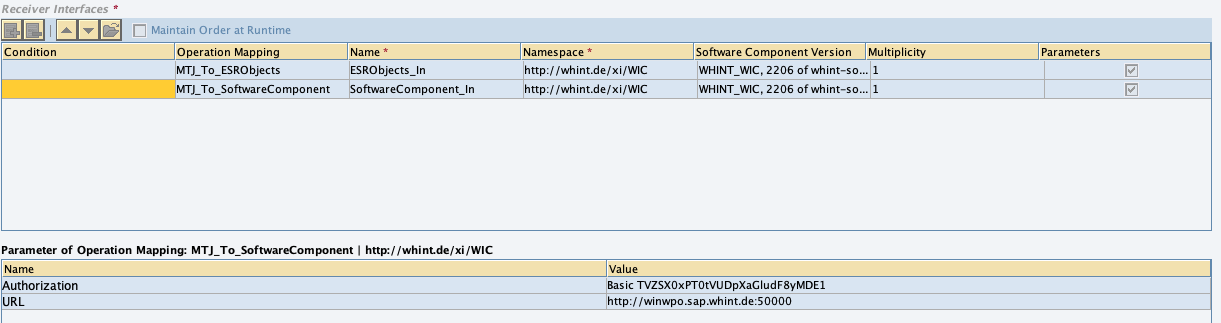
Parameter:
-
Authroization: Basic Auth Header
-
URL: HostURL
Data Source Setup
Step 1: Create Data Source
-
Go to Settings → Connectivity → Data Sources.
-
Click the “+” (Add) button in the top-right corner.
-
Enter the required values:
-
Name: e.g.
WPO -
Type:
SAP_PO -
Environment: e.g.
DEVELOPMENT
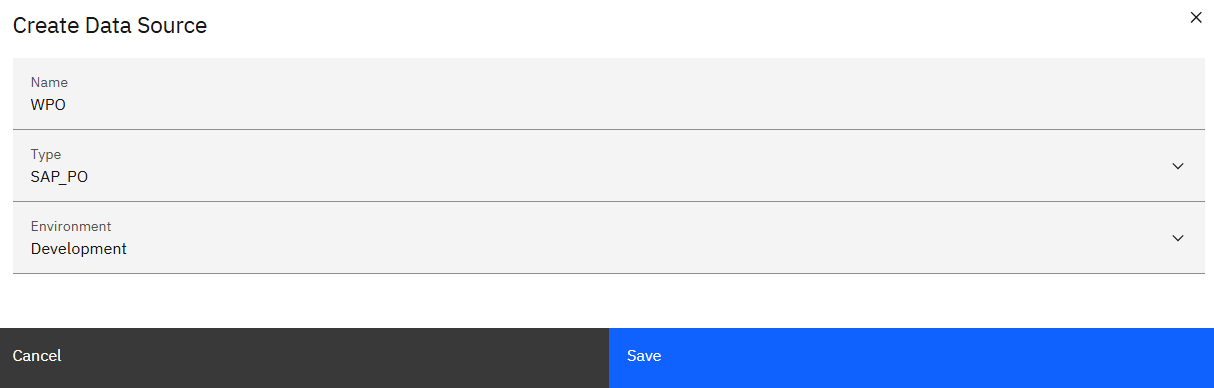
-
Click “Save”.
Step 2: Configure the Data Source
-
Configure the data source:
Connection Details
-
URL: e.g.
https://whintic-test.cfapps.eu10.hana.ondemand.com/inbound/pro -
Proxy: (not required)
Authentication
-
Select “BASICAUTH” and create new credentials by clicking “here” in the box below.
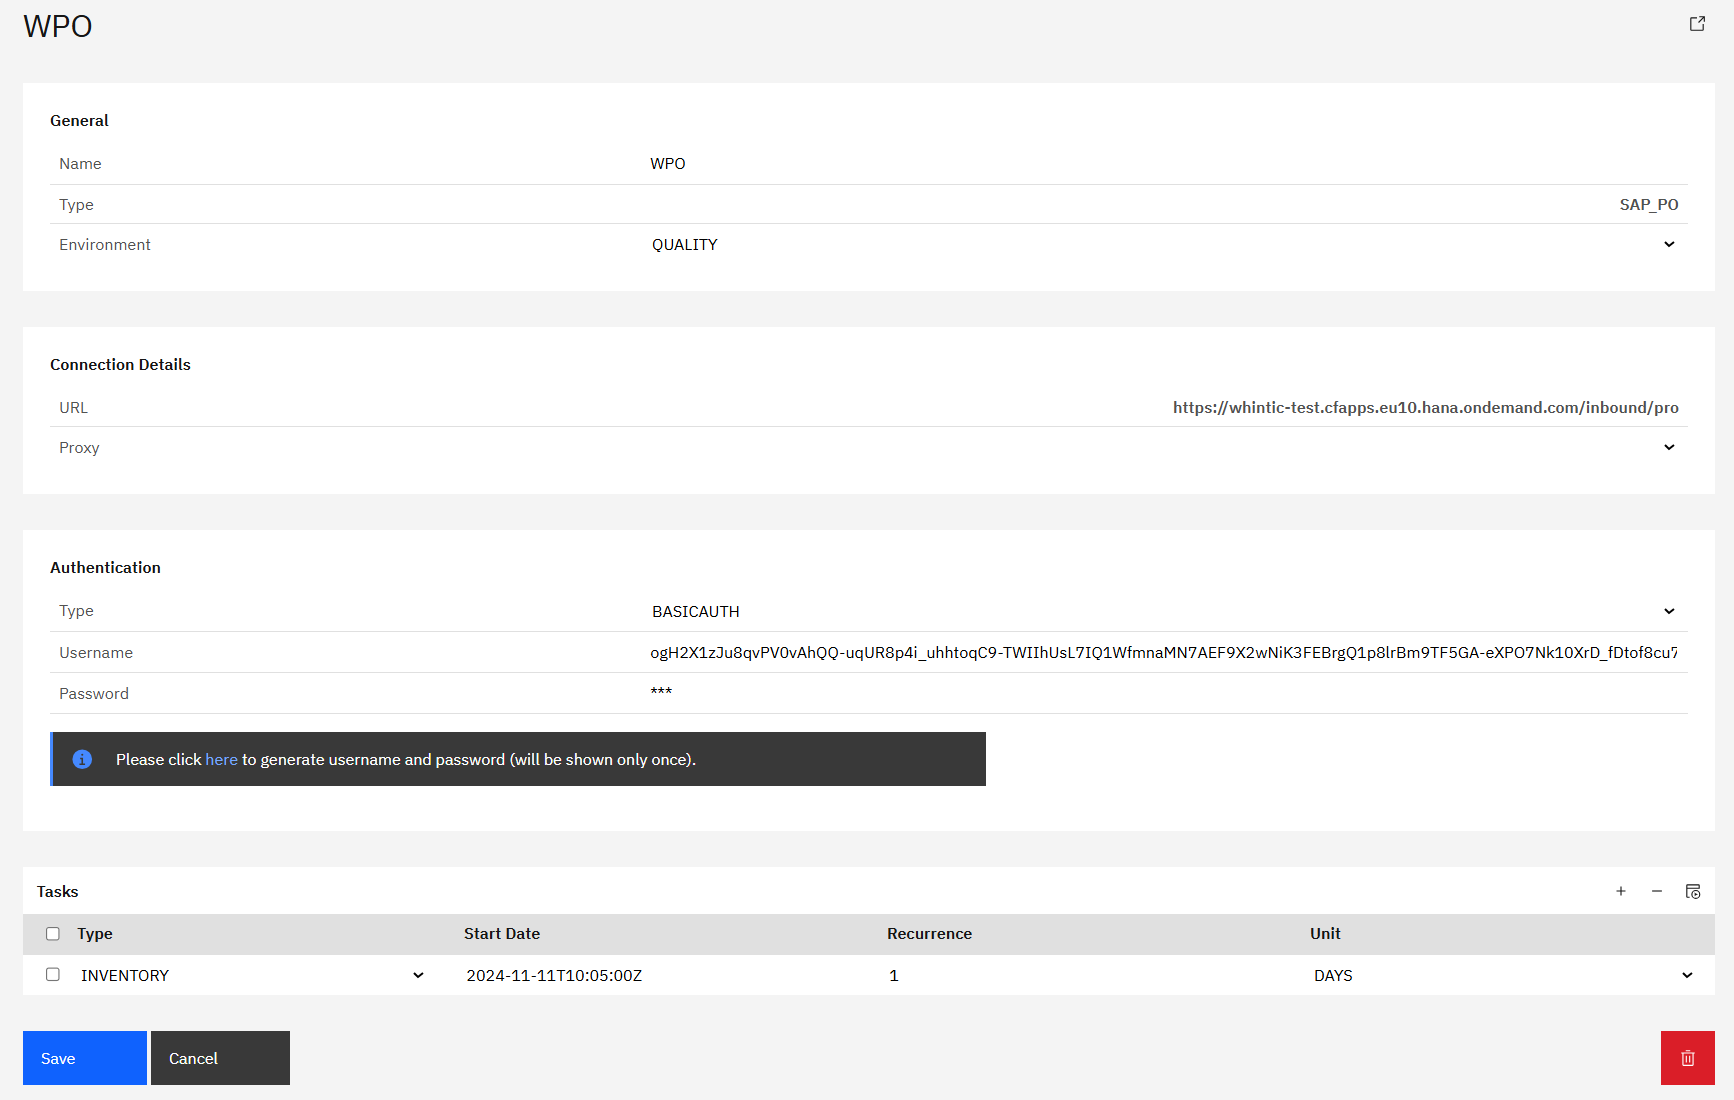
Basic Auth
When generating username and password, make sure to save it.
It will only be shown once!
-
In the Tasks section, click the “+” icon (top right of the table) to add the following tasks:
-
INVENTORY
-
UPDATE
-
-
Click “Save” to complete data source creation.
Step 3: Task Configuration
-
Start the task “INVENTORY” by selecting the checkbox next to it and clicking the “Start Task” icon.

-
Check your “Job Monitor” if the task is done or is still running under “Active Tasks”.

Recommended Task Schedule
|
Task |
Recommended Job Recurrence |
|---|---|
|
INVENTORY |
Every 1 day |
|
UPDATE |
Every 15 days |
1.1.5 Microsoft Azure
Service Key Setup
Before retrieving your Azure service key, ensure that your environment allows API access to Azure Monitor via the public endpoint. ㅤㅤㅤ
If your Azure Management Portal is not publicly accessible, connectivity may be routed via SAP Cloud Connector.
→ See the section “Restricted Azure Access” at the end of this setup panel.
Step 1: Create an Azure App Registration
-
Open the Azure Portal with an administrator account
-
Click on “App registrations” (or navigate to Azure Active Directory → App registrations)
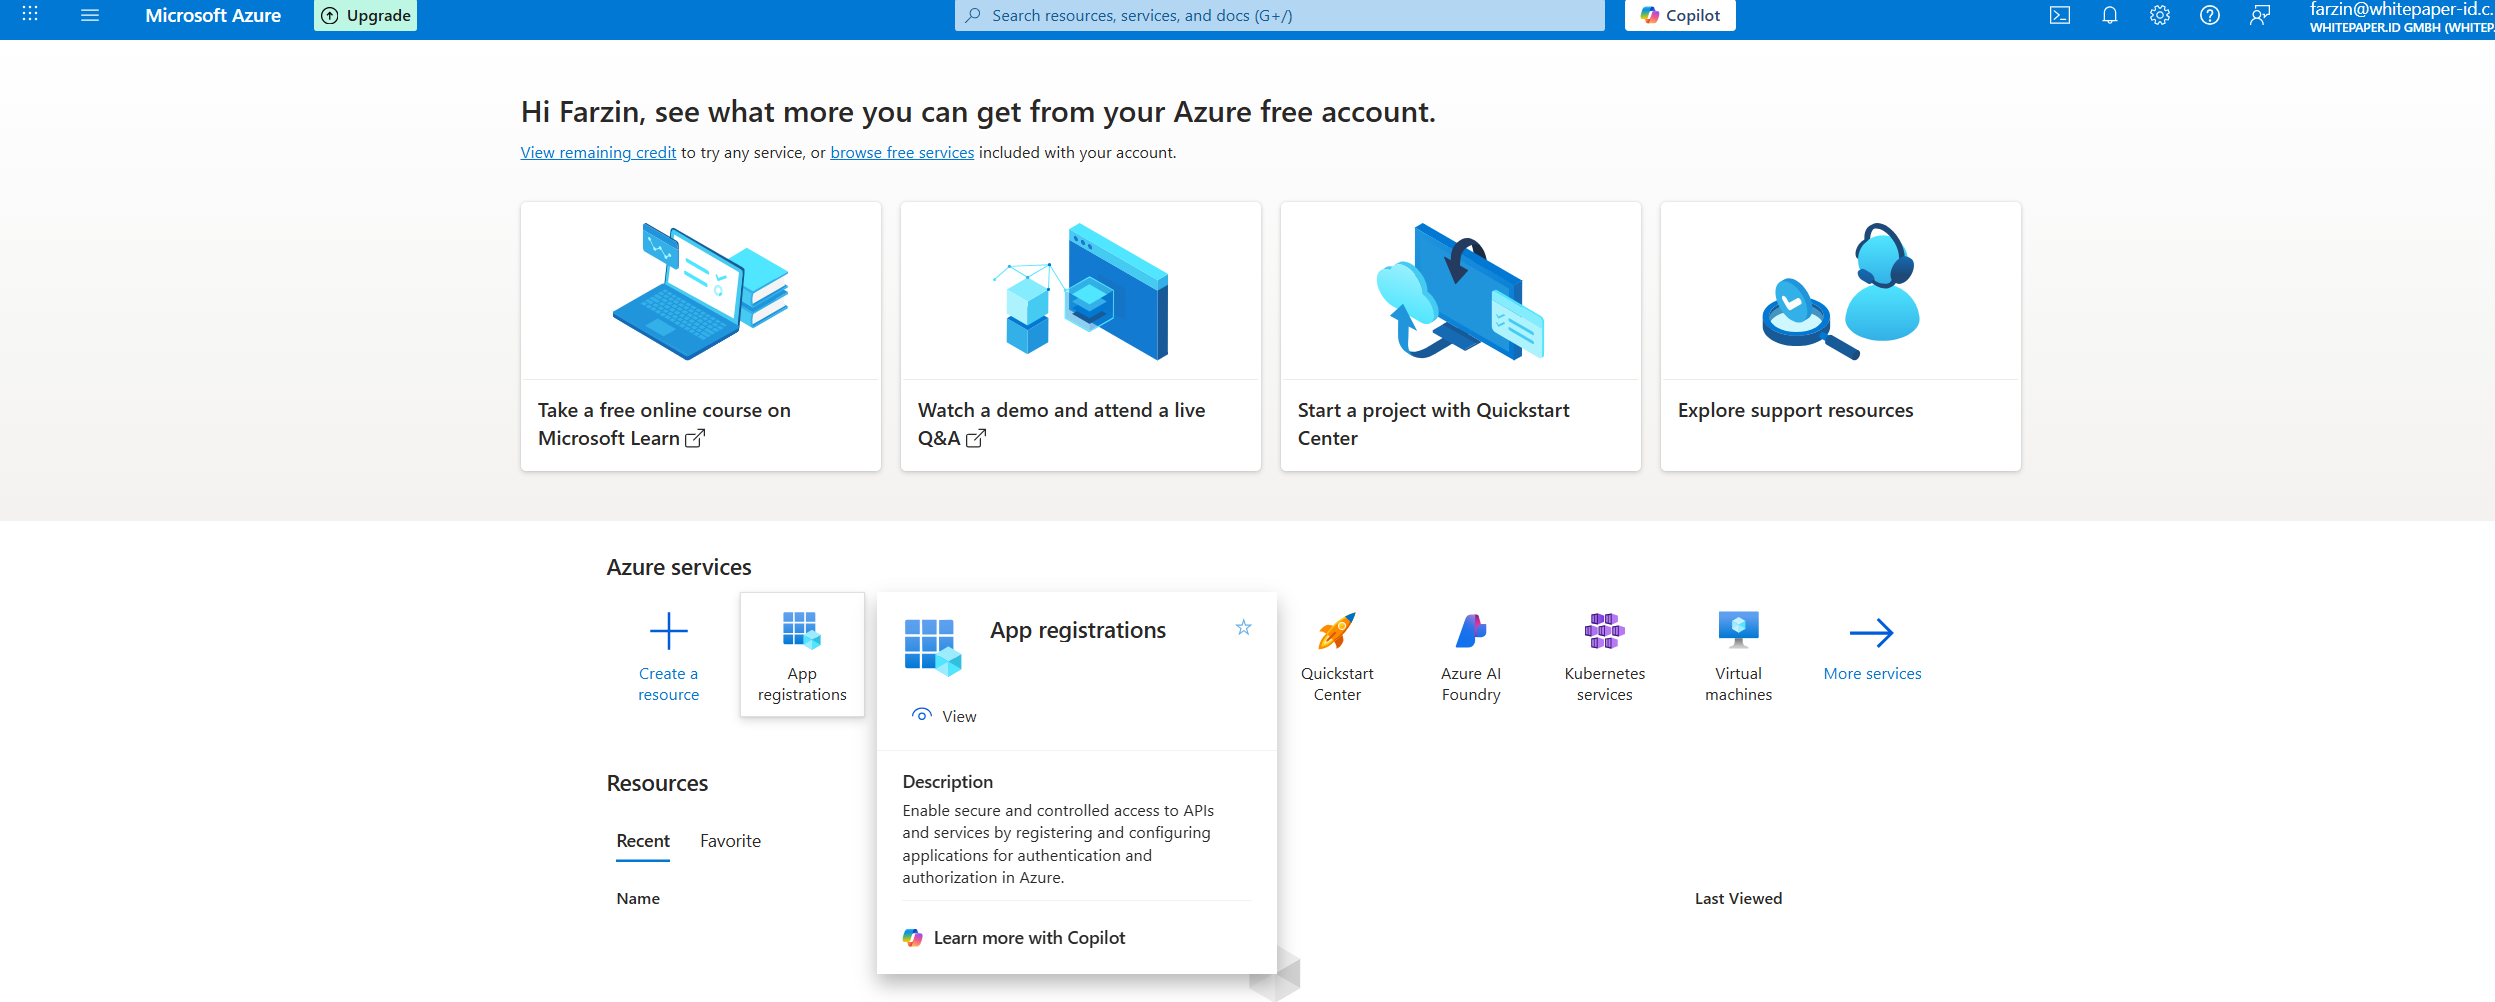
-
Click “New registration”
-
Name:
WHINT_IFM(example) -
Supported account types: All Microsoft account users
-
-
After creation, note the following values from the app’s Overview page - you’ll need these later:
-
Application (client) ID
-
Directory (tenant) ID
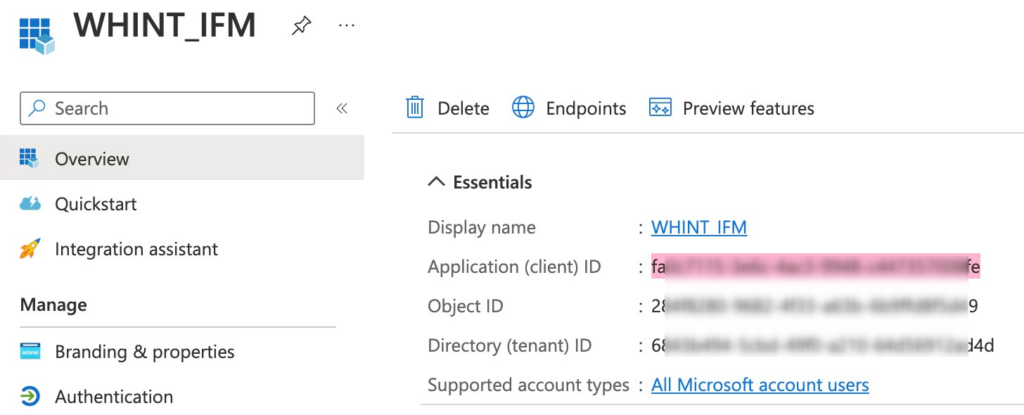
-
Step 2: Add API Permissions
-
Open the created App Registration
-
Go to API permissions
-
Click “+ Add a permission”
-
Under Microsoft APIs, select:
-
API: “Azure Service Management”
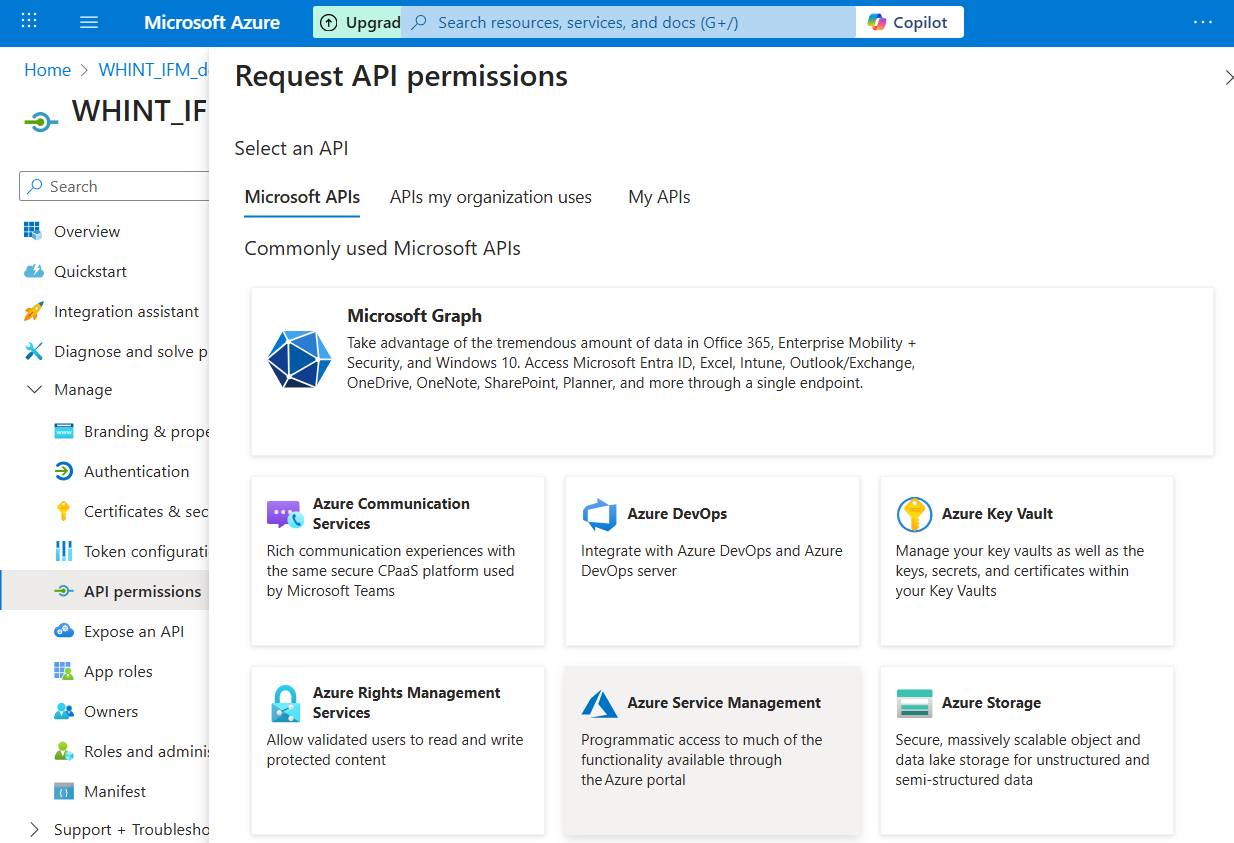
-
-
Click “Add permissions”
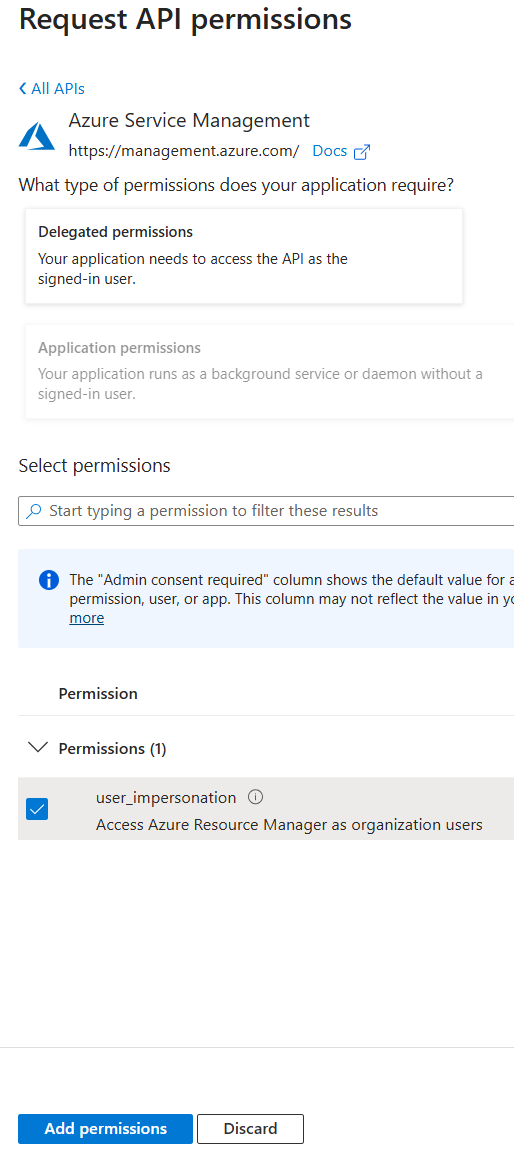
-
Click Grant admin consent (if required)
Step 3: Assign Azure Role
-
Navigate to Subscriptions → select your subscription (e.g.
ISV) -
Go to Access control (IAM) → Role assignments
-
Click + Add > Add role assignment
-
Assign the following:
-
Role:
Monitoring Reader(minimum required for Azure Monitor API)-
Alternatively:
Reader
-
-
Assign access to: App → select your App Registration (e.g.
WHINT_IFM)
-

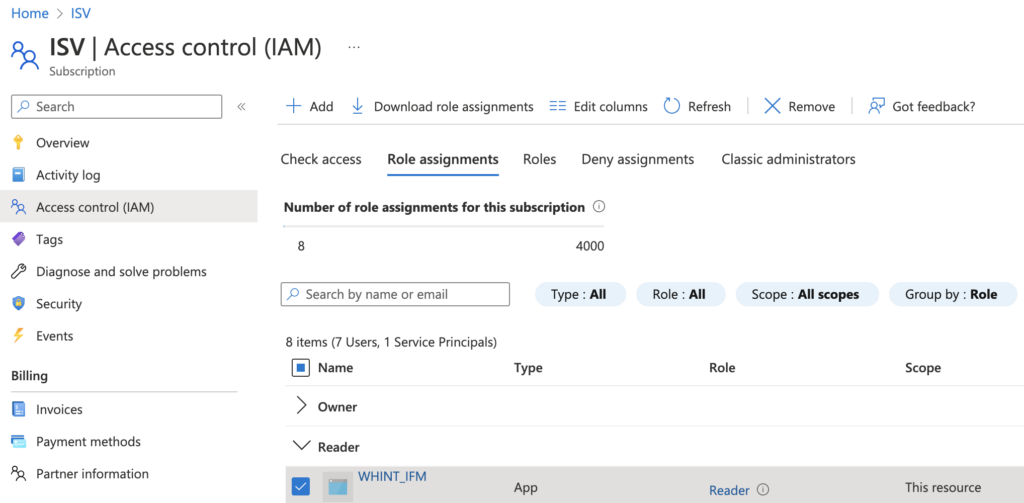
TheMonitoring Reader role provides read-only access to monitoring data across Azure resources and is sufficient for metric queries.
It is more restrictive than the general Reader role and recommended for security-sensitive environments.
Step 4: Create a Client Secret
-
In the App Registration, go to “Certificates & secrets”
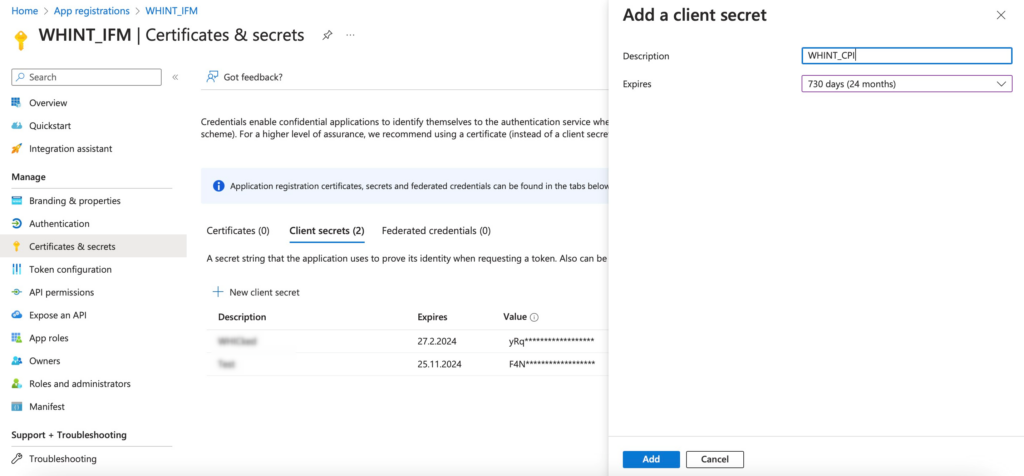
-
Click “+ New client secret”
-
Description: e.g.
WHINT_CPN -
Expiry:
730 days(example)
-
-
Click “Add”
-
Copy and store the secret value immediately – it will not be shown again after leaving the page
Store the secret securely. This will be used to authenticate via OAuth2.
Provide the following credentials to WHINT:
-
Token Service URL
https://login.microsoftonline.com/<tenantID>>/oauth2/v2.0/token -
Client ID
→ From Step 1 -
Client Secret
→ From Step 4
Restricted Azure Access
If your Azure Monitor endpoint is not publicly accessible (e.g. due to a private endpoint), API access from SAP BTP may require custom network routing.
One possible option is to expose the following endpoint via SAP Cloud Connector:
https://management.azure.com
This is a nonstandard setup and should only be implemented by experienced network/security teams.
Please contact your cloud administrator and WHINT Support before attempting this configuration.
Data Source Setup
Step 1: Create Data Source
-
Navigate to Settings → Connectivity → Data Sources.
-
Click “+” Add.

-
Enter the required values:
-
Name: e.g.
WHINT Azure -
Type:
MICROSOFT_AZURE -
Category: e.g.
DEVELOPMENT
-
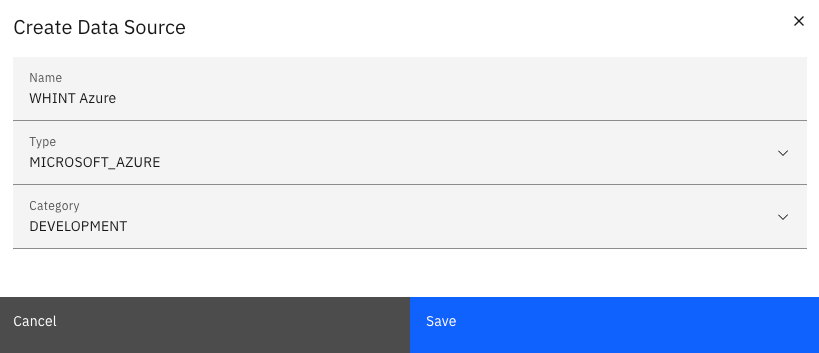
-
Click “Save”.
Step 2: Configure the Data Source
-
Configure the data source with the credentials obtained during the App Registration process:
Connection Details
-
Tenant: Enter the Azure Tenant ID (from App Registration – Directory (tenant) ID)
-
Features: Select one or more Azure-specific features to be shown in the cockpit
-
Proxy: (Not required)
Authentication
-
Type: Select
OAUTH2
Enter the credentials from your Azure App Registration:-
Client ID: From App Registration → Application (client) ID
-
Client Secret: From created Client Secret in Certificates & secrets
-
Token URL:
https://login.microsoftonline.com/<tenantID>/oauth2/v2.0/token -
Scope:
https://management.azure.com/.default
-
-
In the Tasks section, click the “+” icon (top right of the table) to add the following tasks:
-
Configuration
-
Inventory
-
Runtime
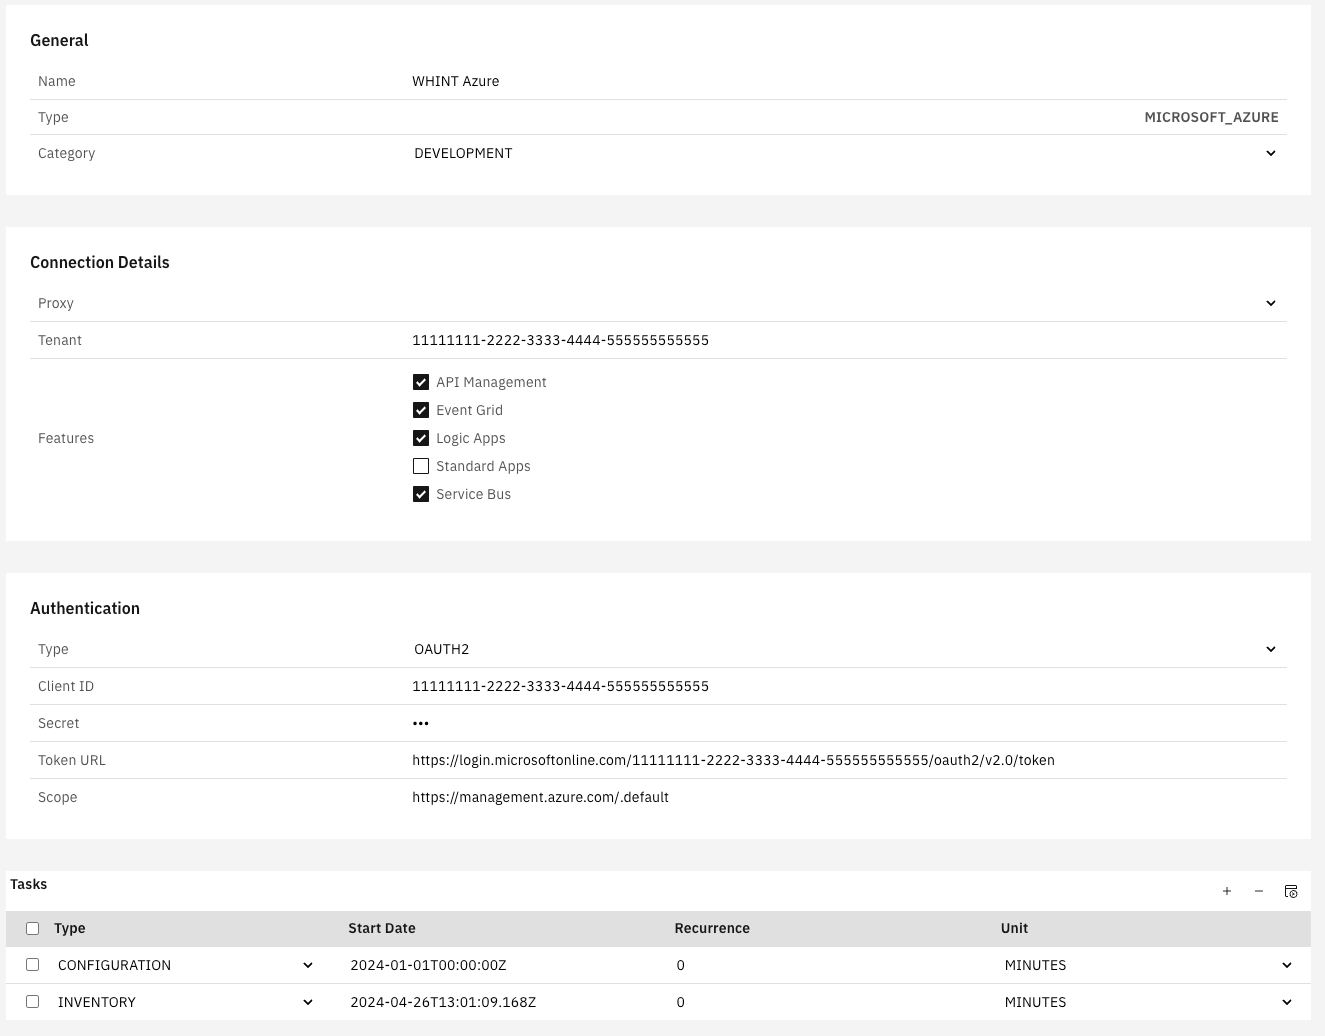
-
Click “Save” to complete data source creation.
Step 3: Task Configuration
-
Start the task “CONFIGURATION” by selecting the checkbox next to it and clicking the “Start Task” icon.
Execute the following tasks in the specified order:
-
CONFIGURATION - Reads all raw data into the database
-
RUNTIME - Reads traffic information from the tenant
-
INVENTORY - Pushes the raw data into the inventory
Run tasks one at a time and monitor each task completion in the Job Monitor before proceeding to the next step.
-
Check your Job Monitor to verify whether the task has completed or is still listed under “Active Tasks”.
Important
Ensure a delay of at least 2–3 hours between CONFIGURATION and INVENTORY to prevent overlapping. CONFIGURATION may take longer to complete.
Recommended Task Schedule
|
Task |
Recommended Job Recurrence |
|---|---|
|
CONFIGURATION |
Every 1 day |
|
INVENTORY |
Every 1 day |
|
RUNTIME |
Every 1 day |
Result
Your Azure Monitor data source is now configured and ready for use.
Monitor task execution regularly through the Job Monitor.
Restricted Azure Access
If your Azure Monitor endpoint is not publicly accessible (e.g. due to a private endpoint), API access from SAP BTP may require custom network routing.
One possible option is to expose the following endpoint via SAP Cloud Connector:
https://management.azure.com
This is a nonstandard setup and should only be implemented by experienced network/security teams.
Please contact your cloud administrator and WHINT Support before attempting this configuration.
1.1.6 MuleSoft Anypoint Platform
Client ID / Client Secret Generation
Create / register connected App
-
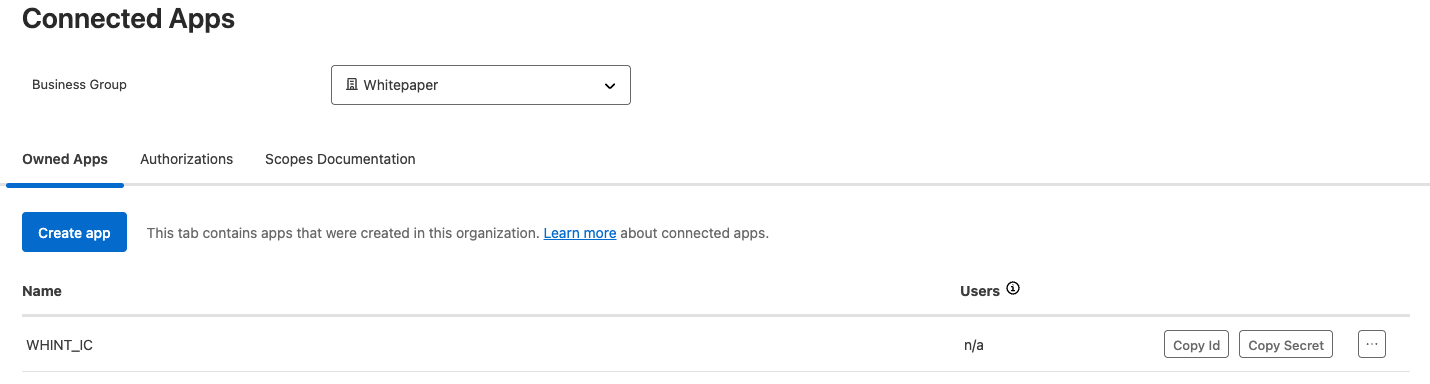
In the Anypoint Platform got to “Access Management → Connected Apps”
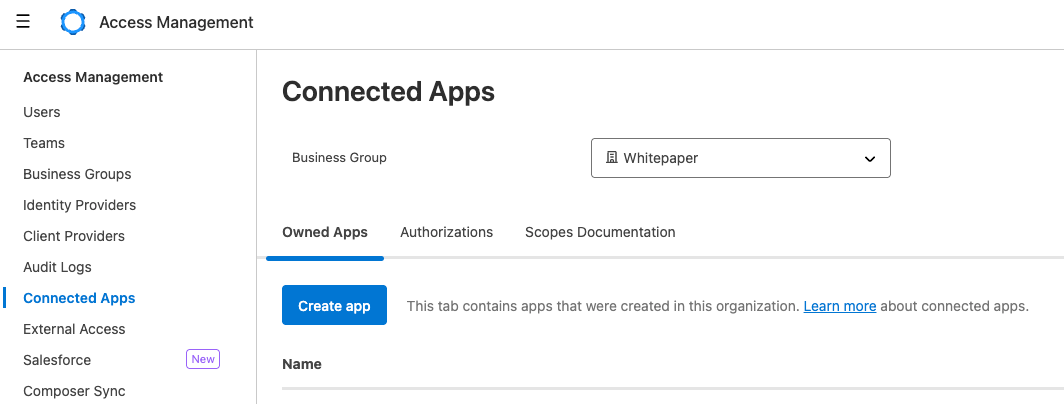
-
Click “Create app”
-
Enter the Details for the connected application.
-
Choose a “Name” for the App and select “App acts on its own behalf (client credentials)”
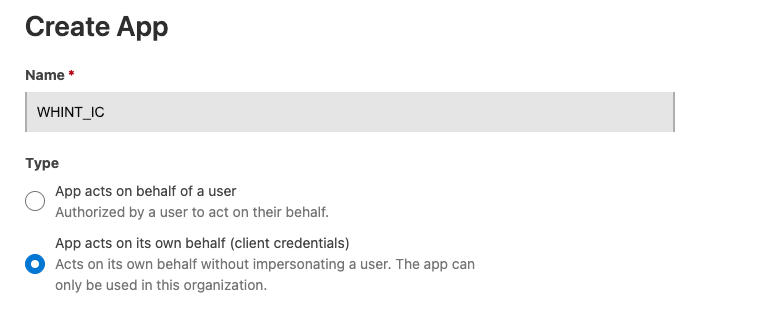
-
Select “Add Scopes”, select all necessary scopes and click “Next”
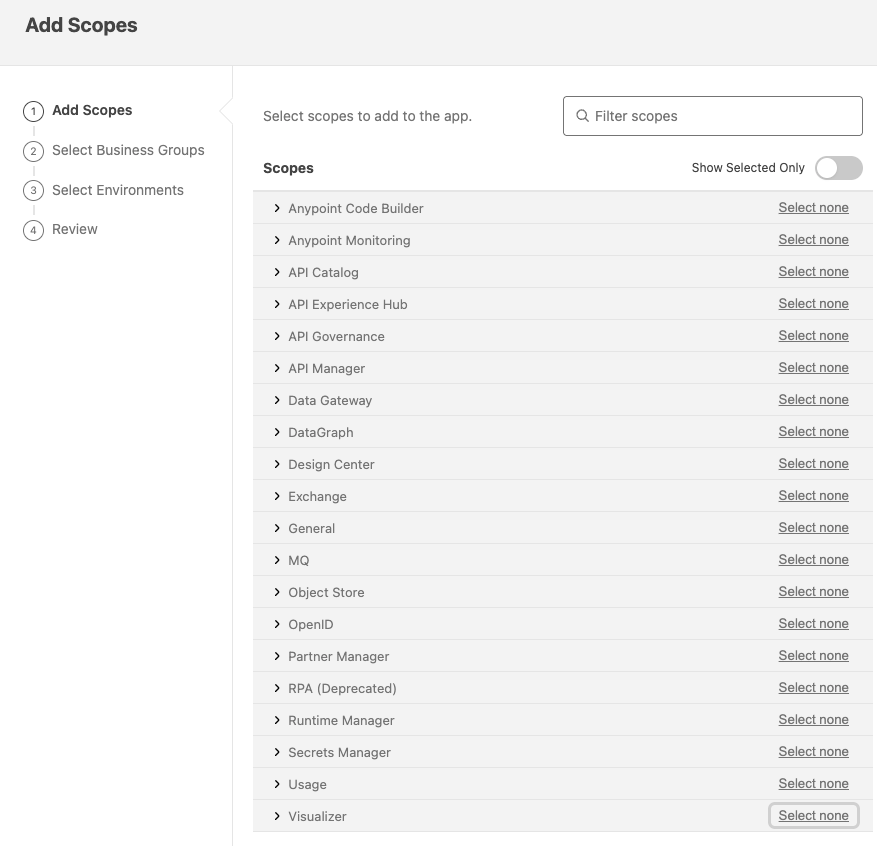
-
In the next step choose the “Business Group”
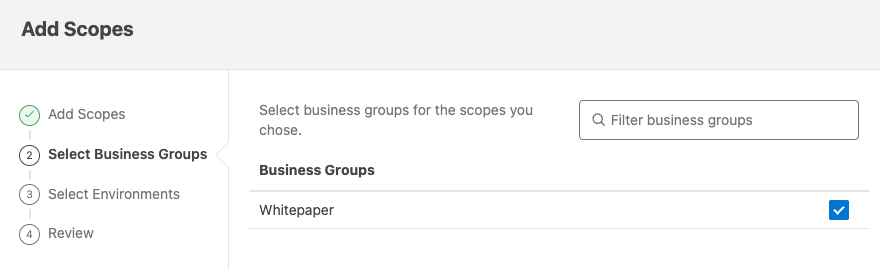
-
Select the “environments” which should be available for the credentials.

-
Check the review and select “Add Scopes” to save the settings.
-
-
To save the credentials select “Save” at the bottom.
-
The new created app will be shown in the overview.
-
Click on “Copy Id” and “Copy Secret” and save them.
For the next Step, Data Source Creation use the appropriate token URL based on your Anypoint region.
Format:
https://{region}.anypoint.mulesoft.com/accounts/api/v2/oauth2/token
Examples:
https://anypoint.mulesoft.com/accounts/api/v2/oauth2/token (default/global region) or https://eu1.anypoint.mulesoft.com/accounts/api/v2/oauth2/token (EU region)
Data Source Setup
Step 1: Create Data Source
-
Navigate to Settings → Connectivity → Data Sources.
-
Click “+” Add.
-
Enter the required values:
-
Name: e.g.
Mulesoft -
Type:
MULESOFT_ANYPOINT -
Category: e.g.
DEVELOPMENT
-

-
Click “Save”.
Step 2: Configure the Data Source
-
Configure the data source with the credentials obtained earlier:
Connection Details
-
Hostname: without
http(s)://(e.g.anypoint.mulesoft.com) -
Proxy: (Optional) Provide only if required by your network setup
Authentication
-
Type:
OAUTH2 -
Client ID: Enter the Client ID from the Connected App
-
Secret: Enter the Client Secret from the same Connected App
-
Token URL: Use the appropriate token URL based on your Anypoint region.
https://{region}.anypoint.mulesoft.com/accounts/api/v2/oauth2/tokenExamples:
-
https://anypoint.mulesoft.com/accounts/api/v2/oauth2/token -
https://eu1.anypoint.mulesoft.com/accounts/api/v2/oauth2/token
-
-
Scope: (Optional - leave empty unless specified by Anypoint client configuration)
-
In the Tasks section, click the “+” icon (top right of the table) to add the following tasks:
-
Configuration
-
Inventory
-
Runtime
-
-
Click “Save” to complete the setup.
Step 3: Task Configuration
-
Start the task “CONFIGURATION” by selecting the checkbox next to it and clicking the “Start Task” icon.

Execute the following tasks in the specified order:
-
CONFIGURATION - Reads all raw data into the database
-
INVENTORY - Pushes the raw data into the inventory
Run tasks one at a time and monitor each task completion in the Job Monitor before proceeding to the next step.
-
Check your “Job Monitor” if the task is done or is still running under “Active Tasks”.

Recommended Task Schedule
|
Task |
Recommended Job Recurrence |
|---|---|
|
CONFIGURATION |
Every 1 day |
|
INVENTORY |
Every 1 day |
Important
Ensure a delay of at least 2–3 hours between CONFIGURATION and INVENTORY to prevent overlapping. CONFIGURATION may take longer to complete.
Result
Your data source is now configured and ready for use.
Monitor task execution regularly through the Job Monitor.
1.2 Backend Systems
1.2.1 SAP ABAP Systems
SAP Cloud Connector (SCC) - Data Source Setup
This section guides you through creating a data source for direct connection to your SAP ABAP systems via SAP Cloud Connector using HTTP(S) and SOAP-RFC.
Applicable Deployment Models
WHINT-hosted in WHINT BTP Subaccount
-
1.1.1 - direct connection via SOAP-RFC + HTTPS
Customer-managed in Own BTP Subaccount
-
2.1.1 - direct connection via SOAP-RFC + HTTPS
Step 1: Create Data Source
-
Navigate to Settings → Connectivity → Data Sources.
-
Click “+” Add.

-
Enter the required values:
-
Name: e.g.
ALM -
Type:
SAP_ABAP -
Environment: e.g.
DEVELOPMENT
-
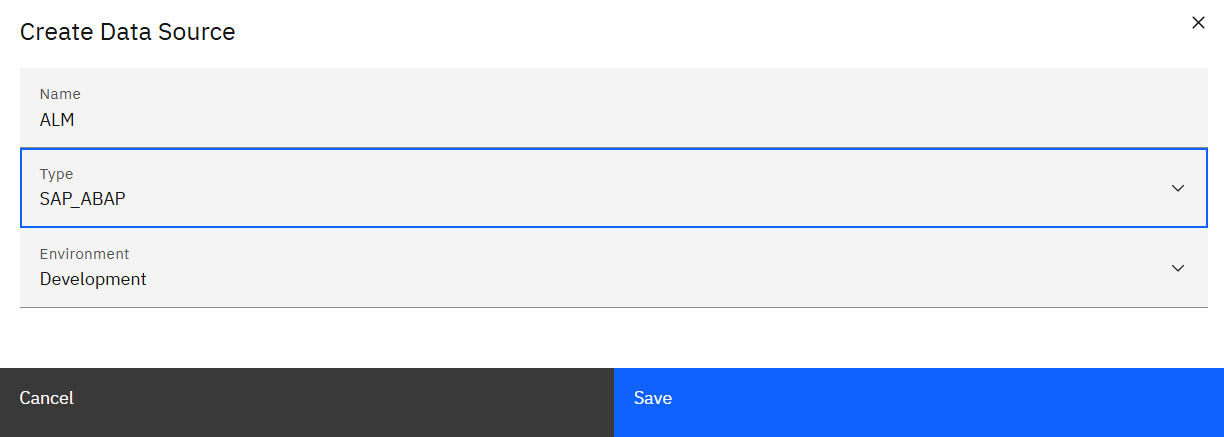
-
Click “Save”.
Step 2: Configure the Data Source
-
Configure the data source with your technical user credentials:
Connection Details
-
Features: Check all applicable (e.g. IDocs, Files, SOAP Services, OData Services, etc.)
-
System: Enter your SAP system ID (e.g.
ALM) -
Client: Enter the client number (e.g.
001) -
Type:
HTTP -
URL: Enter your SAP system's internal URL and port (e.g
http://winalm.sap.whint.de:50000) -
Proxy: Select your Cloud Connector proxy configuration (e.g.
SAP CloudConnector WPO)
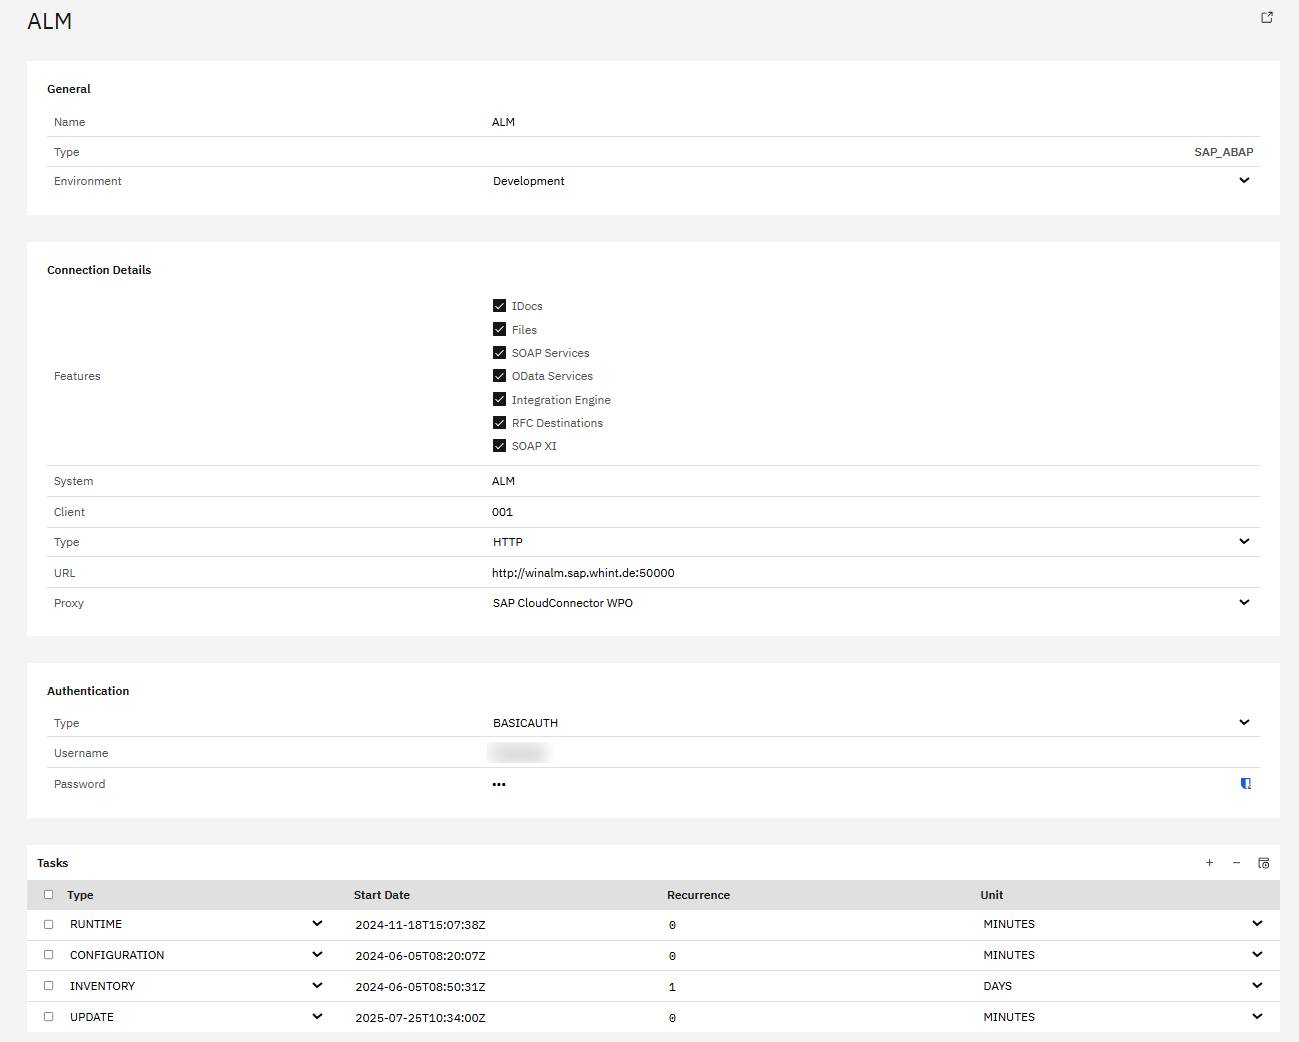
Authentication
-
Type:
BASICAUTH -
Username: Enter your technical user (e.g.
WHINT) -
Password: Enter the corresponding password
-
In the Tasks section, click the "+" icon (top right of the table) to add the following tasks:
-
RUNTIME
-
INVENTORY
-
CONFIGURATION
-
-
Click "Save" to complete the setup.
Step 3: Task Configuration
-
Start the task "CONFIGURATION" by selecting the checkbox next to it and clicking the "Start Task" icon.

Execute the following tasks in the specified order:
-
CONFIGURATION - Reads all raw data into the database
-
RUNTIME - Reads traffic information from the tenant
-
INVENTORY - Pushes the raw data into the inventory
Run tasks one at a time and monitor each task completion in the Job Monitor before proceeding to the next step.
-
Check your “Job Monitor” if the task is done or is still running under “Active Tasks”.
Recommended Task Schedule
|
Task |
Recommended Job Recurrence |
|---|---|
|
CONFIGURATION |
Every 1 day |
|
INVENTORY |
Every 1 day |
|
RUNTIME |
Every 2–5 hours |
Important
Ensure a delay of at least 2–3 hours between CONFIGURATION and INVENTORY to prevent overlapping. CONFIGURATION may take longer to complete.
Result
Your data source is now configured and ready for use. Monitor task execution regularly through the Job Monitor.
SAP Cloud Integration (CPI) - Data Source Setup
This section guides you through creating a data source for proxy connection to your SAP ABAP systems via SAP Cloud Integration, using either RFC-based or HTTP-based connectivity options.
Before starting: Ensure the WHINT Integration Cockpit package is imported and deployed in CPI with both integration flows active (WHINT WIC BACKEND GATEWAY + RFC).
-20250808-112258.png?cb=90c18fa73ecb56a90203491fd93485ab)
Applicable Deployment Models
WHINT-hosted in WHINT BTP Subaccount
-
1.2.1 - via SAP Cloud Integration (CPI) and SOAP-RFC + HTTPS
-
1.2.2 - via SAP Cloud Integration (CPI) and RFC + HTTPS
Customer-managed in Own BTP Subaccount
-
2.2.1 - via SAP Cloud Integration (CPI) and SOAP-RFC + HTTPS
-
2.2.2 - via SAP Cloud Integration (CPI) and RFC + HTTPS
Prerequisites
When using SAP CPI with SAP_CPI type configuration, you must implement the provisioned package and deploy the WHINT WIC Backend Gateway and WHINT WIC Backend Gateway RFC integration flow in your CPI tenant. Before configuring either connectivity Option A (recommended) or Option B, ensure:
-
The WHINT Integration Cockpit package is implemented in your CPI tenant
-
Both integration flows are deployed and active:
-
WHINT WIC Backend Gateway RFC - Used for RFC communication (Option A)
-
WHINT WIC Backend Gateway - Used for HTTP/SOAP-RFC communication (Option B)
-
Why RFC is recommended: Better performance and SAP generally recommends RFC over SOAP-RFC for security reasons (see SAP Note 131403).
Connectivity Options
Your CPI configuration supports multiple connectivity options:
Option A: RFC + HTTPS (Models 1.2.2, 2.2.2) - Recommended
-
Type Configuration:
SAP_CPI -
Integration Flow: WHINT WIC Backend Gateway RFC
Option B: SOAP-RFC + HTTPS (Models 1.2.1, 2.2.1)
-
Type Configuration:
SAP_CPI -
Integration Flow: WHINT WIC Backend Gateway (SOAP-RFC variant)
Data Source Setup - Option A: RFC + HTTPS
Step 1: Create Data Source
-
Navigate to Settings → Connectivity → Data Sources.
-
Click “+” Add.

-
Enter the required values:
-
Name: e.g.
ALM via SAP CPI (RFC) -
Type:
SAP_ABAP -
Environment: e.g.
DEVELOPMENT
-

-
Click “Save”.
Step 2: Configure the Data Source
-
Configure the data source with your technical user credentials:
Connection Details
-
Features: Check all applicable (e.g. IDocs, Files, SOAP Services, OData Services, Integration Engine, RFC Destinations, SOAP XI)
-
System: Enter your SAP system ID (e.g.
ALM) -
Client: Specify the client number (e.g.
001) -
Type:
SAP_CPI -
URL: Enter your URL
e.g.https://xxxx-iflmap.hcisbp.eu1.hana.ondemand.com/http/whint/wic/rfc -
RFC Destination: e.g.
RFC_ALM_001 -
Host: (leave empty)
-
Port: (leave empty)
-
User: (leave empty)
-
Proxy: (not required)
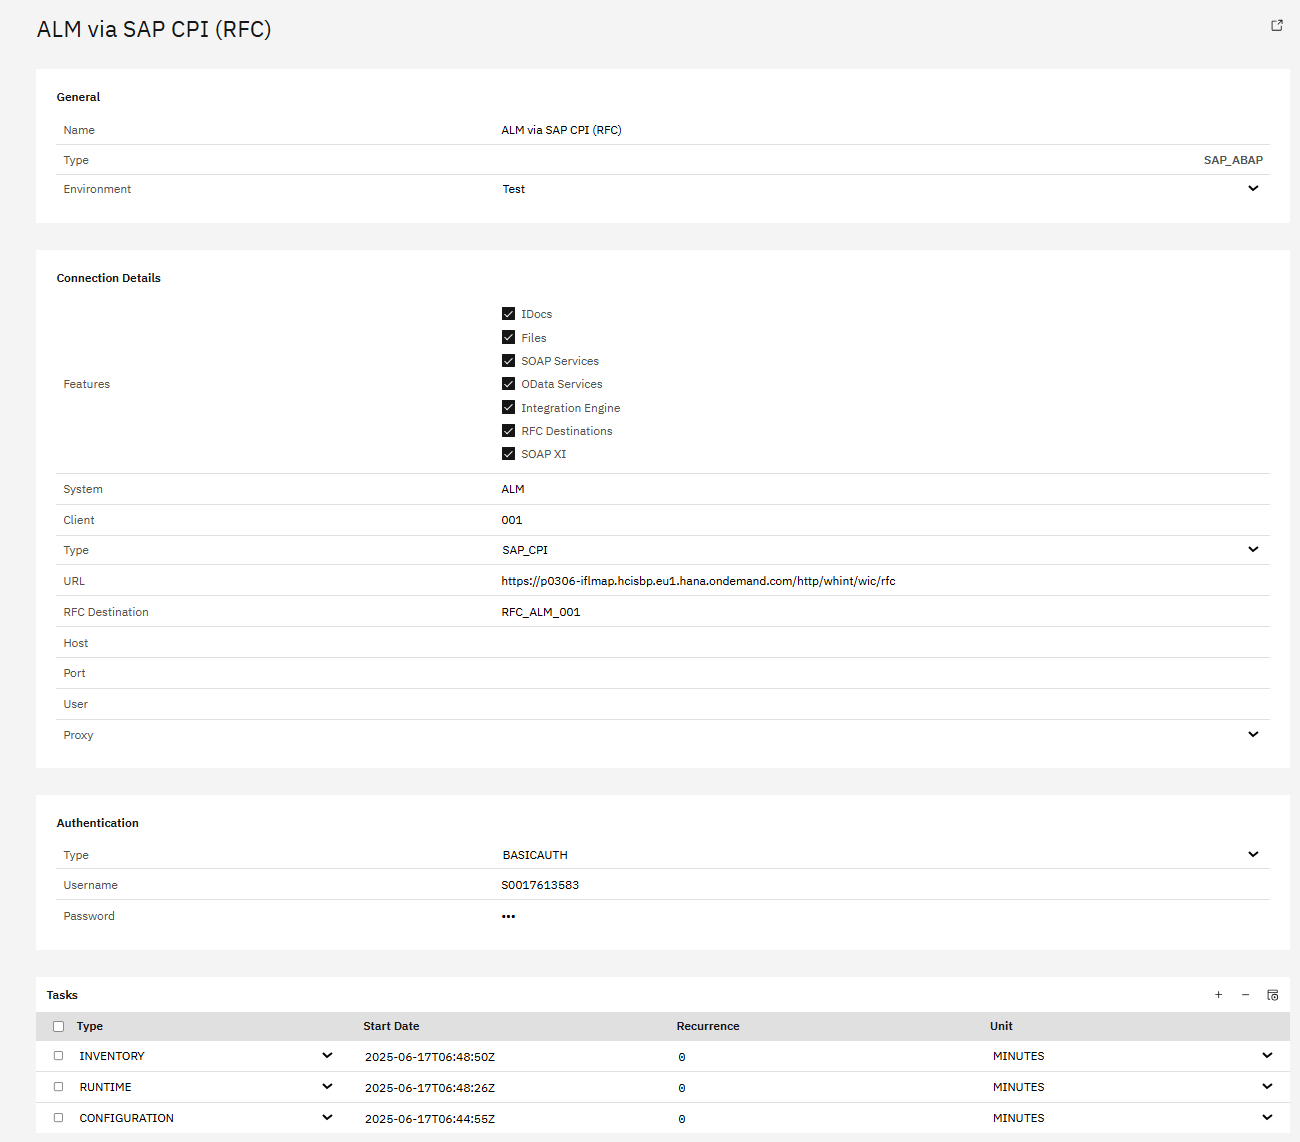
Authentication
-
Type:
BASICAUTH -
Username: Enter your Username here (e.g.
WHINT) -
Password: Enter the corresponding password
-
In the Tasks section, click the "+" icon (top right of the table) to add the following tasks:
-
RUNTIME
-
INVENTORY
-
CONFIGURATION
-
-
Click "Save" to complete the setup.
Data Source Setup - Option B: SOAP-RFC + HTTPS
Step 1: Create Data Source
-
Navigate to Settings → Connectivity → Data Sources.
-
Click “+” Add.

-
Enter the required values:
-
Name: e.g.
ALM via SAP CPI (HTTP) -
Type:
SAP_ABAP -
Environment: e.g.
DEVELOPMENT
-
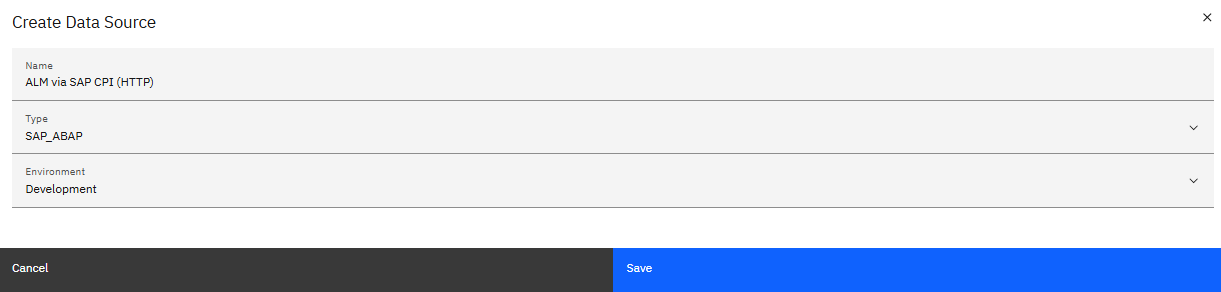
-
Click “Save”.
Step 2: Configure the Data Source
-
Configure the data source with your technical user credentials:
Connection Details
-
Features: Check all applicable (e.g. IDocs, Files, SOAP Services, OData Services, Integration Engine, RFC Destinations, SOAP XI)
-
System: Enter your SAP system ID (e.g.
ALM) -
Client: Specify the client number (e.g.
001) -
Type:
SAP_CPI -
URL: Enter your URL
e.g.https://xxxx-iflmap.hcisbp.eu1.hana.ondemand.com/http/whint/wic/http -
RFC Destination: (leave empty)
-
Host: e.g.
winalm.sap.whint.de -
Port: (leave empty)
-
User: Enter your technical user e.g.
SAPALM -
Proxy: (not required)
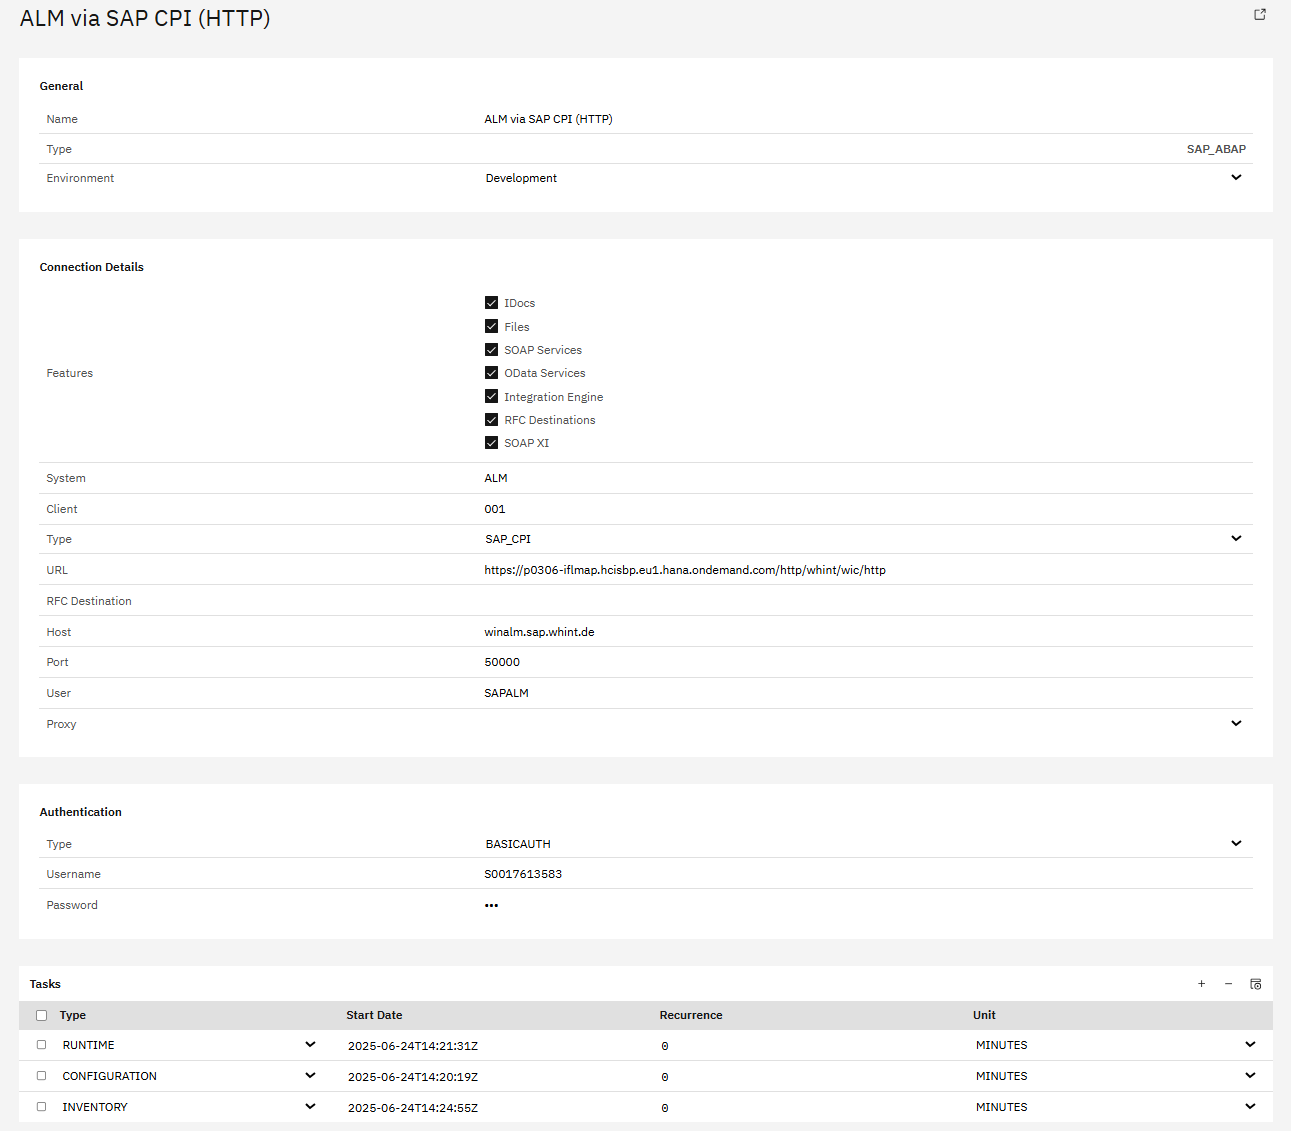
Authentication
-
Type:
BASICAUTH -
Username: Enter your Username here (e.g.
WHINT) -
Password: Enter the corresponding password
-
In the Tasks section, click the "+" icon (top right of the table) to add the following tasks:
-
RUNTIME
-
INVENTORY
-
CONFIGURATION
-
-
Click "Save" to complete the setup.
Step 3: Task Configuration
-
Start the task "CONFIGURATION" by selecting the checkbox next to it and clicking the "Start Task" icon.

Execute the following tasks in the specified order:
-
CONFIGURATION - Reads all raw data into the database
-
RUNTIME - Reads traffic information from the tenant
-
INVENTORY - Pushes the raw data into the inventory
Run tasks one at a time and monitor each task completion in the Job Monitor before proceeding to the next step.
-
Check your “Job Monitor” if the task is done or is still running under “Active Tasks”.

Recommended Task Schedule
|
Task |
Recommended Job Recurrence |
|---|---|
|
CONFIGURATION |
Every 1 day |
|
INVENTORY |
Every 1 day |
|
RUNTIME |
Every 2–5 hours |
Important
Ensure a delay of at least 2–3 hours between CONFIGURATION and INVENTORY to prevent overlapping. CONFIGURATION may take longer to complete.
Result
Your data source is now configured and ready for use. Monitor task execution regularly through the Job Monitor.
1.3 Jira & Confluence
API Access Token Setup (Jira & Confluence)
Create an API Token
-
Go to https://id.atlassian.com/manage-profile/security/api-tokens
-
Click “Create API token”
-
Enter a name (e.g.
WHINT_Jira_Integration) and click on “Create”
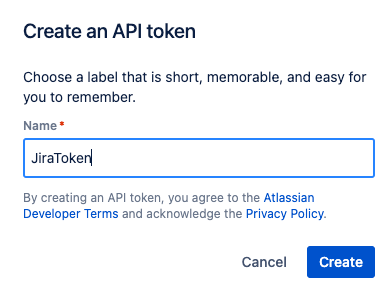
-
Save the token.
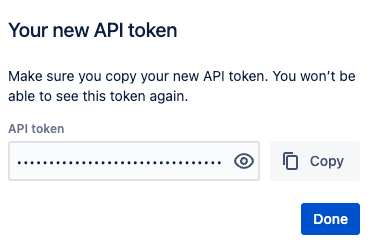
Copy and store the token immediately - it will only be shown once
-
You will see the new token in your token list

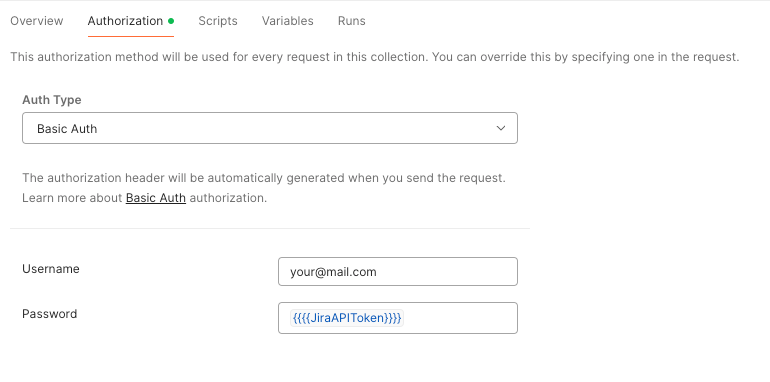
Use the access token:
Type: Basic
Username: Your Jira account email address
Password: The API token you just created
Example: Test Credentials via Postman Authorization Header (optional)
Authorization: Basic base64encode(username:token)
Replace
username:tokenwith your email address and the API token, encoded in Base64.
Jira Data Source Setup
Step 1: Create Data Source
-
Navigate to Settings → Connectivity → Data Sources.
-
Click “+” Add.
-20250723-095627.png?cb=e94c96aea33a37f1361b0f8342f15be7)
-
Enter the required values:
-
Name: e.g.
WHINT_Jira -
Type: Choose
Jira -
Category: e.g.
DEVELOPMENT
-
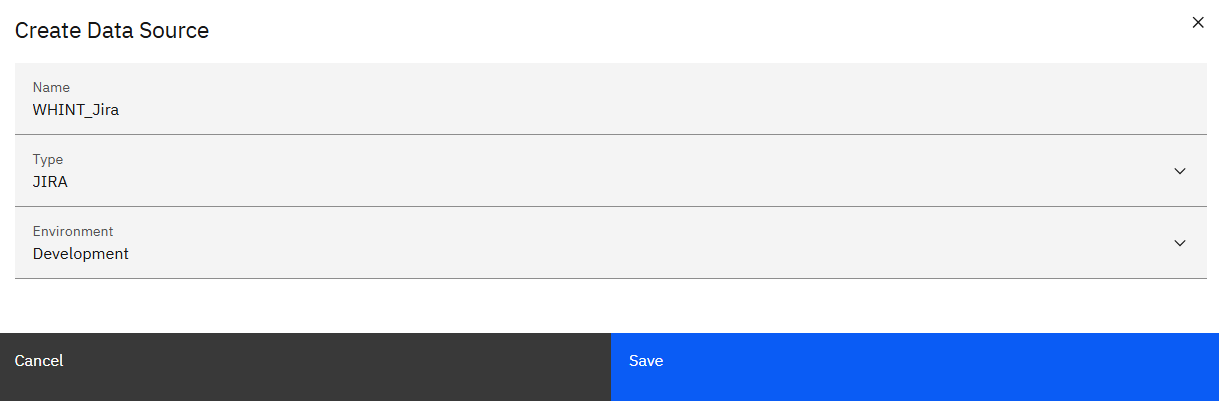
-
Click “Save”.
Step 2: Configure the Data Source
-
Configure the data source using your Atlassian credentials obtained earlier:
Connection Details
-
Hostname: Base URL of your Jira instance e.g.
your-domain.atlassian.net -
Project ID: Enter your Project ID
-
Property: Confluence URL:
Optional: Set a corresponding property e.g.Documentation URL in Confluence-
Note: Properties can be created under Settings → Configuration → Properties)
-
Authentication
-
Type:
BASICAUTH -
Username: Email address of your Atlassian account
-
Password: API Token from your Atlassian profile
→ Generated at https://id.atlassian.com/manage-profile/security/api-tokens
-
In the Tasks section, click the “+” icon (top right of the table) to add the following tasks:
-
Configuration
-
-
Click “Save” to complete data source creation.
Step 3: Task Configuration
-
Start the task “CONFIGURATION” by selecting the checkbox next to it and clicking the “Start Task” icon.

Execute the following tasks in the specified order:
-
CONFIGURATION - Reads all raw data into the database
Run tasks one at a time and monitor each task completion in the Job Monitor before proceeding to the next step.
-
Check your “Job Monitor” if the task is done or is still running under “Active Tasks”.
Recommended Task Schedule
|
Task |
Recommended Job Recurrence |
|---|---|
|
CONFIGURATION |
Every 1 day |
Important
Ensure a delay of at least 2–3 hours between CONFIGURATION and INVENTORY to prevent overlapping. CONFIGURATION may take longer to complete.
Result
Your Jira data source is now configured and ready for use.
Monitor task execution regularly through the Job Monitor.
Confluence Data Source Setup
Step 1: Create Data Source
-
Navigate to Settings → Connectivity → Data Sources.
-
Click “+” Add.

-
Enter the required values:
-
Name: e.g.
WHINT_Confluence -
Type: Choose
CONFLUENCE -
Category: e.g.
DEVELOPMENT
-

-
Click “Save”.
Step 2: Configure the Data Source
-
Configure the data source using your Atlassian credentials and base URL obtained earlier:
Connection Details
-
Root URL: Base URL to the documentation root page
e.g.https://whint.atlassian.net/wiki/spaces/ID/pages/xxxxxxx/WHINT -
Property: URL:
Optional: Set a corresponding property e.g.Confluence: URL-
Note: Properties can be created under Settings → Configuration → Properties
-
-
Environments: Select all environments that should be included in documentation (e.g.
Development,Production) -
Mode: Choose
UPDATE -
Proxy: not required
Authentication
-
Type:
BASICAUTH -
Username: Email address of your Atlassian account
-
Password: API Token from your Atlassian profile
→ Generated at https://id.atlassian.com/manage-profile/security/api-tokens
-
In the Tasks section, click the “+” icon (top right of the table) to add the following tasks:
-
UPDATE
-

-
Click “Save” to complete data source creation.
Step 3: Task Configuration
-
Start the task “UPDATE” by selecting the checkbox next to it and clicking the “Start Task” icon.

-
Check your “Job Monitor” if the task is done or is still running under “Active Tasks”.
Recommended Task Schedule
|
Task |
Recommended Job Recurrence |
|---|---|
|
UPDATE |
Every 1 day |
Result
Your Confluence data source is now configured and ready for use.
The UPDATE task will push documentation updates into Confluence.
Monitor task execution regularly through the Job Monitor.
1.4 EAM & IT Management Tools
Connect your enterprise architecture and IT management platforms for enriched interface context.
1.4.1 LeanIX
Integrate with LeanIX to add business capability context to your interface inventory
Data Source Setup
Step 1: Create Data Source
-
Navigate to Settings → Connectivity → Data Sources
-
Click "+" Add
-
Enter basic information:
-
Name: e.g.
LeanIX -
Type:
LEANIX -
Environment: e.g.
Development
-
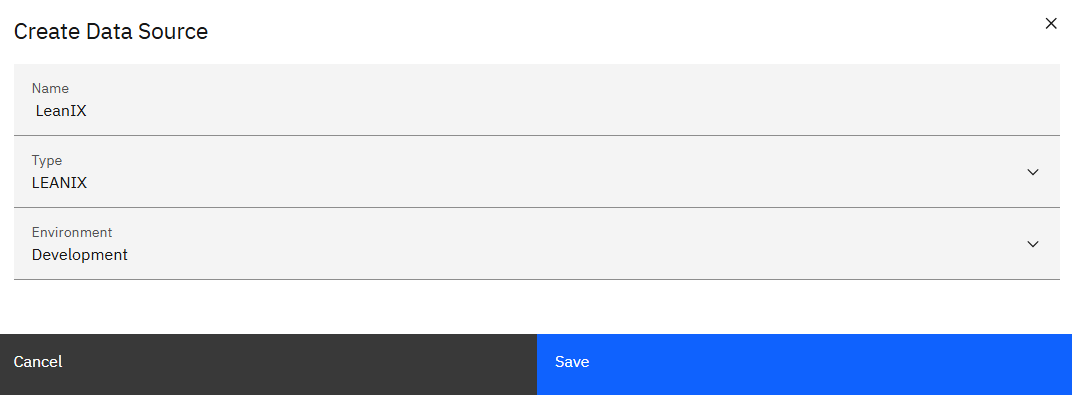
-
Click "Save"
Step 2: Configure Connection Details
Connection Details:
-
Hostname: Your LeanIX instance (e.g.
http://app.leanix.net) -
Workspace: Your LeanIX workspace name (e.g.
ctideveloping) -
Features: Select features to sync (Applications, Data Objects, Interfaces)
-
Update Mode:
UPDATEBYEXTERNALIDor other options -
Property: IT Component: e.g.
IT Component (LeanIX)mapping -
Property: External ID: e.g.
LeanIX: External IDfield mapping -
Tag: Tag for imported data (e.g.
WHINT) -
Target Field: Field for additional interface information (e.g.
technicalInformation) -
Proxy: not required
Authentication (OAuth2):
-
Type:
OAUTH2 -
Client ID: Your LeanIX API token identifier
-
Secret: Your LeanIX API token secret
-
Token URL: LeanIX OAuth endpoint
(e.g.https://demo-dte.leanix.net/services/mtm/v1/oauth2/token) -
Scope: not required
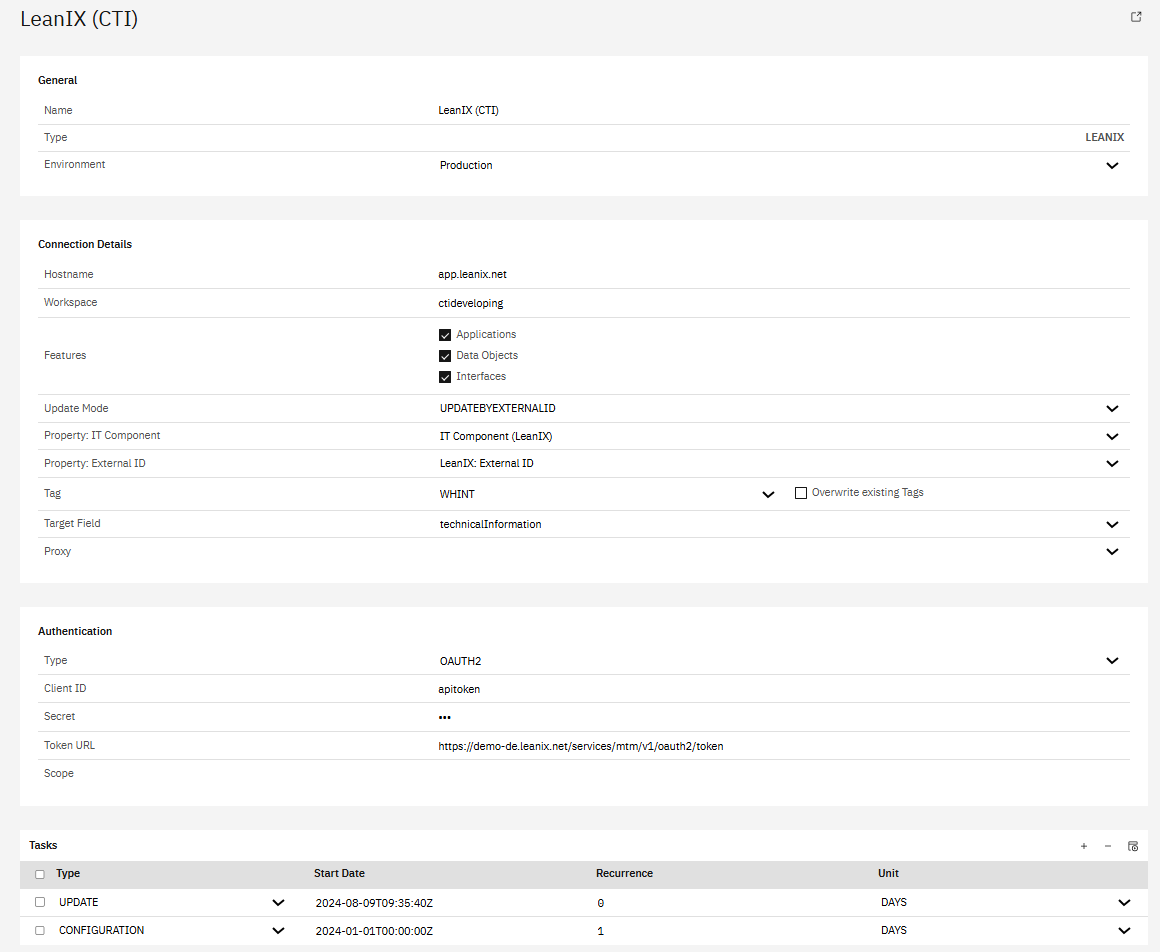
Step 3: Task Configuration
-
Add required tasks in the Tasks section:
-
CONFIGURATION - Reads all raw data into the database
-
UPDATE - Aggregates the monthly traffic
-

-
Configure recurrence (typically daily for both tasks)
-
Start with CONFIGURATION task first
-
Click "Save" to complete setup
Important
Run CONFIGURATION task first to establish the initial connection and metadata, then schedule UPDATE for regular synchronization.
Recommended Task Schedule
|
Task |
Recommended Job Recurrence |
|---|---|
|
CONFIGURATION |
Every 1 day |
|
UPDATE |
Every 15 days |
Important
Ensure a delay of at least 2–3 hours between CONFIGURATION and UPDATE to prevent overlapping. CONFIGURATION may take longer to complete.
Result
Your data source is now configured and ready for use. Monitor task execution regularly through the Job Monitor.
1.4.2 Bee360
Integrate with Bee360 for linking interfaces to IT governance and enterprise planning views.
Data Source Setup
Step 1: Create Data Source
-
Navigate to Settings → Connectivity → Data Sources
-
Click "+" Add
-
Enter basic information:
-
Name: e.g.
BEE360 -
Type:
BEE360 -
Environment: e.g.
Quality
-
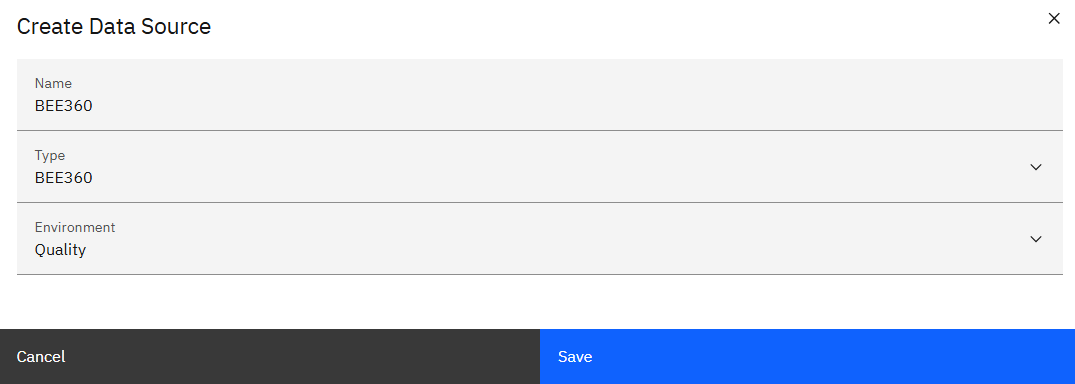
-
Click "Save"
Step 2: Configure Connection Details
Connection Details:
-
Hostname: Your BEE360 instance (e.g.
eqconsultants.bee360.rocks) -
Features: Select features to sync (Business Objects, Applications, Interfaces)
-
Proxy: Optional proxy configuration
Authentication (API Key):
-
Type: APIKEY
-
Header: Authorization
-
Key: Your BEE360 API key
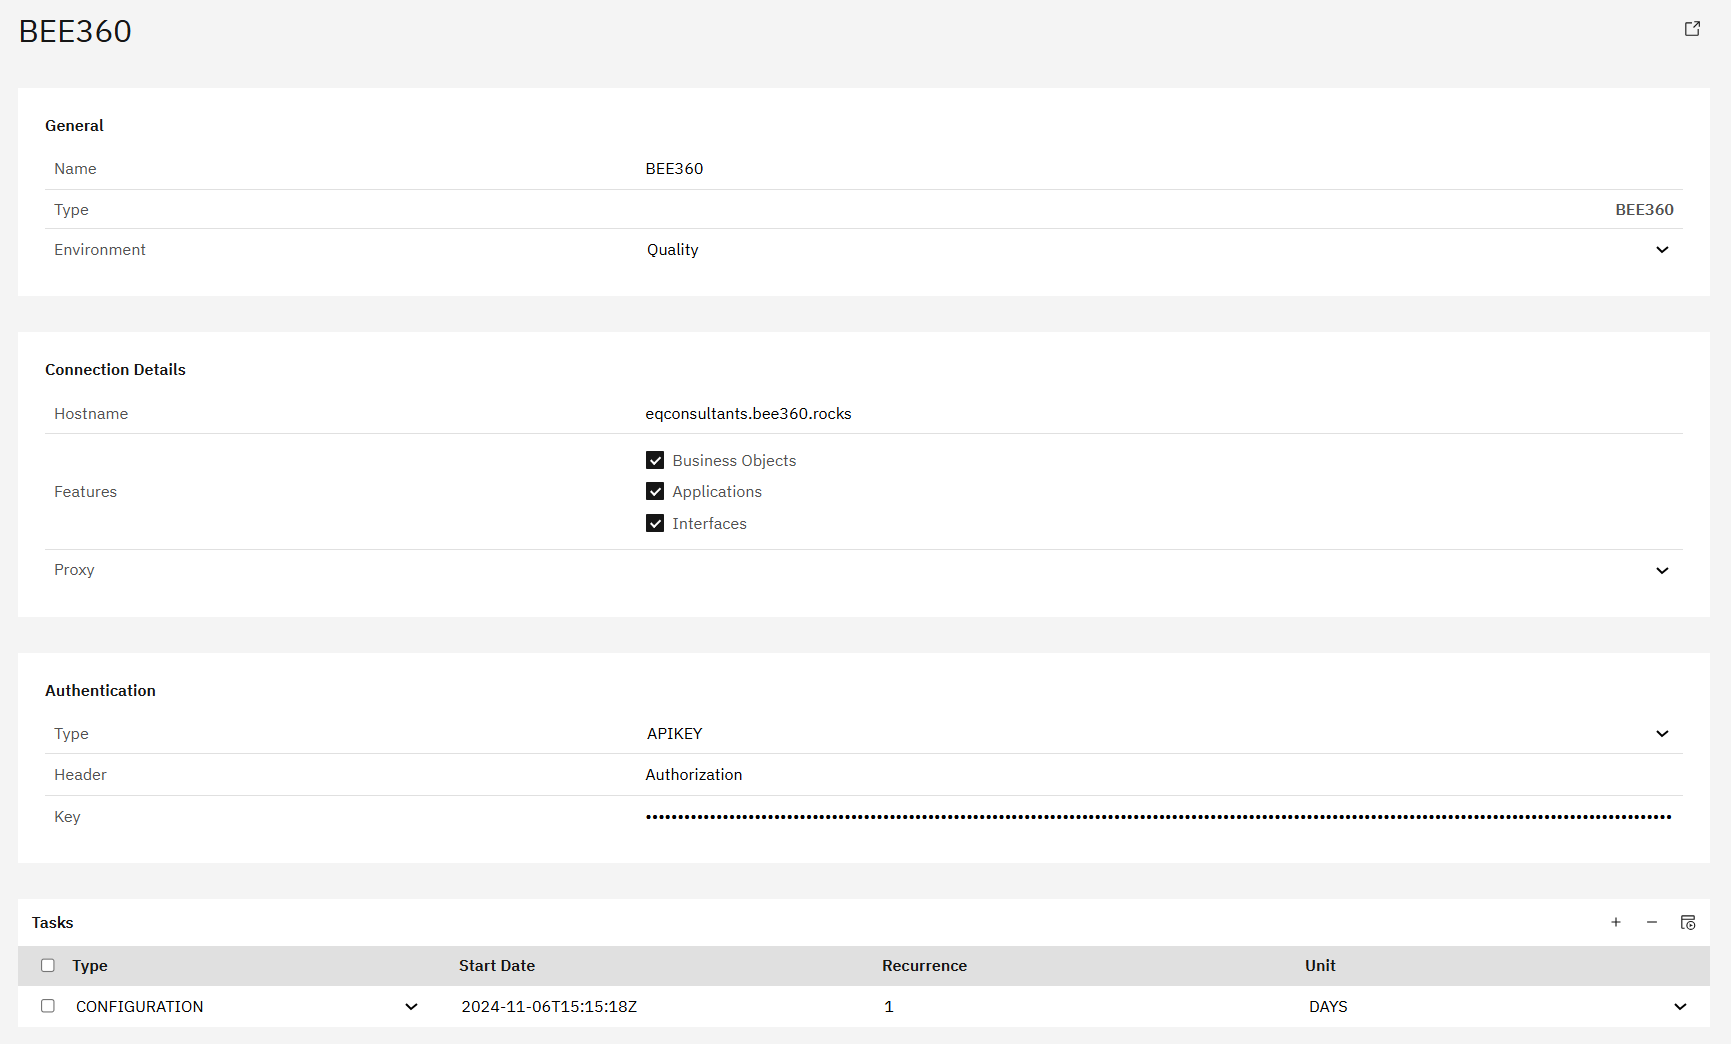
Step 3: Task Configuration
-
Add required tasks in the Tasks section:
-
CONFIGURATION - Reads all raw data into the database
-
-
Configure recurrence (daily)

-
Click "Save" to complete setup
-
Check your “Job Monitor” if the task is done or is still running under “Active Tasks”.
Recommended Task Schedule
|
Task |
Recommended Job Recurrence |
|---|---|
|
CONFIGURATION |
Every 1 day |
Result
Your data source is now configured and ready for use. Monitor task execution regularly through the Job Monitor.
1.4.3 LUY
LUY integration enables tracking of integration flows within LUY application landscapes.
Data Source Setup
Step 1: Create Data Source
-
Navigate to Settings → Connectivity → Data Sources
-
Click "+" Add
-
Enter basic information:
-
Name: e.g.
WHINT LUY -
Type:
LUY -
Environment: e.g.
Production
-

-
Click "Save"
Step 2: Configure Connection Details
-
Configure the data source with your user credentials:
Connection Details
-
Hostname: Your LUY instance (e.g.
whitepaperid.luy.app) -
Features: Select features to sync (Business Objects, Information Flows, Information Systems)
-
Update Mode:
CREATEUPDATEor other options -
Property: External ID: optional, but e.g.
Luy: External ID field mapping -
Proxy: not required
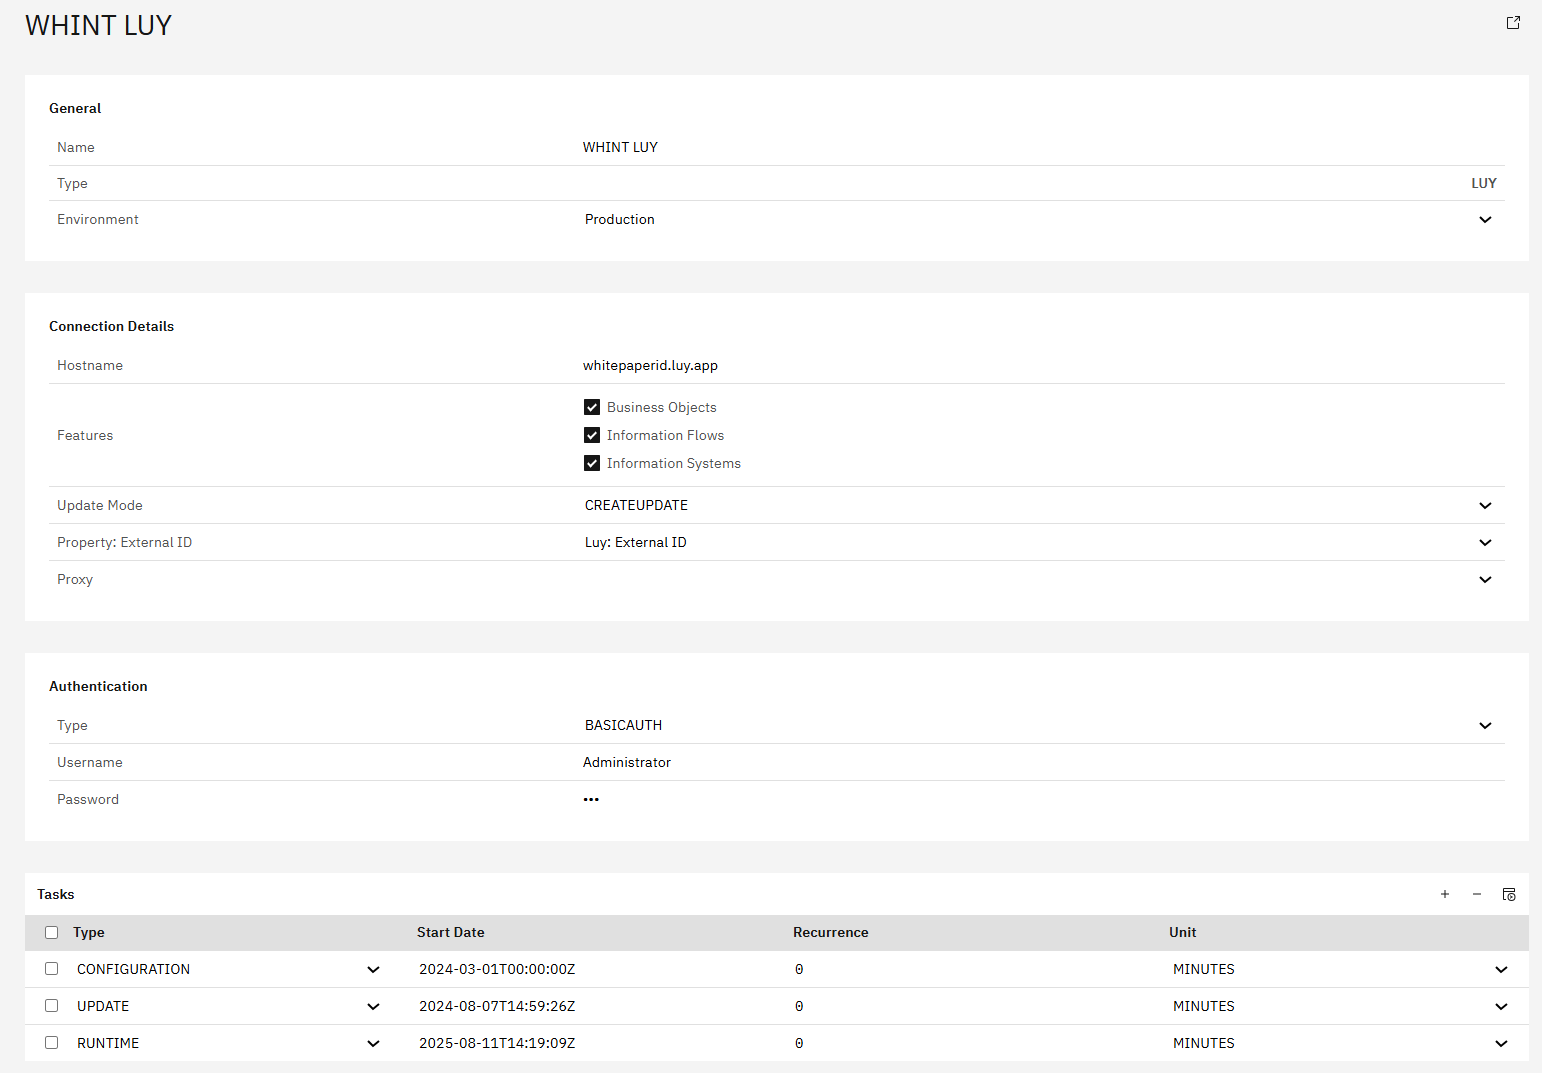
Authentication
-
Type:
BASICAUTH -
Username: Your LUY username (e.g. Administrator)
-
Password: Your LUY password
-
In the Tasks section, click the "+" icon (top right of the table) to add the following tasks:
-
CONFIGURATION
-
RUNTIME
-
UPDATE
-
-
Click "Save" to complete the setup.
Step 3: Task Configuration
-
Start the task "CONFIGURATION" by selecting the checkbox next to it and clicking the "Start Task" icon.

Execute the following tasks in the specified order:
-
CONFIGURATION - Reads all raw data into the database
-
RUNTIME - Reads traffic information from the tenant
-
UPDATE - Aggregates the monthly traffic
Run tasks one at a time and monitor each task completion in the Job Monitor before proceeding to the next step.
-
Check your “Job Monitor” if the task is done or is still running under “Active Tasks”.
Recommended Task Schedule
|
Task |
Recommended Job Recurrence |
|---|---|
|
CONFIGURATION |
Every 1 day |
|
RUNTIME |
Every 2–5 hours |
|
UPDATE |
Every 15 days |
Result
Your data source is now configured and ready for use. Monitor task execution regularly through the Job Monitor.
1.4.4 HOPEX
Use HOPEX to reflect integration structures in your enterprise architecture repository.
Data Source Setup
Step 1: Create Data Source
-
Navigate to Settings → Connectivity → Data Sources
-
Click "+" Add
-
Enter basic information:
-
Name: e.g.
WHINT Hopex -
Type:
HOPEX -
Environment: e.g.
Development
-
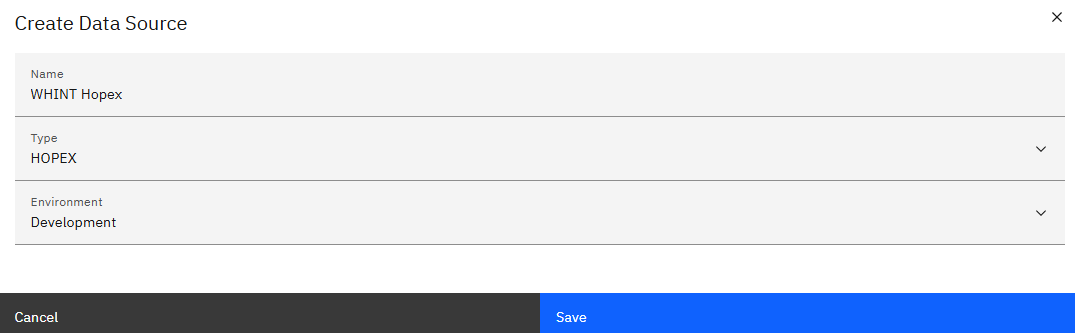
-
Click "Save"
Step 2: Configure Connection Details
-
Configure the data source with your credentials:
Connection Details:
-
Hostname: Your HOPEX instance (e.g.
poc06546.demo.mega.com) -
Features: Select features to sync (Applications, Application Flows, Content)
-
Update Mode:
UPDATEBYEXTERNALIDor other options -
Property: External ID: not required
-
Proxy: not required
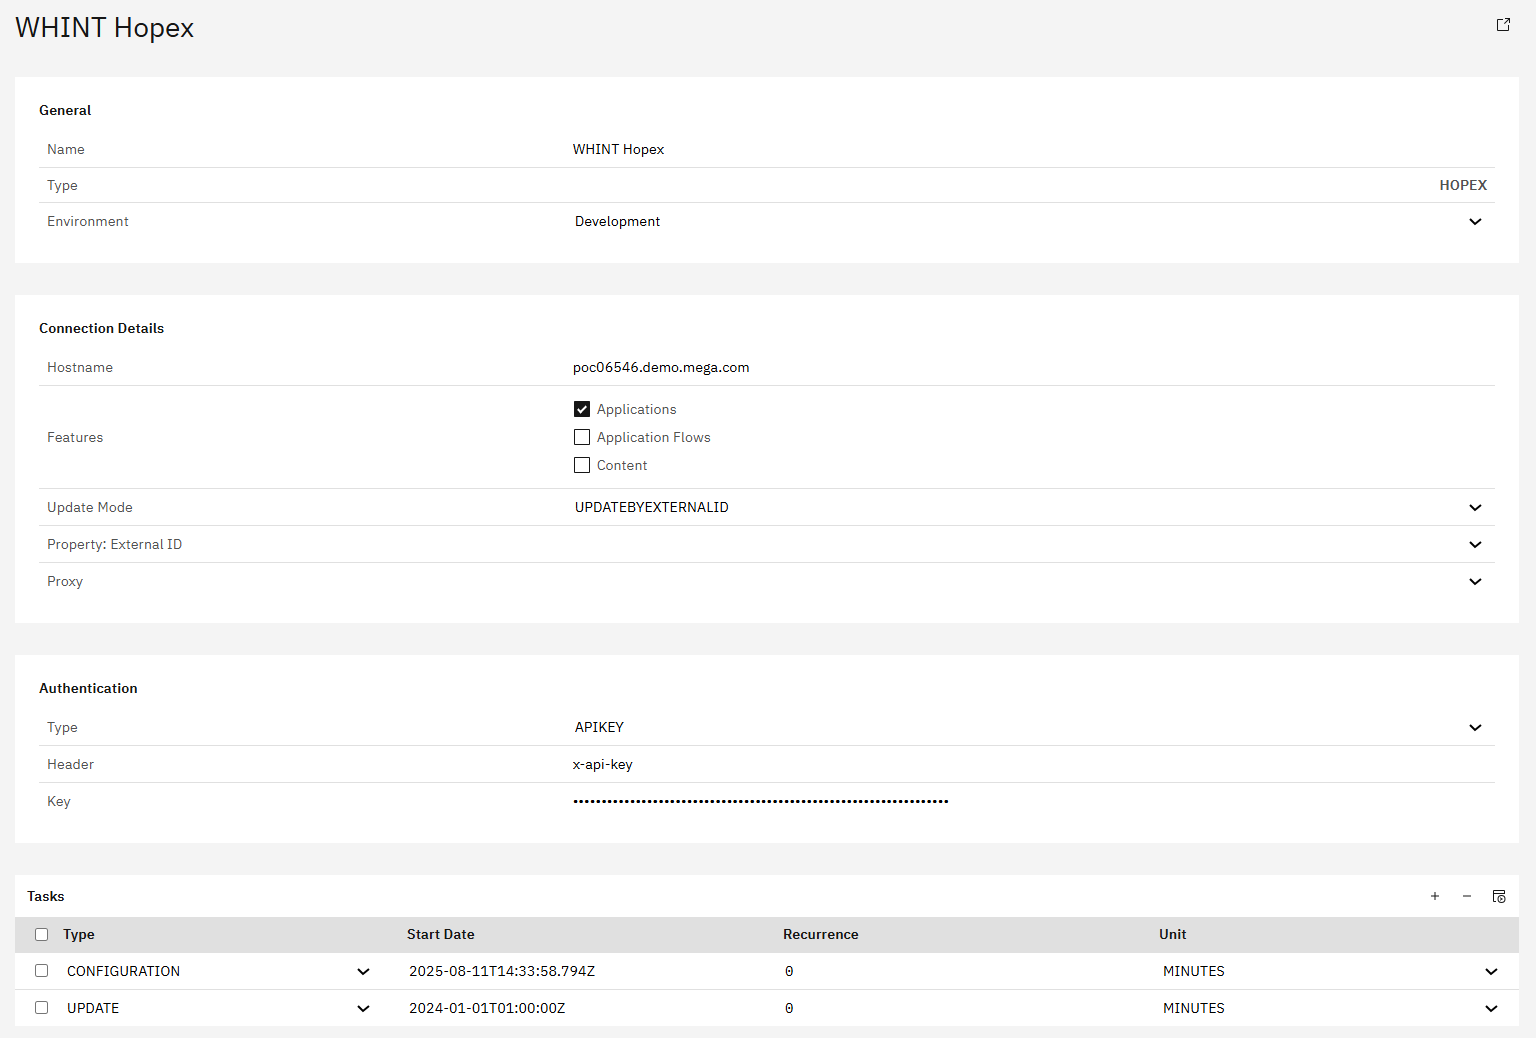
Authentication (API Key):
-
Type:
APIKEY -
Header:
x-api-key -
Key: Your HOPEX API key
-
In the Tasks section, click the "+" icon (top right of the table) to add the following tasks:
-
CONFIGURATION
-
UPDATE
-
-
Click "Save" to complete the setup
Step 3: Task Configuration
-
Start the task "CONFIGURATION" by selecting the checkbox next to it and clicking the "Start Task" icon.

Execute the following tasks in the specified order:
-
CONFIGURATION - Reads all raw data into the database
-
UPDATE - Aggregates the monthly traffic
Run tasks one at a time and monitor each task completion in the Job Monitor before proceeding to the next step.
-
Check your “Job Monitor” if the task is done or is still running under “Active Tasks”.
-20250811-144252.png?cb=2c30a53f8ed575182d463c575b43482d)
Recommended Task Schedule
|
Task |
Recommended Job Recurrence |
|---|---|
|
CONFIGURATION |
Every 1 day |
|
UPDATE |
Every 15 days |
Result
Your data source is now configured and ready for use. Monitor task execution regularly through the Job Monitor.
1.5 Housekeeping
Configure system maintenance tasks for log reorganization and traffic calculation to optimize Integration Cockpit performance.
Data Source Setup
Step 1: Create Housekeeping Data Source
-
Navigate to Settings → Connectivity → Data Sources
-
Click "+" Add
-
Enter basic information:
-
Name: e.g.
WIC Housekeeping - Reorganization of Logs, Traffic Calculation -
Type:
LOGS -
Environment: e.g.
Test
-
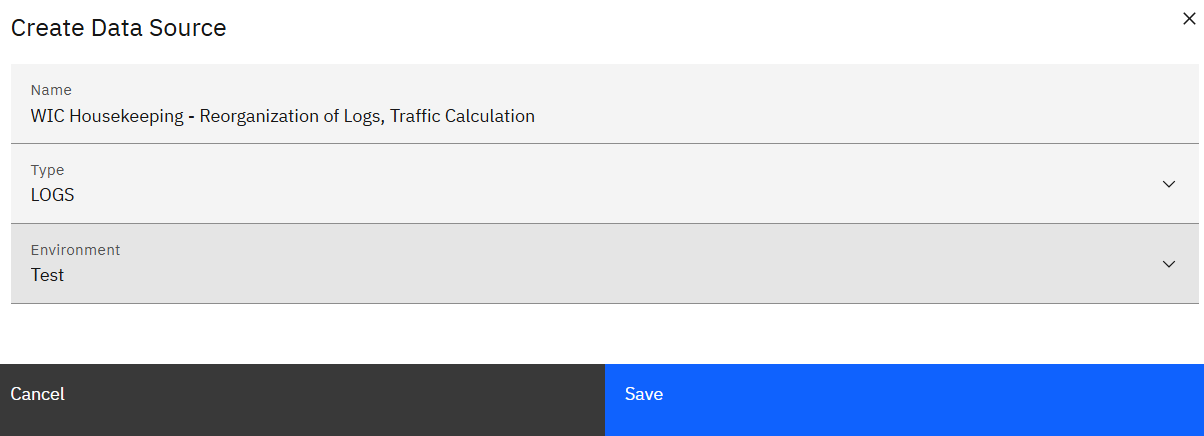
-
Click "Save"
Step 2: Task Configuration
-
In the Tasks section, click the "+" icon to add the following tasks:
-
UPDATE - Deletes logs older than 7 days
-
RUNTIME - Generates the aggregated monthly traffic
-
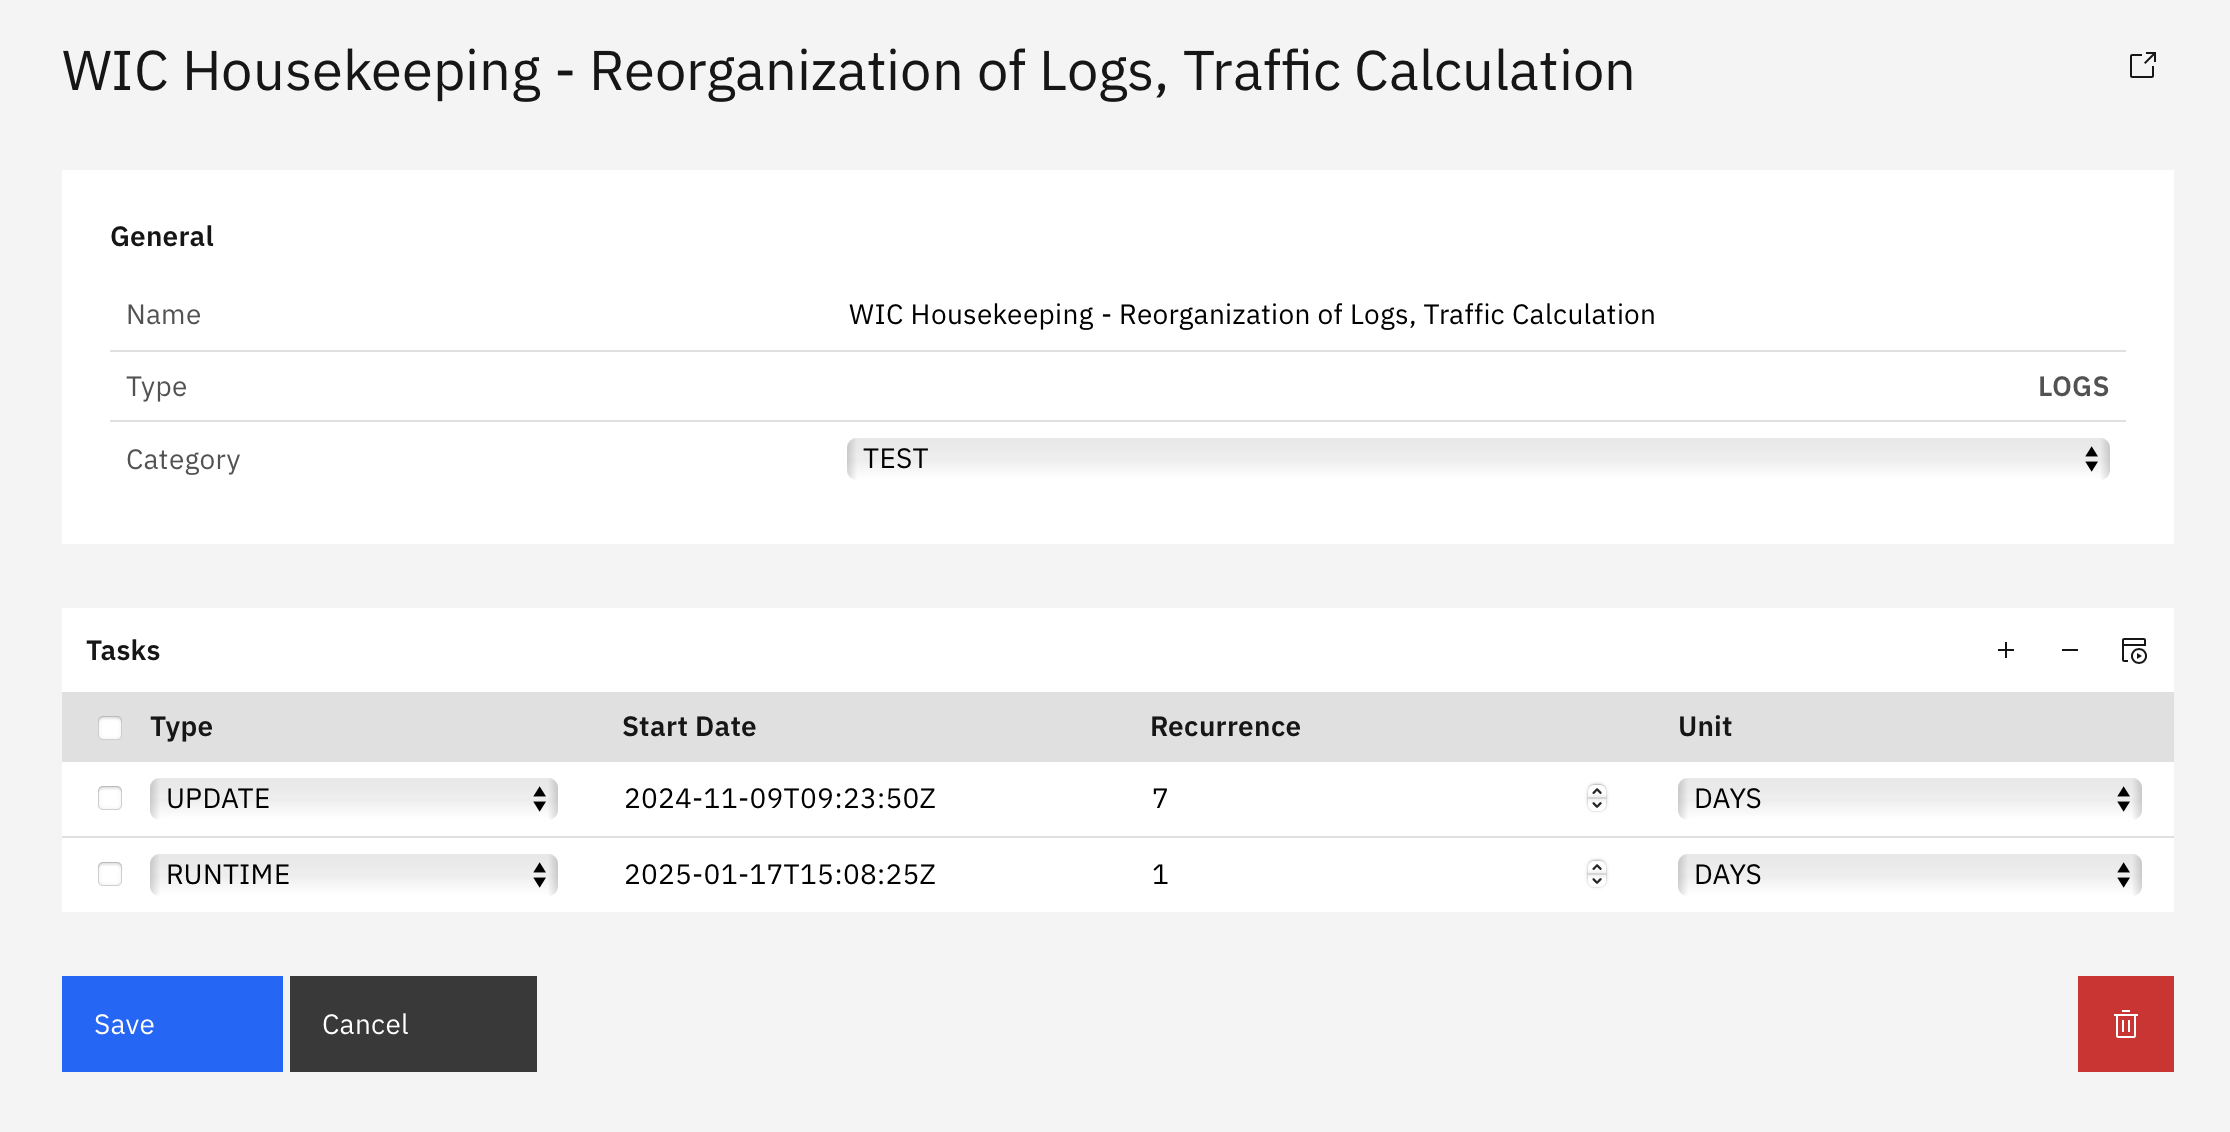
-
Click "Save" to complete the setup
Recommended Task Schedule
|
Task |
Recommended Job Recurrence |
|---|---|
|
UPDATE |
Every 7 days |
|
RUNTIME |
Every 1 day |
Result
System housekeeping is now configured to automatically maintain log files and calculate traffic statistics, ensuring optimal Integration Cockpit performance.
Step 2: Basic Configuration
2.1 Add Properties & Tags
Enrich your interface inventory with structured metadata to ensure transparency, ownership and lifecycle visibility. While not mandatory for tool operation, defining consistent Properties and Tags is strongly recommended for governance, filtering and reporting across your integration landscape.
2.1.1 Properties
The following properties are recommended to describe interfaces, systems and data objects. They enable traceability, lifecycle planning and alignment with architectural and operational standards.
How to Configure Properties:
-
Navigate to Settings → Configuration → Properties.
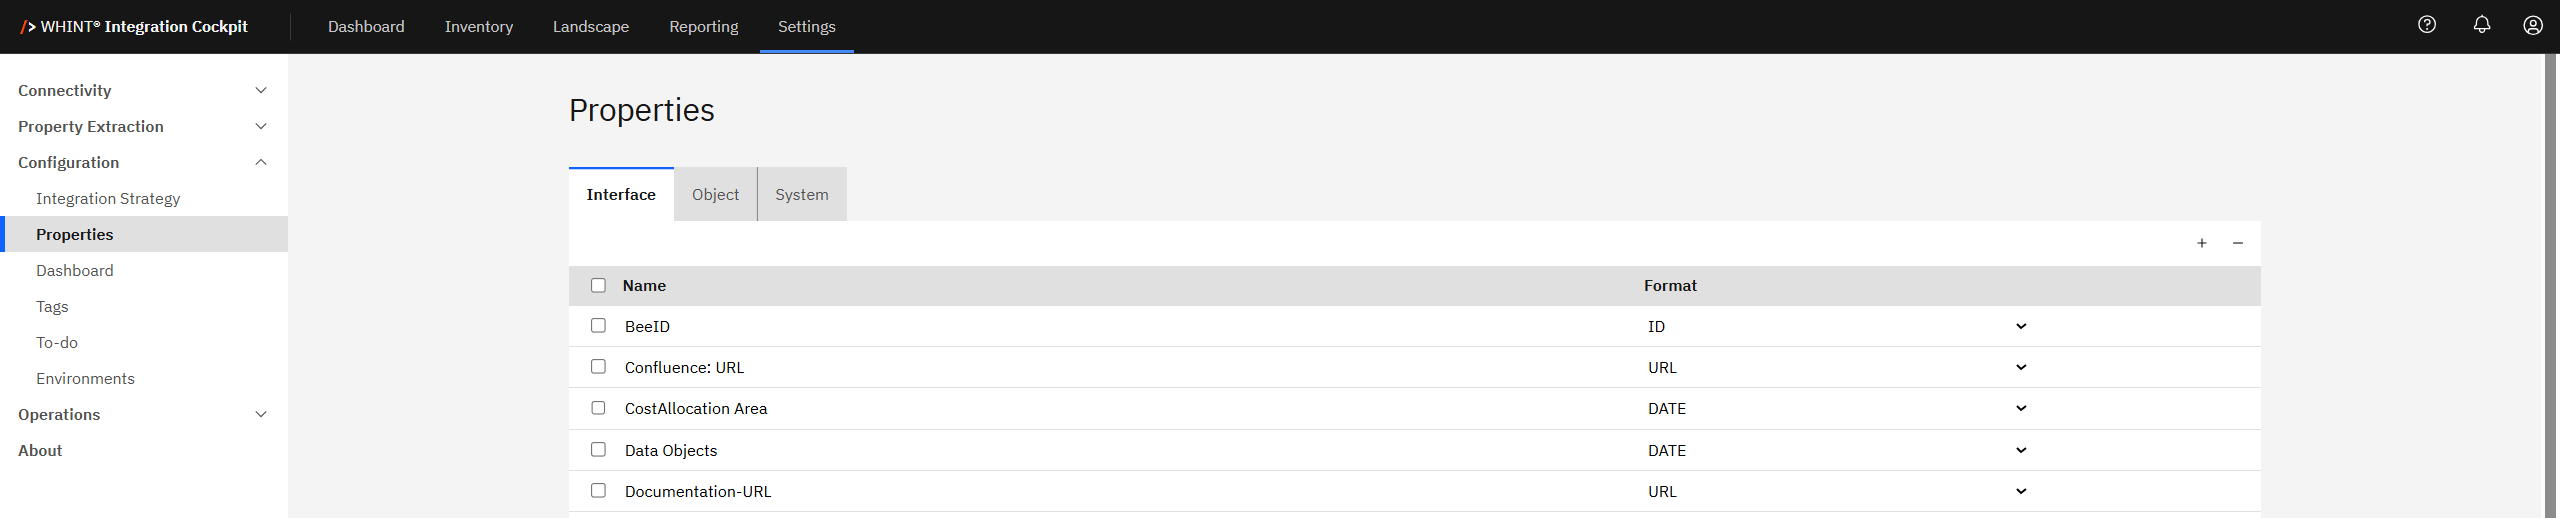
-
Select the appropriate tab (Interface, Object or System).
-
Add a Property: Click the "+" icon, enter a Name, select a Format from the dropdown (ID, URL, DATE,NUMBER STRING), then save.
-
Remove a Property: Select the checkbox next to the property and click the "-" icon.
-
Click "Save" to apply your settings.
2.1.2 Tags
Tags allow flexible categorization and filtering of interfaces. Use them to group interfaces by business domain, risk level, technology stack or deployment characteristics.
Tags are flexible and scalable - ideal for high-level overviews or fine-grained filtering.
How to Configure Tags:
-
Navigate to Settings → Configuration → Tags.
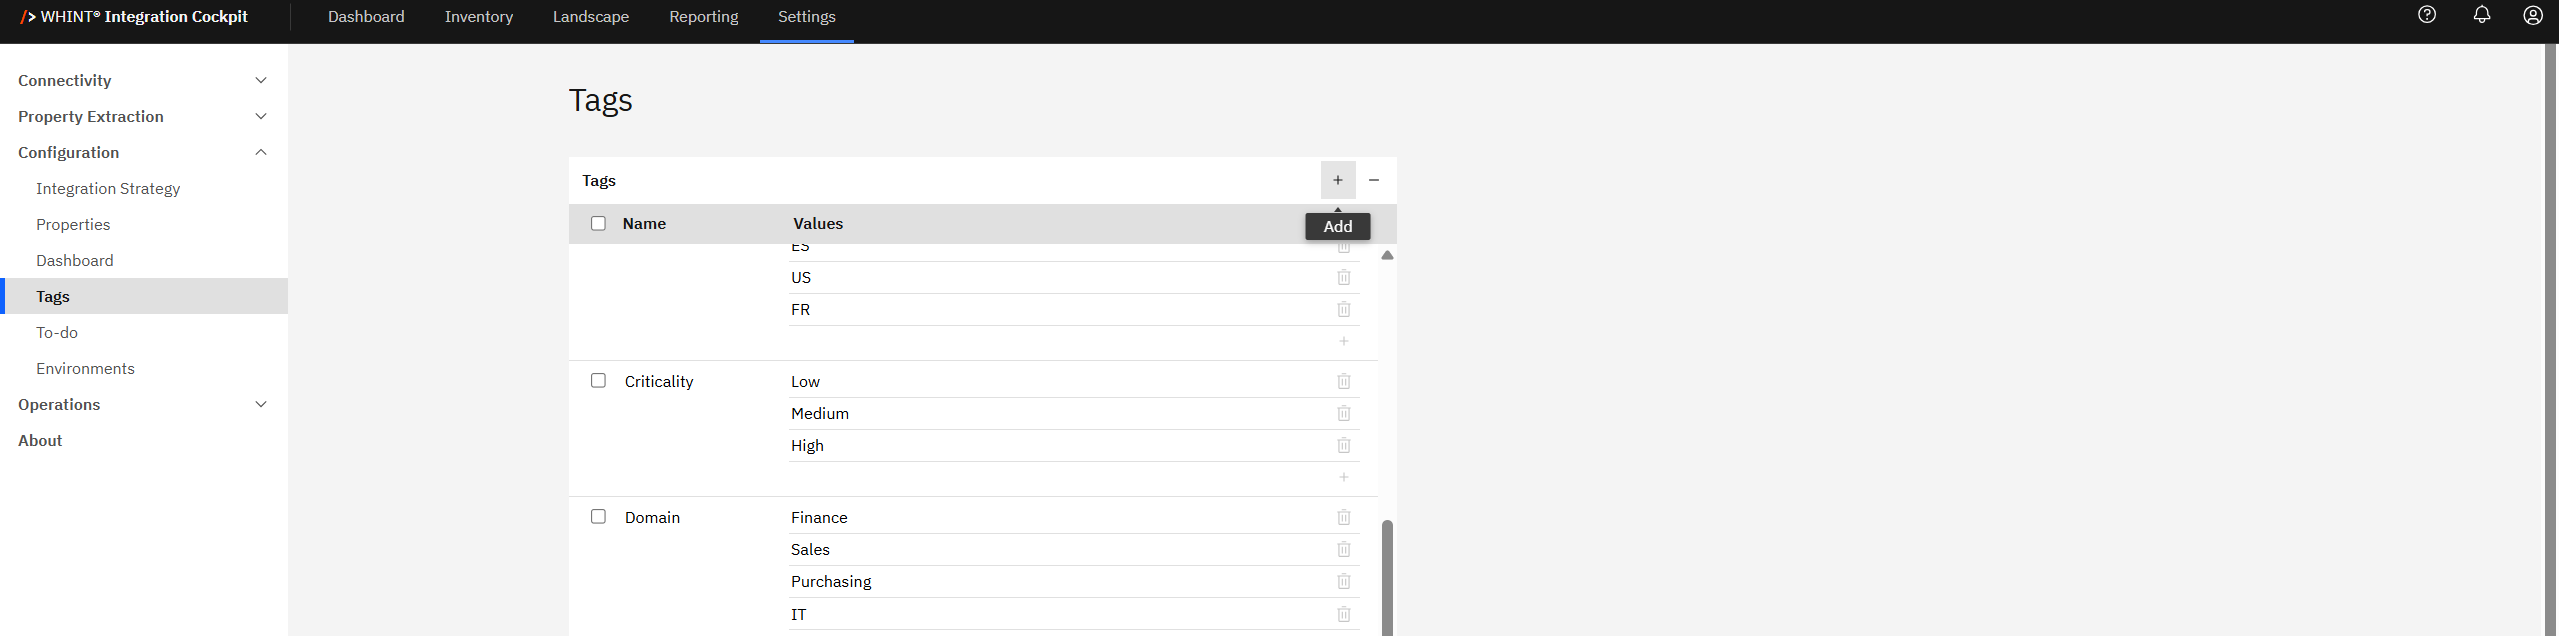
-
Add a Tag Category: Click the "+" icon, enter a Name (e.g. "Domain", "Criticality").
-
Add Values: For each category, add multiple Values (e.g. for Domain: Finance, Sales, IT).
-
Remove Tags: Select the checkbox and click the "-" icon to delete.
-
Click "Save" to apply your settings.
Quick Tip
You could include more tags later, but these three (Domain, Criticality, Brand/Division) form a solid tagging strategy for business alignment.
2.2 Dashboard
The Dashboard serves as your central control center for monitoring integration landscape KPIs and accessing external resources. This section covers configuration of dashboard elements, KPI thresholds and Quick Links.
Navigate to Settings → Configuration → Dashboard to access these configuration tabs:
-
Activate – Select which dashboard elements are displayed
-
Robustness – Define color thresholds for interface stability metrics
-
Decommissioning – Configure thresholds for inactive interface identification
-
Inventory – Set parameters for inventory tracking
-
Errors - Configure error monitoring timeframes and data source tracking
-
Anomalies - Set traffic anomaly detection parameters and volume thresholds
-
Links – Manage Quick Links for external resources
2.2.1 Activate
Follow these steps to customize which elements are displayed on your Dashboard:
-
Navigate to Settings → Configuration → Dashboard → Activate.
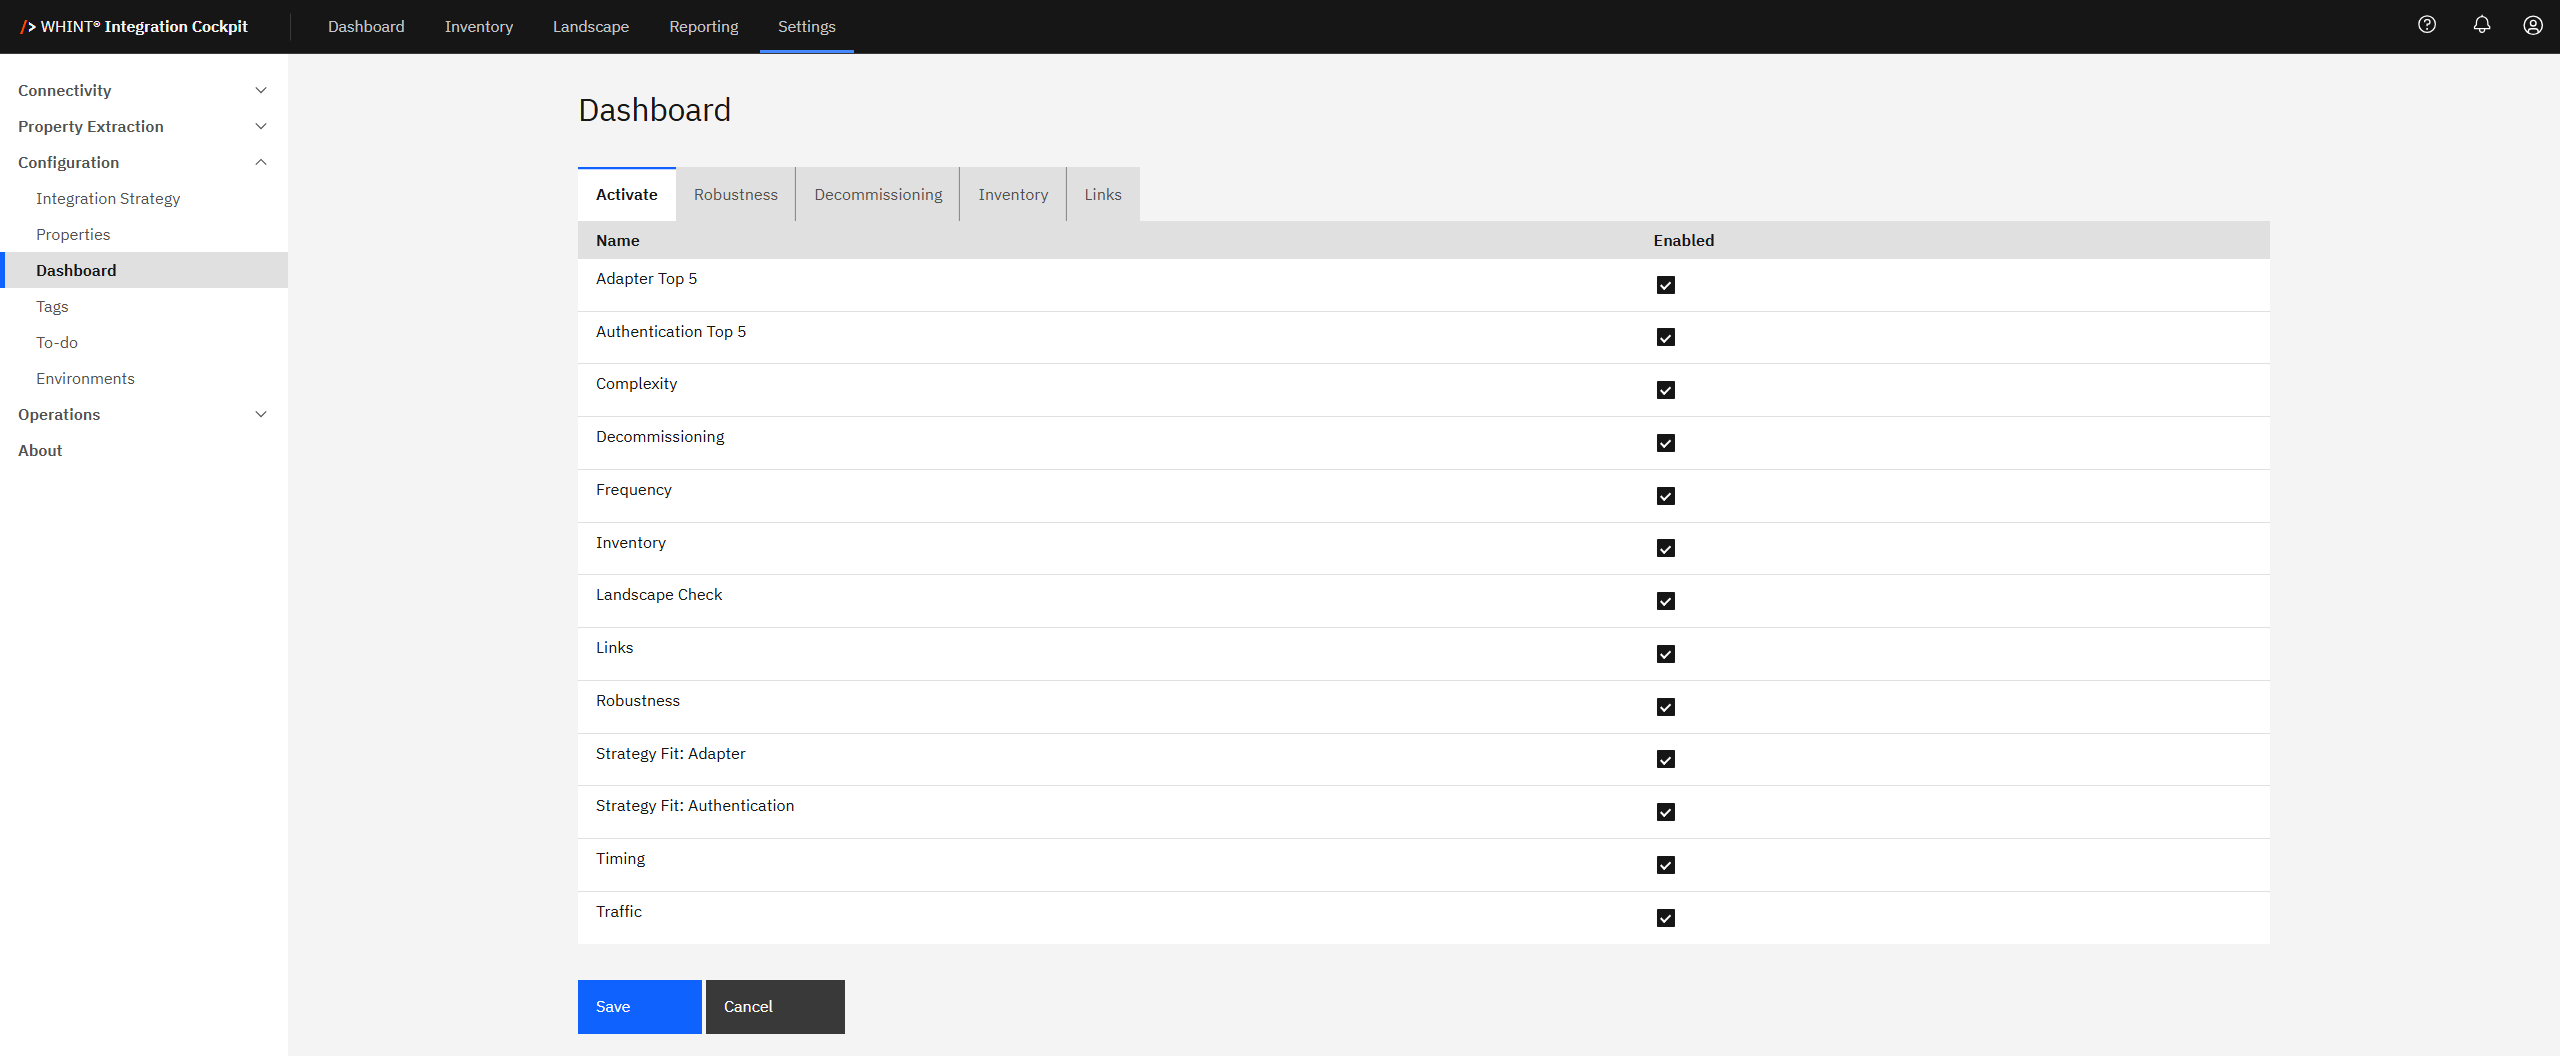
-
Select which dashboard elements to display. We recommend enabling all checkboxes to ensure that all key KPIs and metrics are fully displayed on your Dashboard.
Note: This setting is global and applies system-wide, not per user.
-
Click "Save" to apply your settings.
These settings control which KPI tiles and analytics are visible on your main Dashboard interface.
2.2.2 Robustness
Follow these steps to define your Robustness bar color thresholds:
-
Navigate to Settings → Configuration → Dashboard → Robustness.
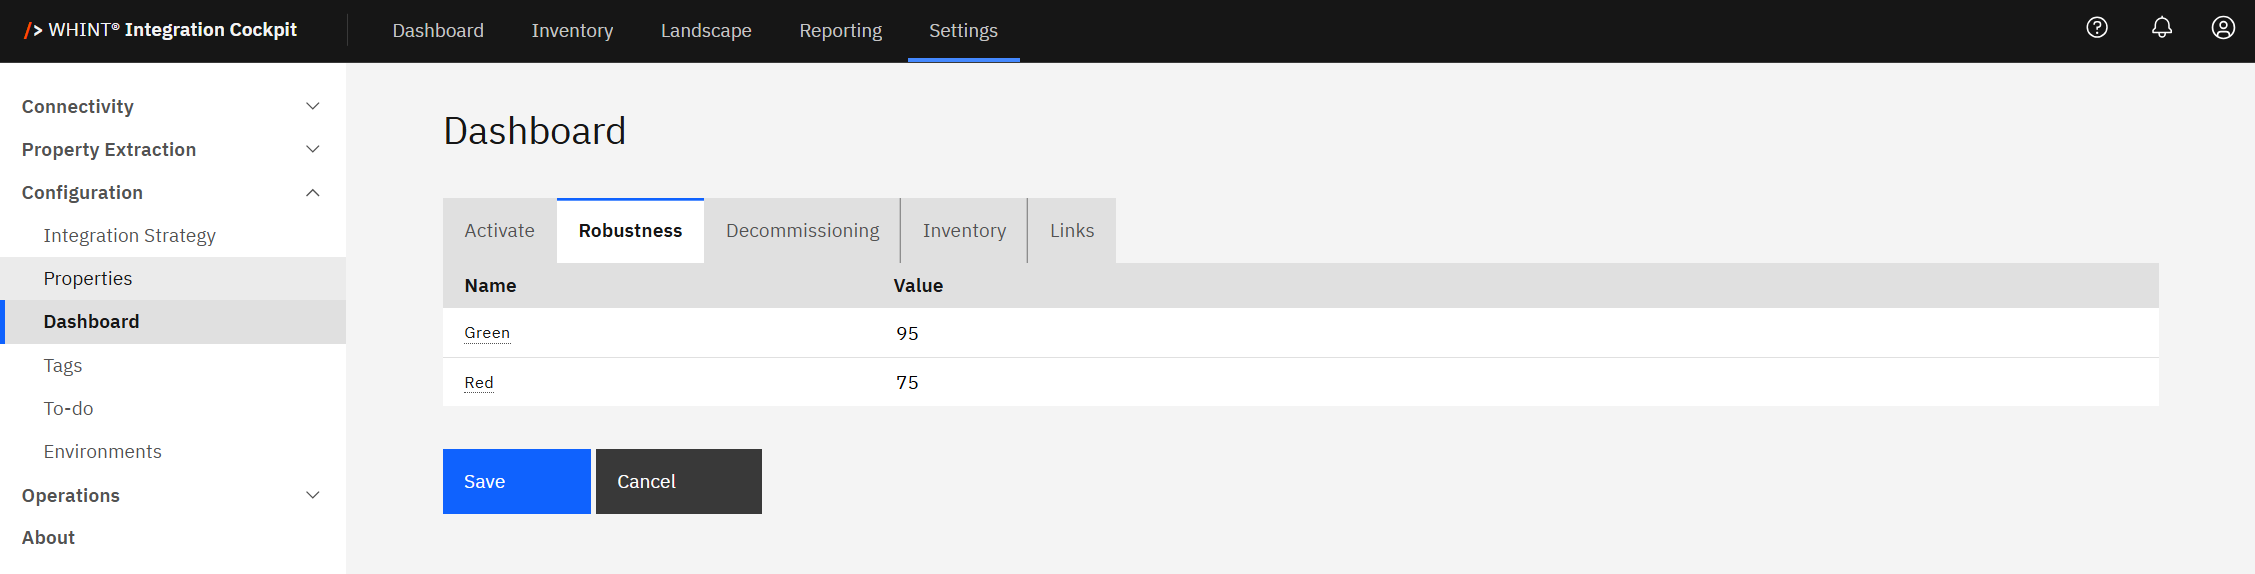
-
Set threshold values. We recommend these defaults, but you can adjust them to fit your requirements:
-
🟩Green: 95 and above
-
🟥Red: 0 to 75
-
🟨The Yellow range (76–94) is assigned automatically between red and green.
-
-
Click “Save” to apply your settings.
These thresholds control how the Robustness bar is displayed on the Dashboard.
Learn more: Robustness KPI
2.2.3 Decommissioning
Follow these steps to configure Decommissioning parameters:
-
Navigate to Settings → Configuration → Dashboard → Decommissioning.

-
Set threshold values. We recommend these defaults, but you can adjust them to fit your requirements:
-
🟩 Green: Fewer than 20 inactive interfaces (no traffic in Production in the last 30 days)
-
🟥 Red: More than 100 inactive interfaces
-
Days: Number of days to consider for decommissioning, recommended default is 45
-
Note: The “value” refers to the number of inactive interfaces.
-
Click “Save” to apply your settings.
These settings control how decommissioning status is displayed across the Dashboard and reports.
Learn more: Decommissioning KPI
2.2.4. Inventory
Follow these steps to configure what is displayed in the Inventory panel on your Dashboard:
-
Navigate to Settings → Configuration → Dashboard → Inventory.
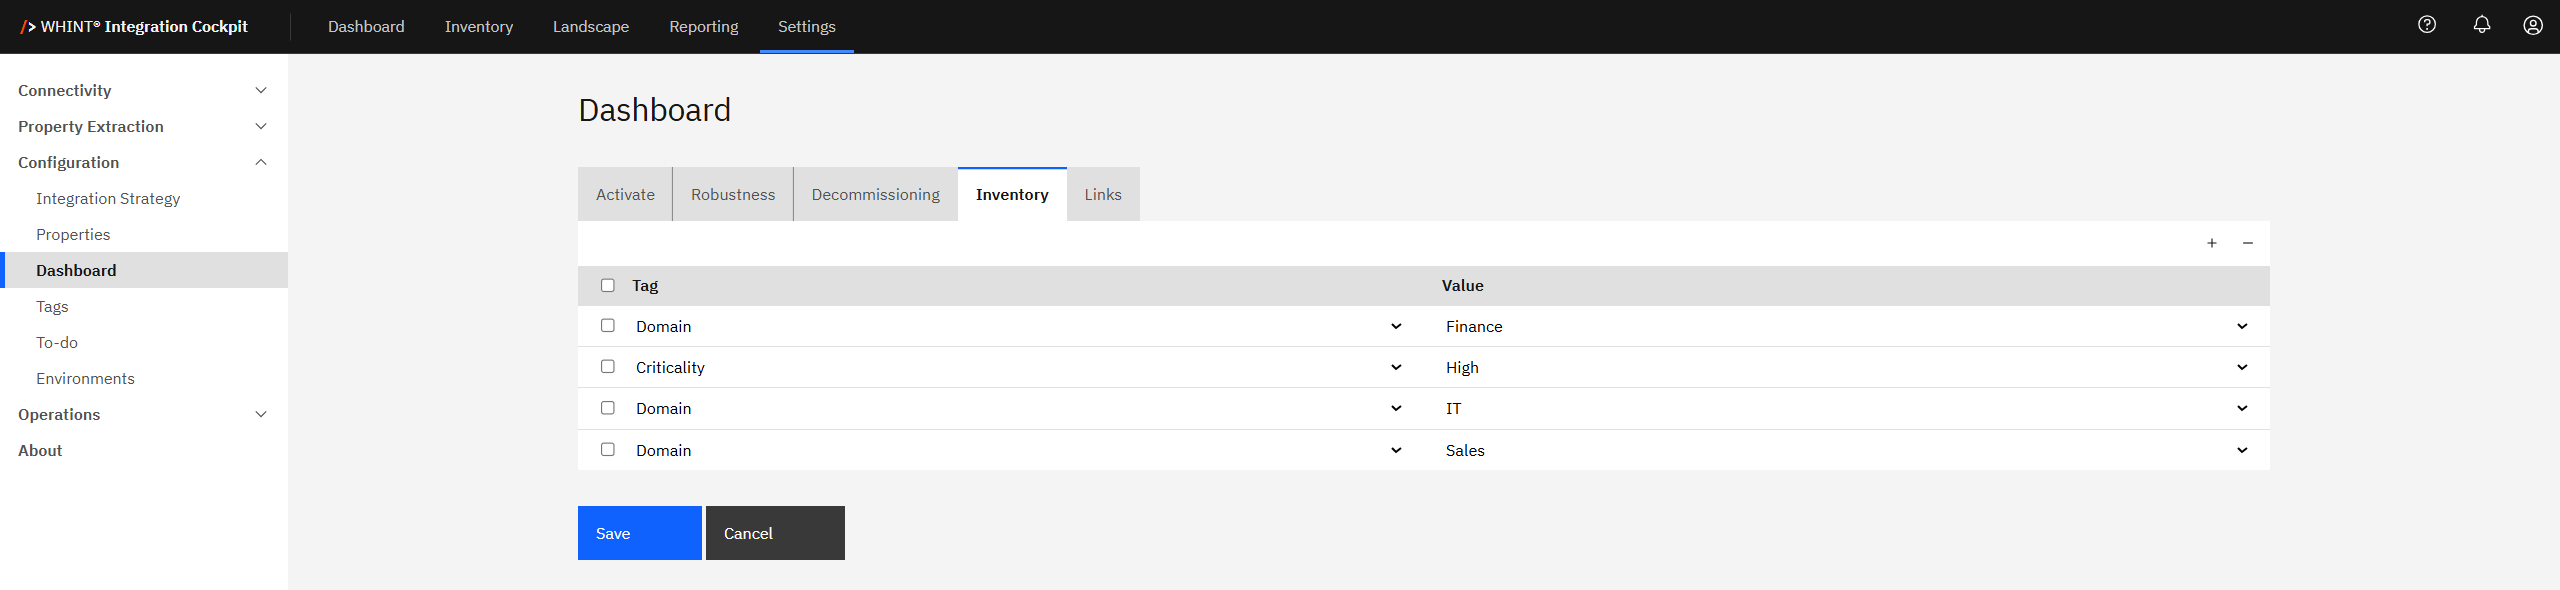
-
Select which inventory metrics to display:
-
Add a Tag: Click the "+" icon, select a Tag category and Value to show on the Dashboard.
-
Remove a Tag: Select the checkbox next to the tag display you want to remove and click the "-" icon.
-
Note: Tags must be configured first (see 2.1.2 Tags) before they can be used here.
-
Click "Save" to apply your settings.
These settings control which interface counts and breakdowns are visible in the Inventory panel on your main Dashboard.
2.2.5 Errors
Follow these steps to configure error monitoring timeframes:
-
Navigate to Settings → Configuration → Dashboard → Errors.

-
Configure error tracking parameters for each data source:
-
Select Data Source - Check the boxes for data sources you want to monitor for errors
-
Interface Type - Choose the specific interface type from the dropdown (e.g. SAP_IS_C1, SAP_XI)
-
Hours - Set the time window for error analysis (recommended: 1-4 hours for real-time monitoring)
-
Note: Lower hour values provide more immediate error detection, while higher values offer broader error pattern analysis.
-
Click "Save" to apply your settings.
These settings control the timeframe used for error monitoring and analysis displayed on the Dashboard.
2.2.6 Anomalies
Follow these steps to configure anomaly detection parameters:
-
Navigate to Settings → Configuration → Dashboard → Anomalies.
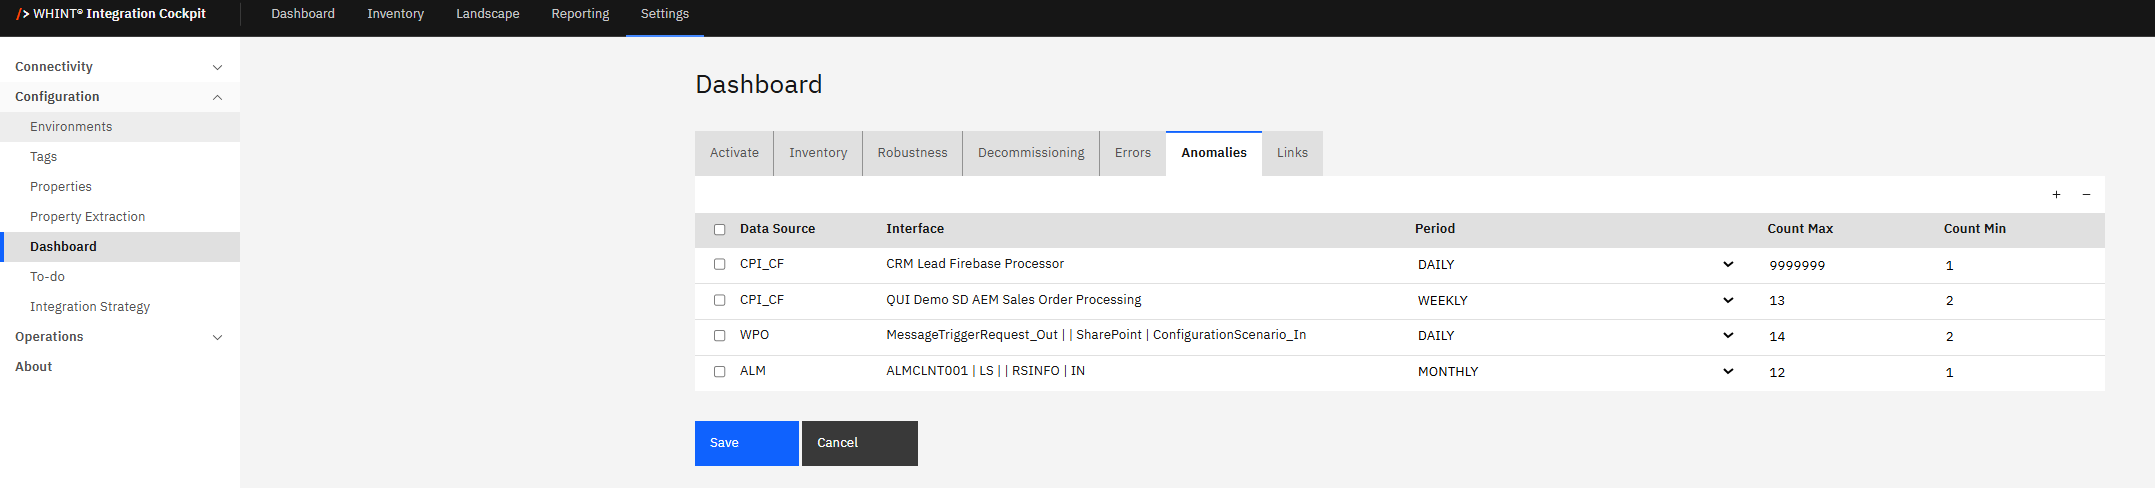
-
Configure monitoring settings for each interface:
-
Select interfaces - Check the boxes for interfaces you want to monitor for traffic anomalies
-
Set Period - Choose monitoring frequency:
-
DAILY - For high-volume interfaces requiring frequent monitoring
-
WEEKLY - For moderate-volume interfaces with regular patterns
-
MONTHLY - For low-volume interfaces with less frequent traffic
-
-
Count Max - Set upper threshold for normal traffic volume
-
Count Min - Set lower threshold for expected traffic volume
-
Note: Configure wider threshold ranges for high-volume interfaces to accommodate normal fluctuations.
-
Click "Save" to apply your settings.
These settings control how anomaly detection monitors interface traffic patterns and identifies unusual volume deviations on the Dashboard.
Learn more: Anomalies
2.2.7. Links
Follow these steps to manage Quick Links displayed in the Dashboard panel:
-
Navigate to Settings → Configuration → Dashboard → Links.
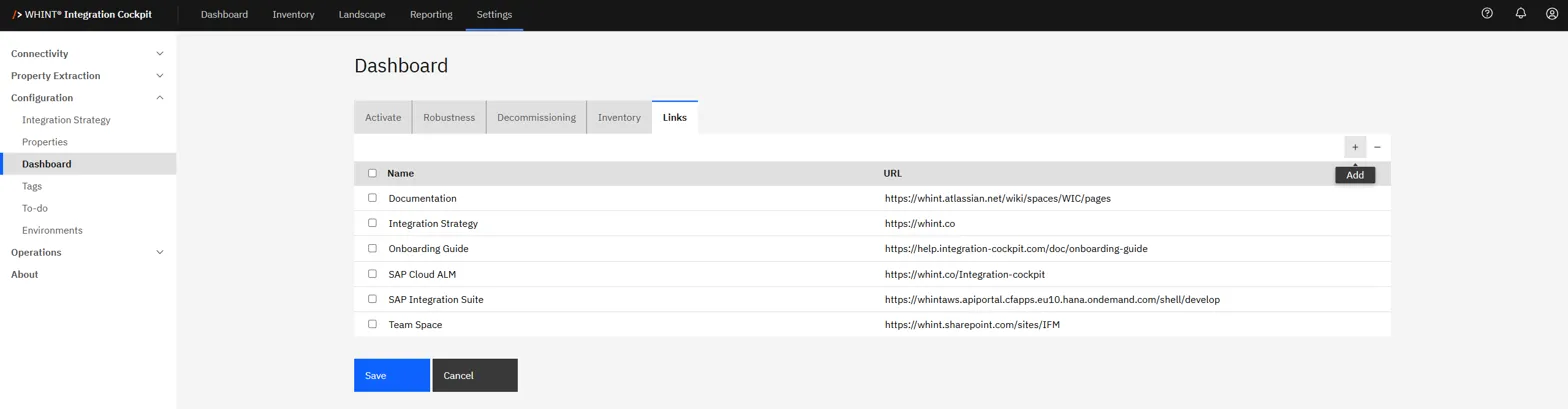
-
Manage your Quick Links:
-
Add a Link: Click the "+" icon, enter a Name and URL
-
Remove a Link: Select the checkbox next to the link you want to remove and click the "-" icon.
-
Click "Save" to apply your changes.
These Quick Links provide direct access to external resources most relevant to your integration team and appear in the Dashboard panel for convenient navigation.
2.3 Integration Strategy
Use this step to classify the adapters and authentication methods in your integration landscape and assign a strategic fit.
This helps you evaluate alignment with your target architecture, identify outdated or insecure technologies and highlight areas that may require modernization.
Each adapter or authentication method can be assigned one of the following fit types:
-
Good Fit – aligned with your integration strategy
-
Partial Fit – tolerated but not ideal
-
No Fit – to be avoided (due to technical debt or security risk)
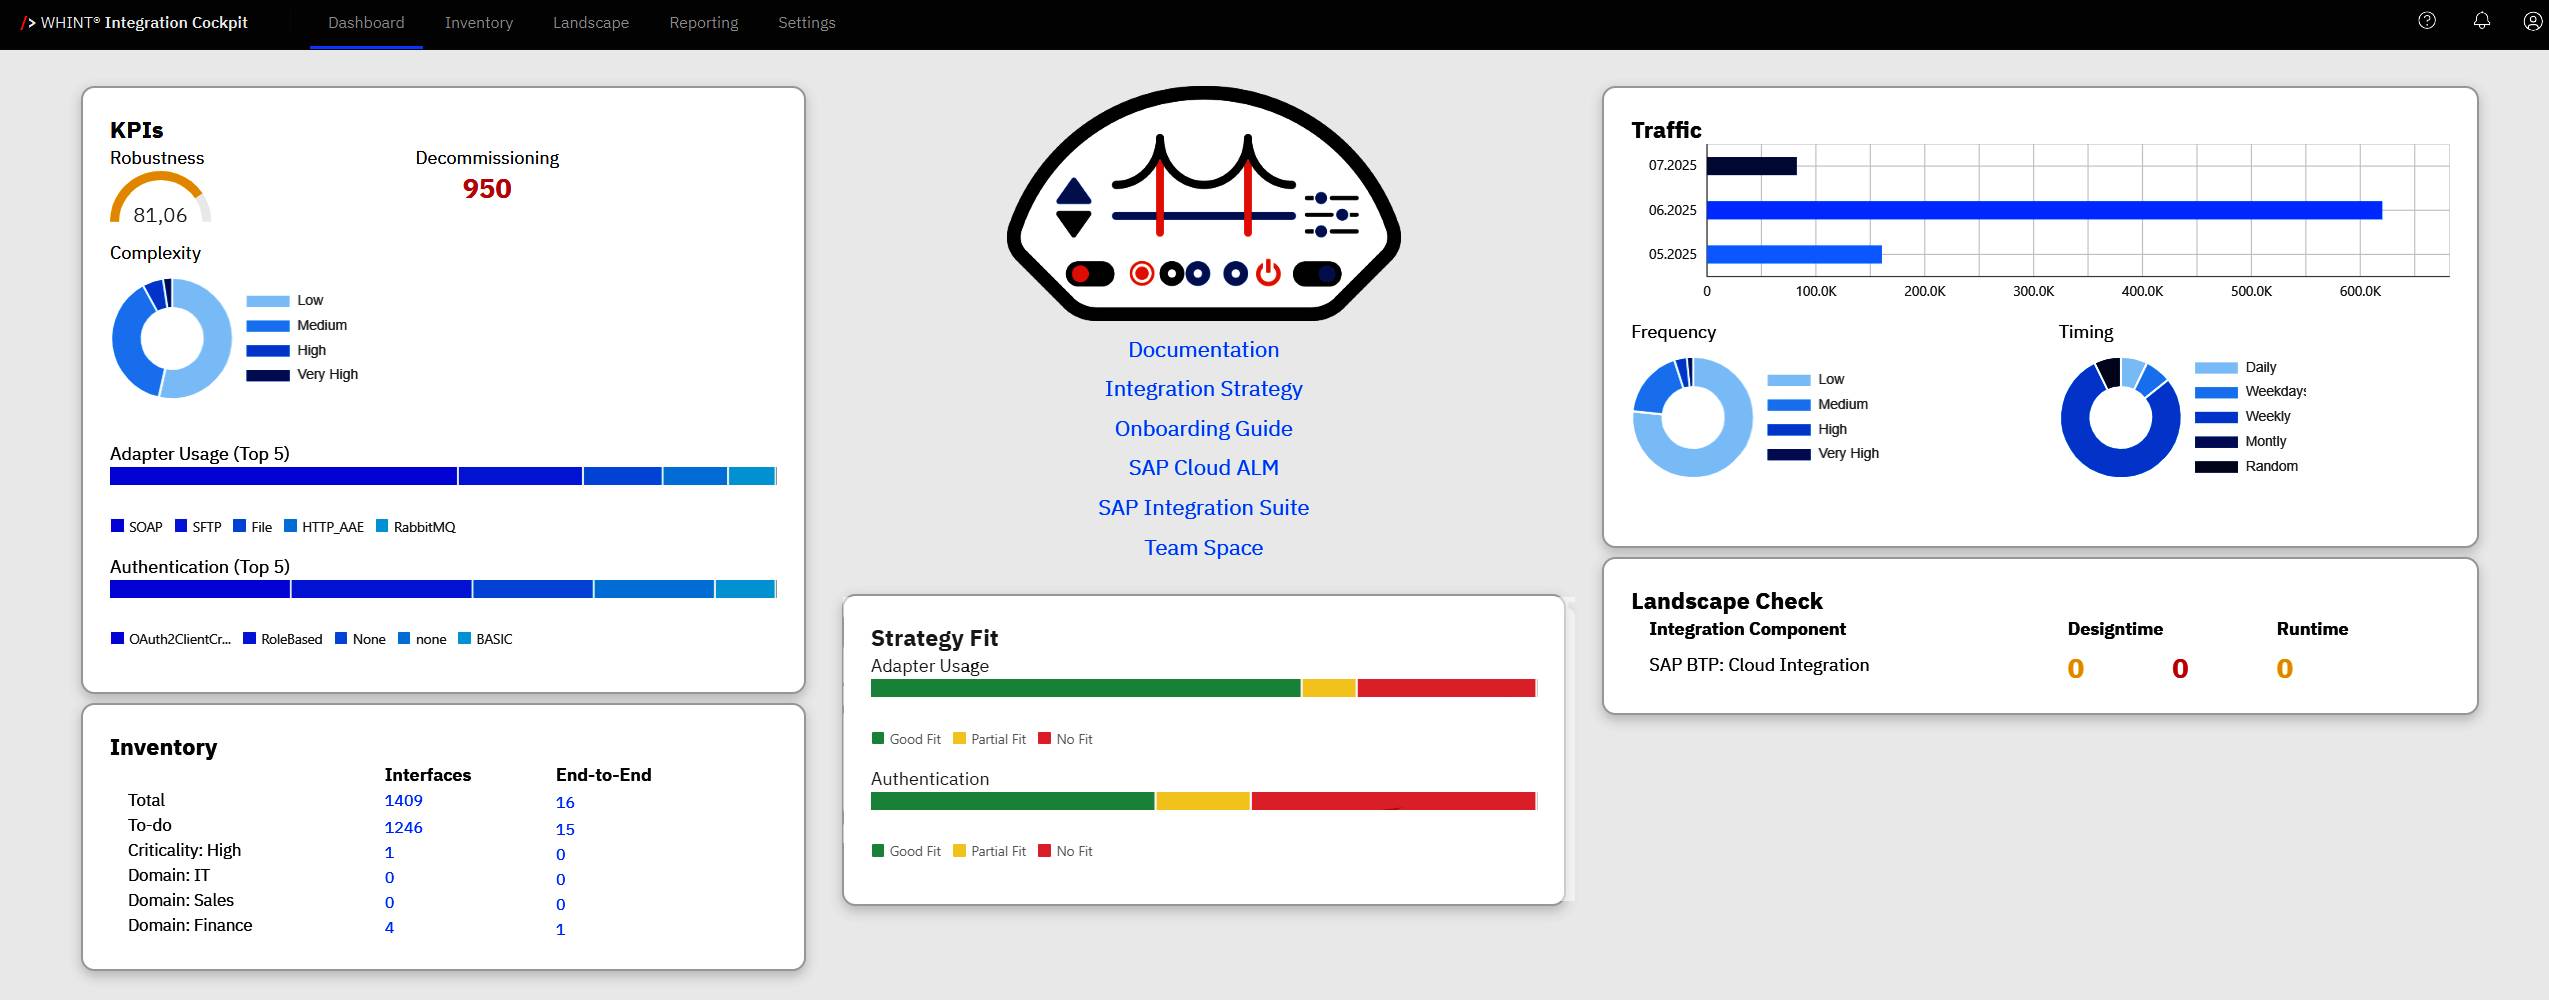
2.3.1 Adapter
Follow these steps to classify adapter types based on your integration strategy:
-
Navigate to Settings → Configuration → Integration Strategy → Adapter.
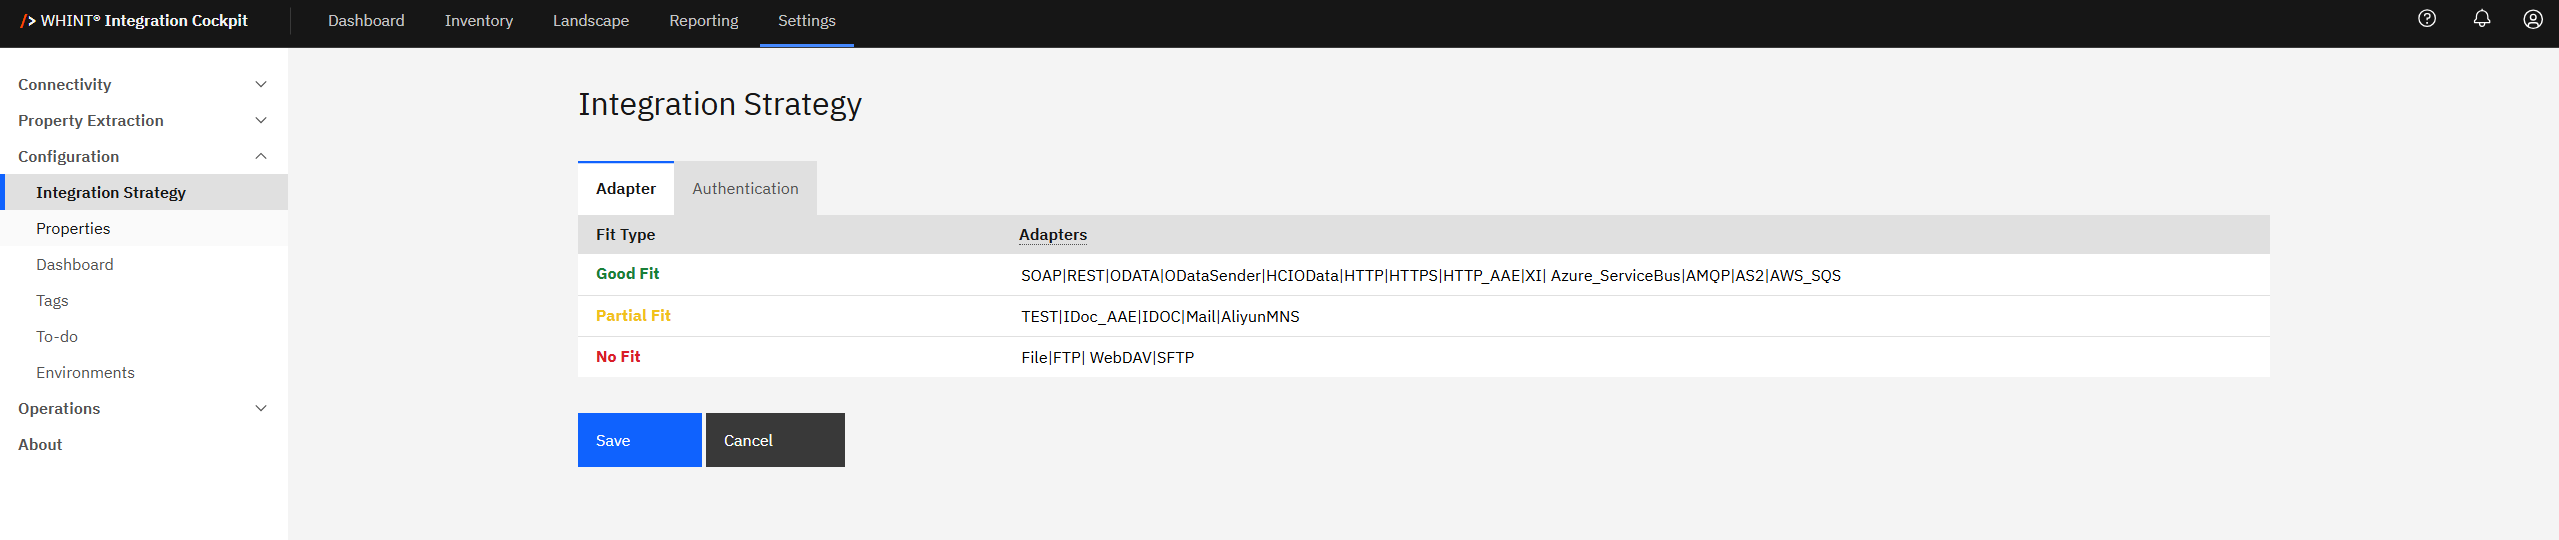
-
Classify your adapters by fit category:
-
Review and configure adapter classifications in the Fit Type table:
-
Good Fit: Adapters aligned with your integration strategy
-
Partial Fit: Tolerated but not ideal adapters
-
No Fit: Deprecated or avoided adapters
-
Use pipe-separated values to list multiple technologies.
Example: SOAP|FTP|HTTPS
|
Fit Type |
Common Adapters |
|---|---|
|
Good Fit |
|
|
Partial Fit |
|
|
No Fit |
|
Adjust fit values based on your organization's integration strategy.
-
Click "Save" to apply your settings.
These classifications control how adapter usage is displayed in the Strategy Fit dashboard panels and help identify alignment with your integration architecture.
2.3.2 Authentication
Follow these steps to classify authentication types based on your security standards:
-
Navigate to Settings → Configuration → Integration Strategy → Authentication.
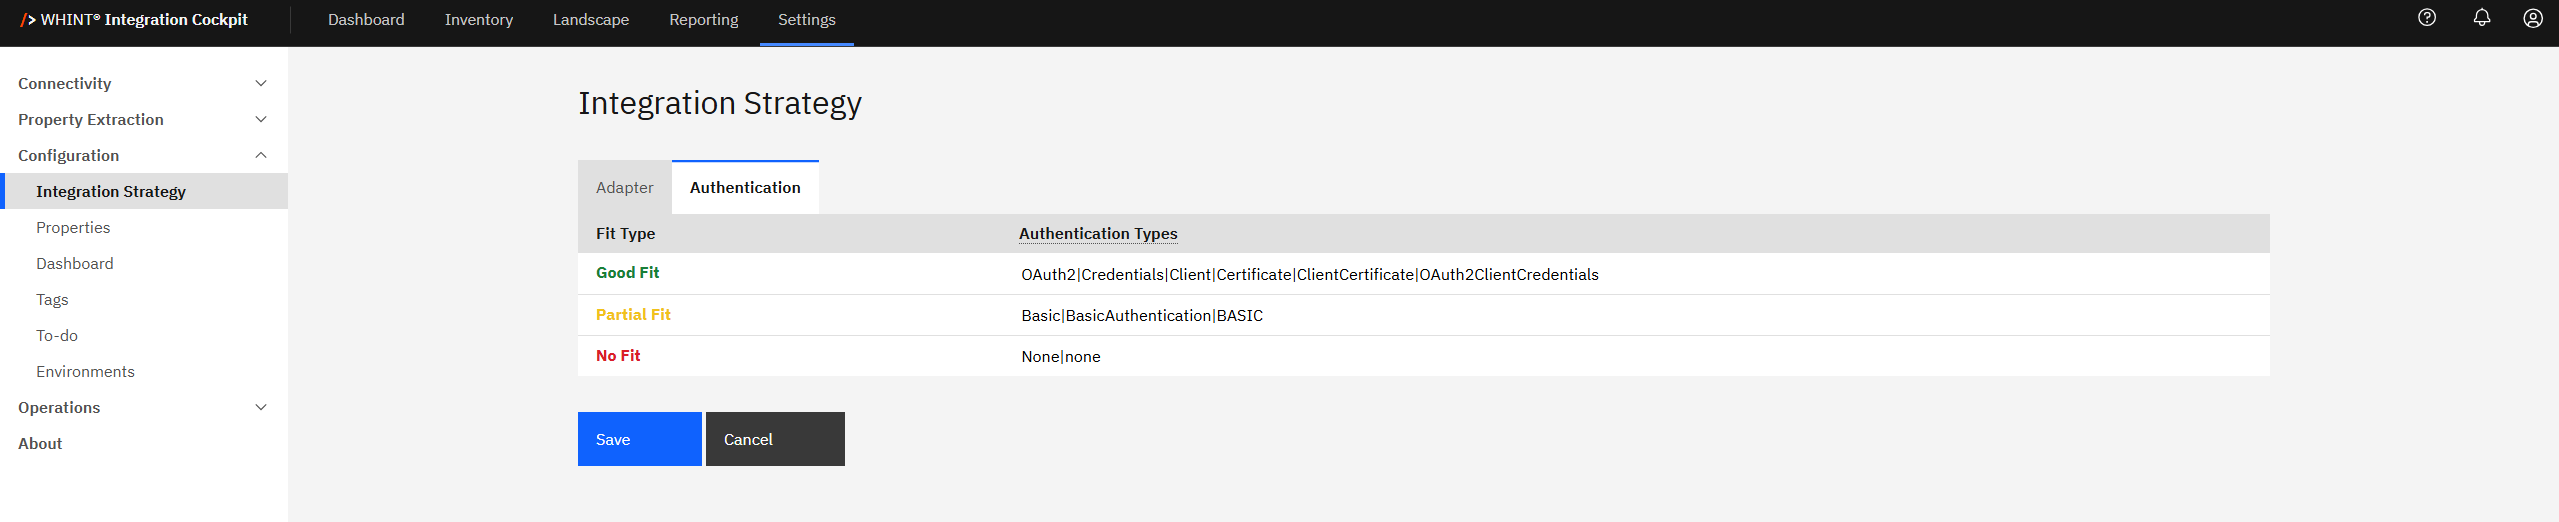
-
Review and configure authentication method classifications in the Fit Type table:
-
Good Fit: Secure authentication methods aligned with your security standards
-
Partial Fit: Acceptable but not preferred authentication methods
-
No Fit: Deprecated or insecure authentication methods
Use pipe-separated values to list multiple technologies.
Example: OAuth2|ClientCertificate|OAuth2ClientCredentials
|
Fit Type |
Common Authentication Types |
|---|---|
|
Good Fit |
|
|
Partial Fit |
|
|
No Fit |
|
-
Click "Save" to apply your settings.
These classifications control how authentication usage is displayed in the Strategy Fit dashboard panels and help ensure security compliance across your integration landscape.
2.4 To-do
Follow these steps to configure To-do criteria for interface enrichment processing:
-
Navigate to Settings → Configuration → To-do.
The To-do list helps identify interfaces requiring enrichment with systems, objects, properties and tags. Configure which criteria determine when interfaces appear in the To-do workflow.
2.4.1 General
-
Select the General tab.
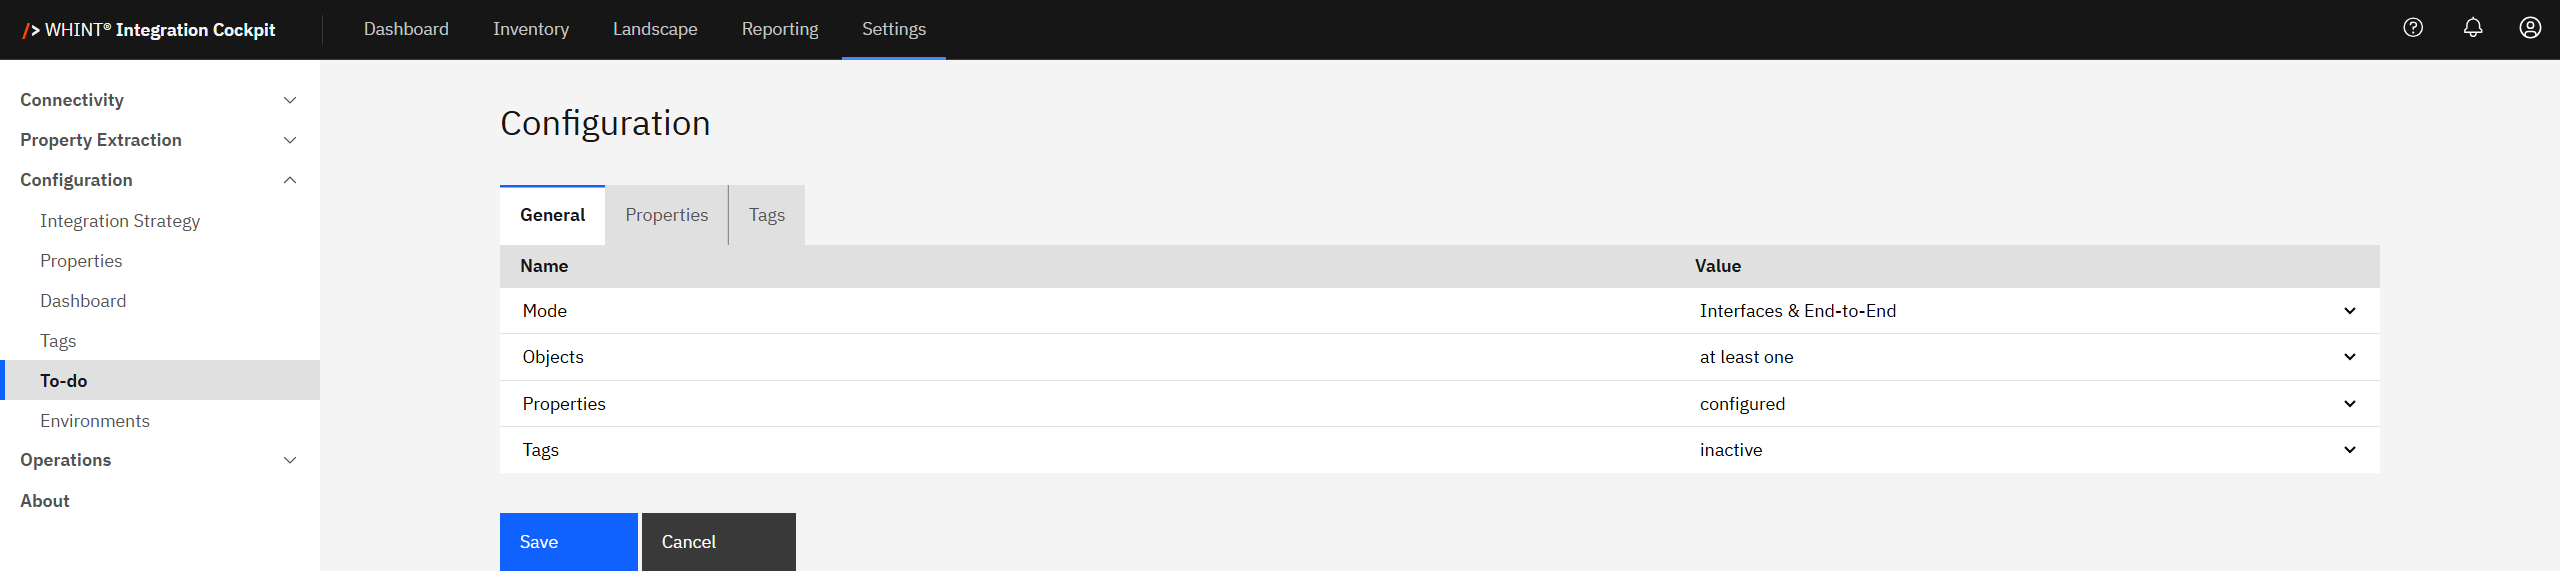
-
Configure To-do criteria:
-
Mode: Select scope - "Interfaces & End-to-End" (recommended), "Interfaces (no End-to-End)", "End-to-End (no Interfaces)", or "inactive"
-
Objects: Set object requirements - "at least one", "configured", or "inactive"
-
Properties: Define property requirements - "configured", "at least one", or "inactive"
-
Tags: Set tag requirements - "configured", "at least one", or "inactive"
-
Selecting "configured" for Properties or Tags requires enabling specific items in the respective tabs.
-
Click "Save" to apply your settings.
2.4.2 Properties
-
Select the Properties tab.
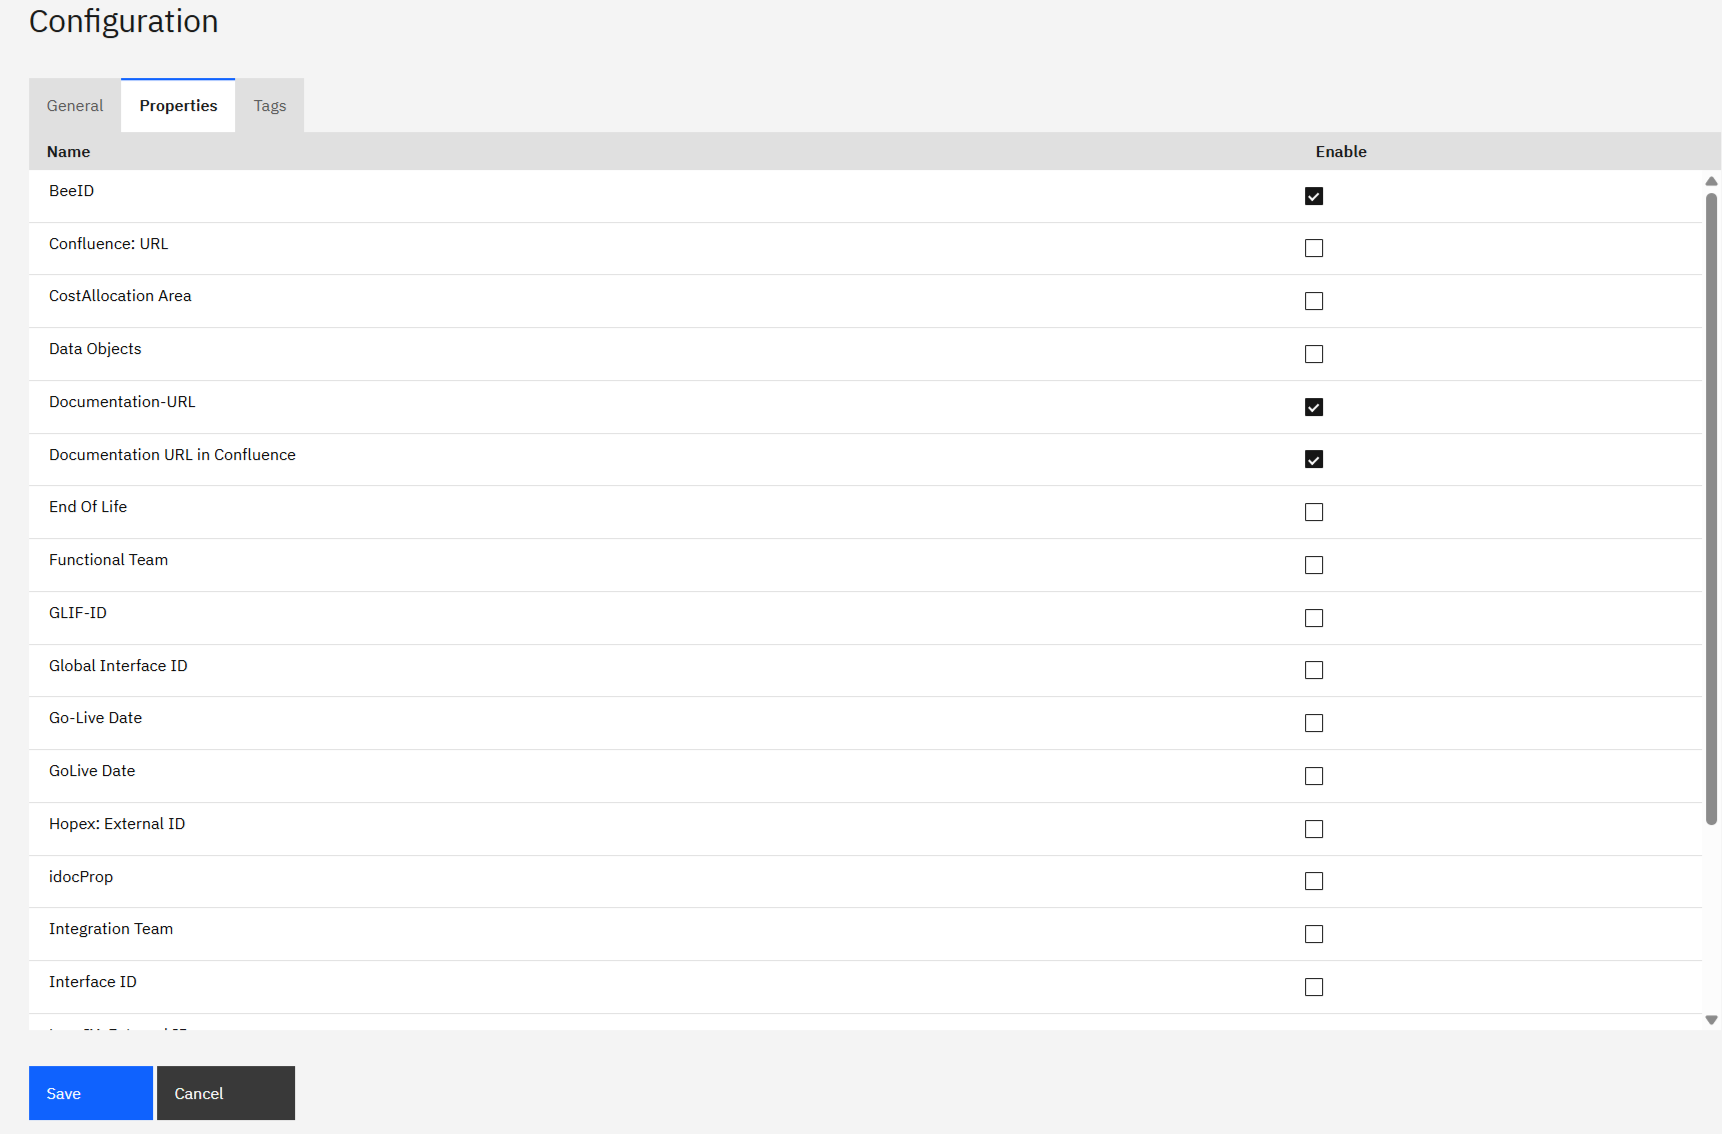
-
Enable properties for To-do enrichment by checking the boxes for properties that should be required during To-do processing.
Note: Only properties configured in 2.1.1 Properties are available here.
-
Click "Save" to apply your settings.
2.4.3 Tags
-
Select the Tags tab.
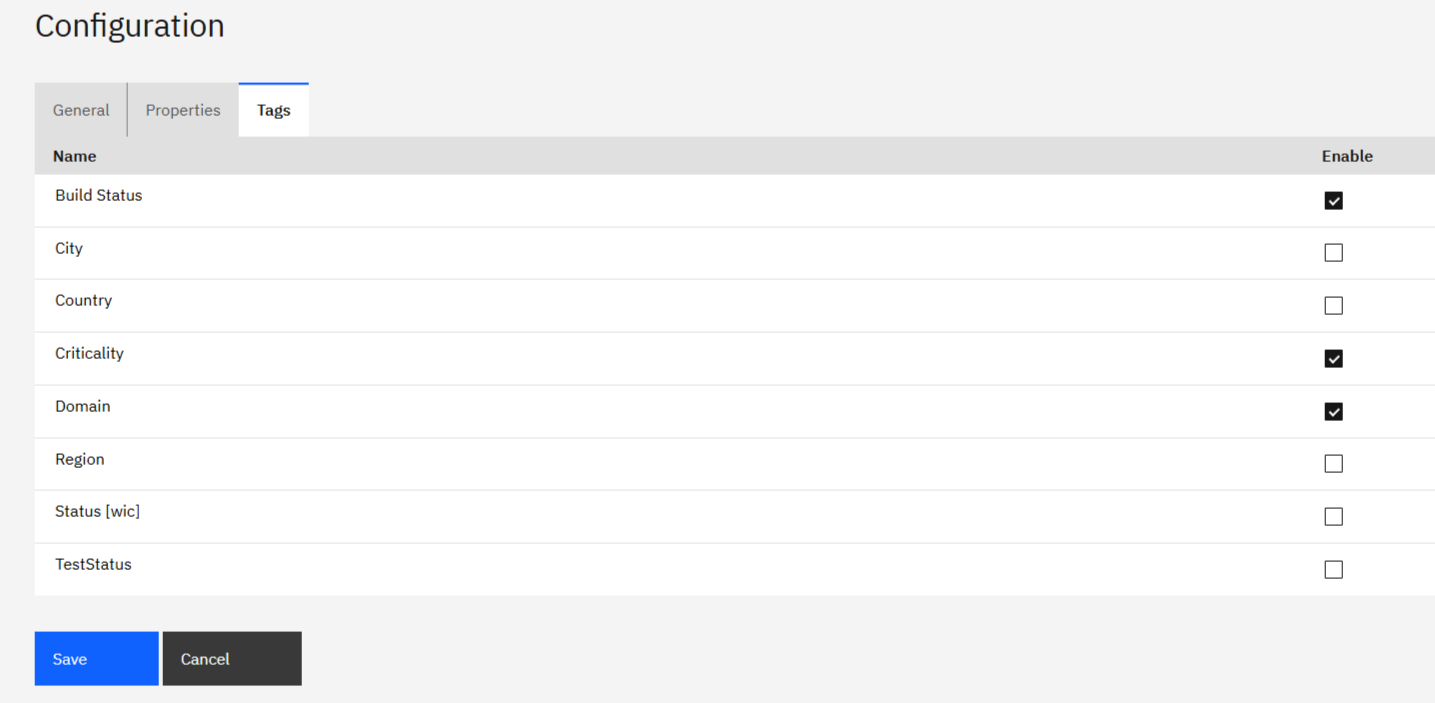
-
Enable tags for To-do enrichment by checking the boxes for tags that should be required during To-do processing.
Note: Only tags configured in 2.1.2 Tags are available here.
-
Click "Save" to apply your settings.
These settings determine which interfaces appear in the To-do list for enrichment and which fields are required for completion.
2.5 Environments
Follow these steps to define the environments in your integration landscape:
-
Navigate to Settings → Configuration → Environments.
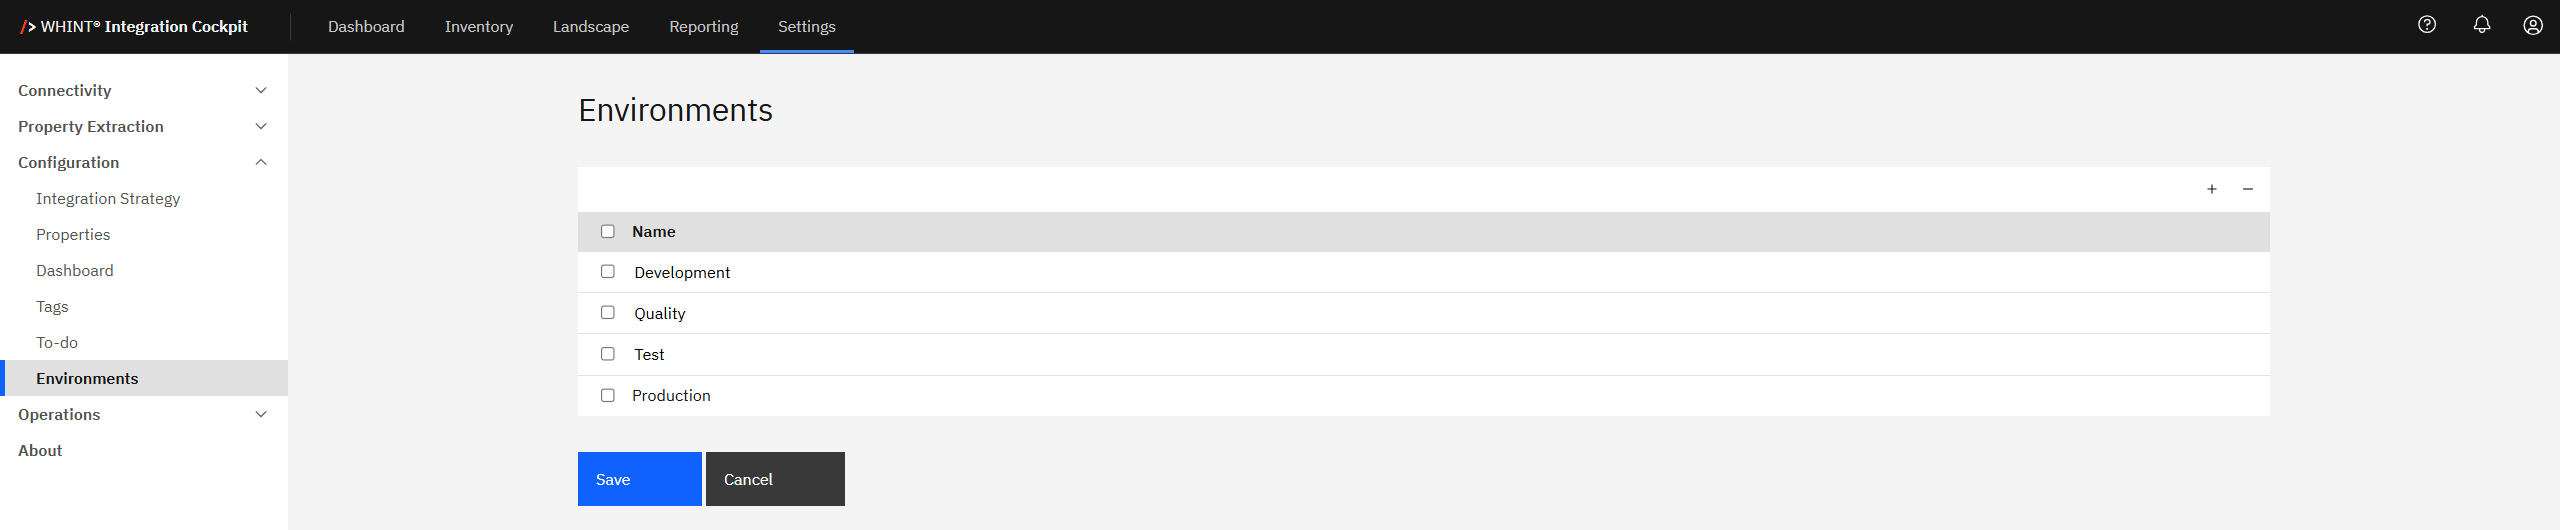
-
Manage your environment definitions:
-
Add an Environment: Click the "+" icon, enter an environment Name (e.g. "Development", "Production"), then save.
-
Remove an Environment: Select the checkbox next to the environment and click the "-" icon.
Standard environment types for integration landscapes:
-
-
Click "Save" to apply your settings.
These environment definitions are used throughout the Integration Cockpit for landscape management, reporting and Landscape Check functionality.
Step 3: Configure Transformation Rules
Transformation rules in the Integration Cockpit allow you to clean, enrich or restructure incoming interface metadata before it is stored in the Inventory. This ensures consistency, harmonization and alignment across connected systems.
Use transformation rules to normalize inconsistent naming, correct interface classifications and inject missing attributes across platforms.
3.1 Prerequisites
Ensure you have defined Systems and Objects before creating transformation rules:
Systems (Applications/Business Systems):
-
Navigate to Landscape → Systems and click "+" to create systems manually
-
Recommendation: Import systems from EAM tools (see 1.4 EAM & IT Management Tools)
-
Configure properties: Source System, System Landscape (DEV/TEST/PROD), Target System (see 2.1.1 Properties)
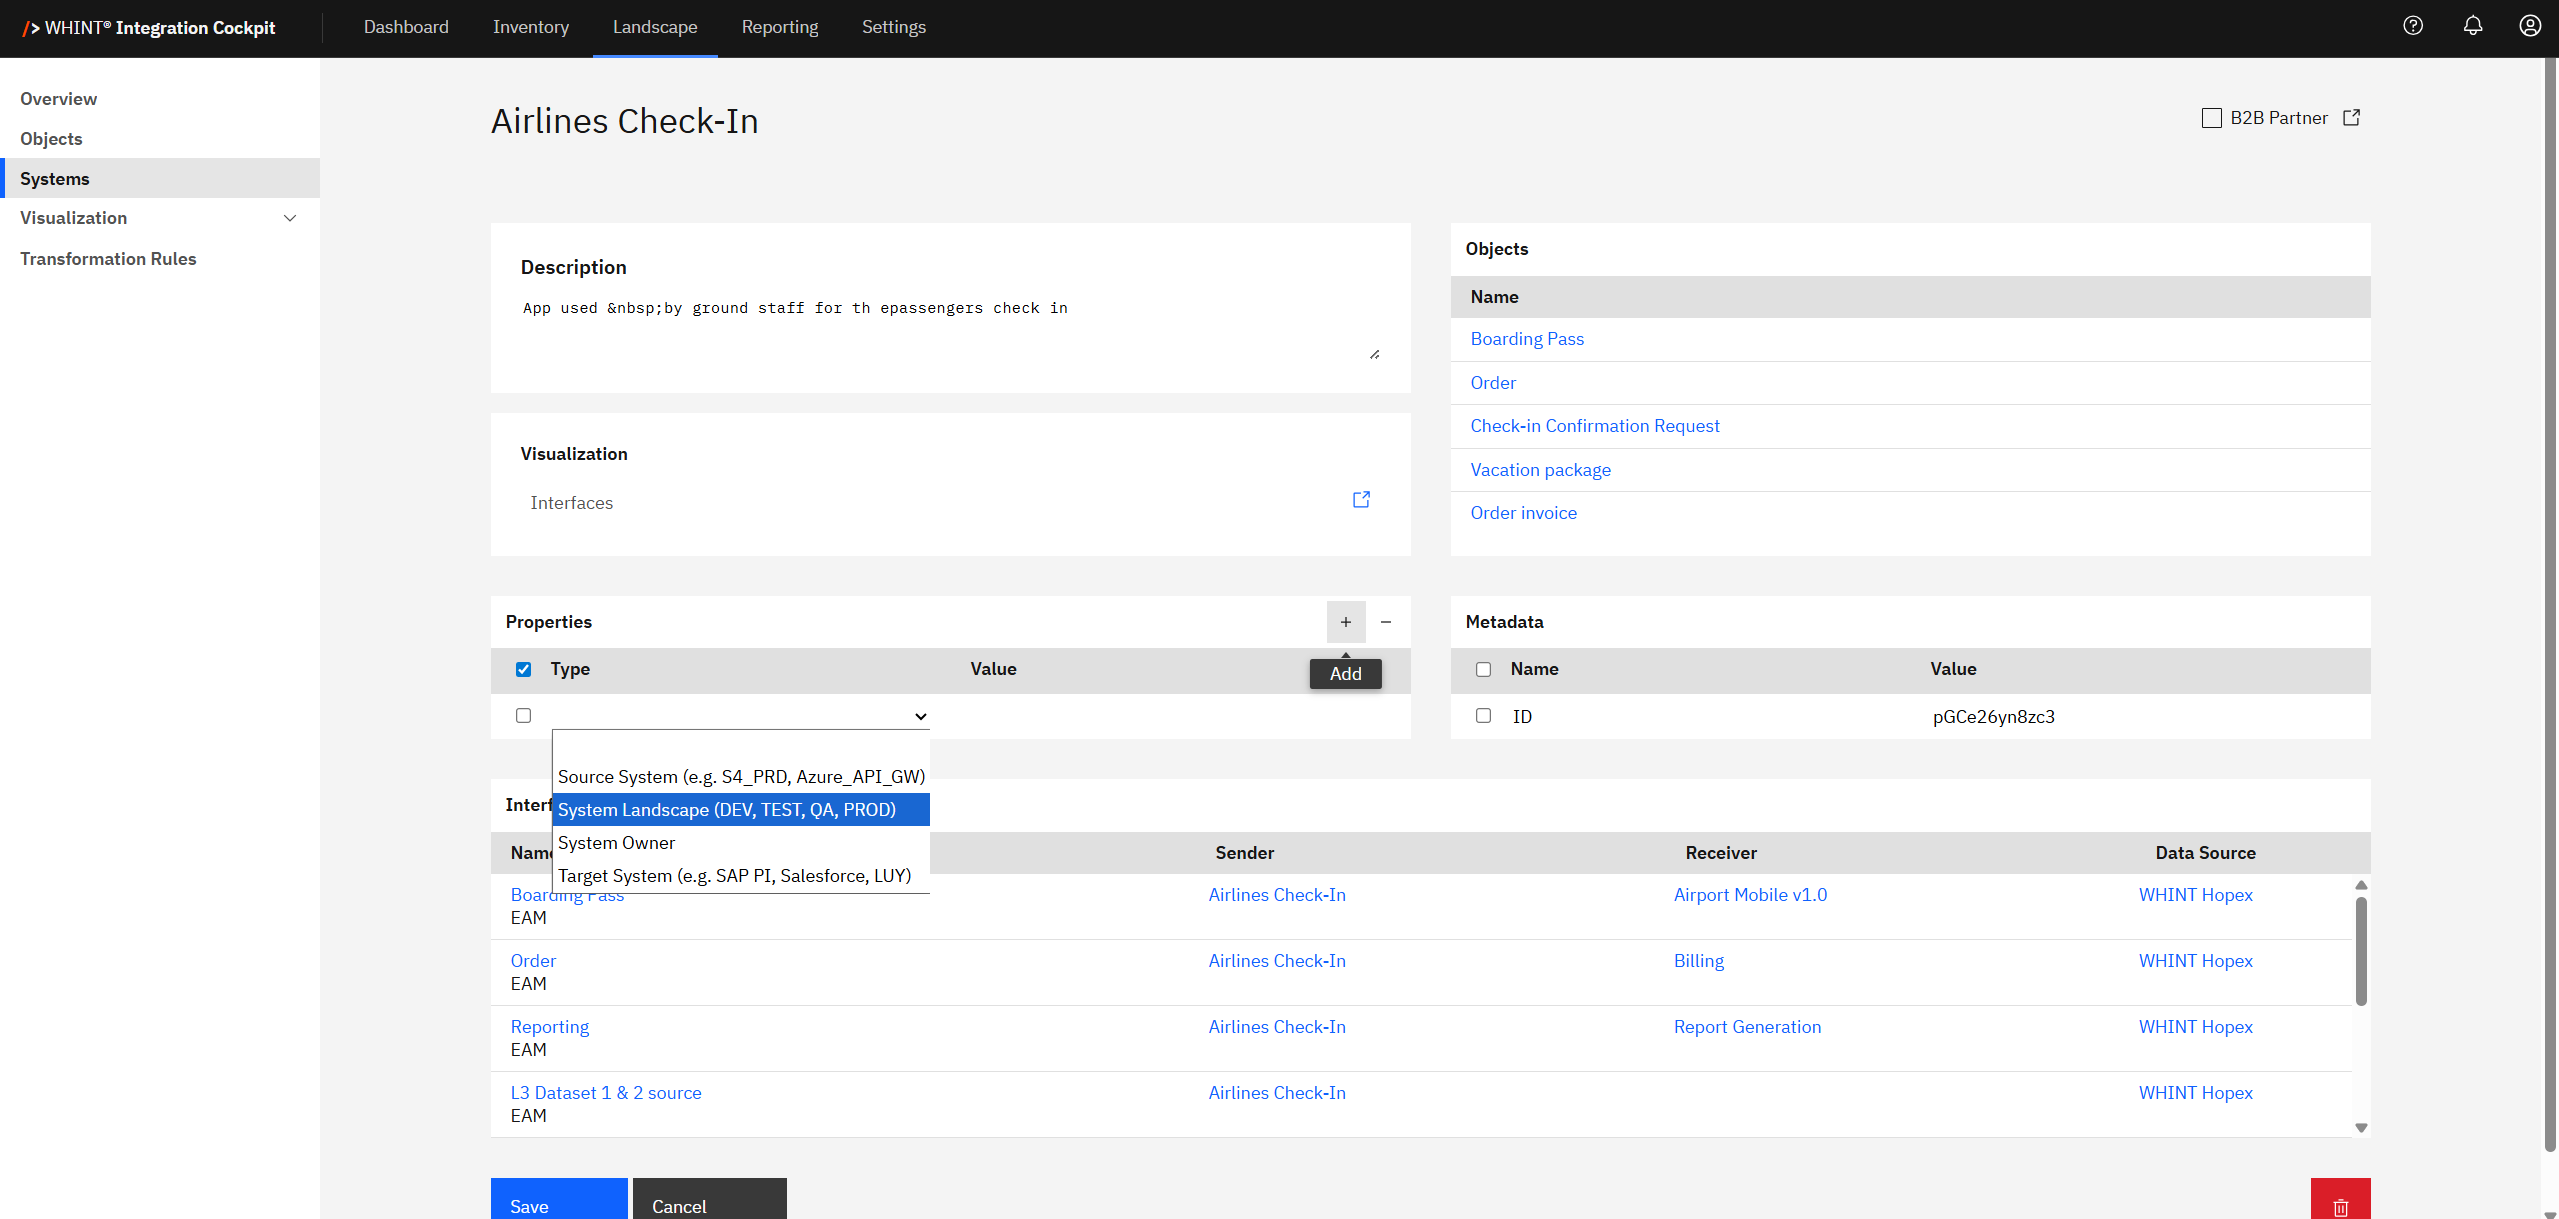
Objects (Data Objects/Business Objects):
-
Navigate to Landscape → Objects and click "+" to create business objects manually
-
Recommendation: Import objects from EAM tools (see 1.4 EAM & IT Management Tools)
-
Add Description, Properties (see 2.1.2 Tags) and Metadata as needed
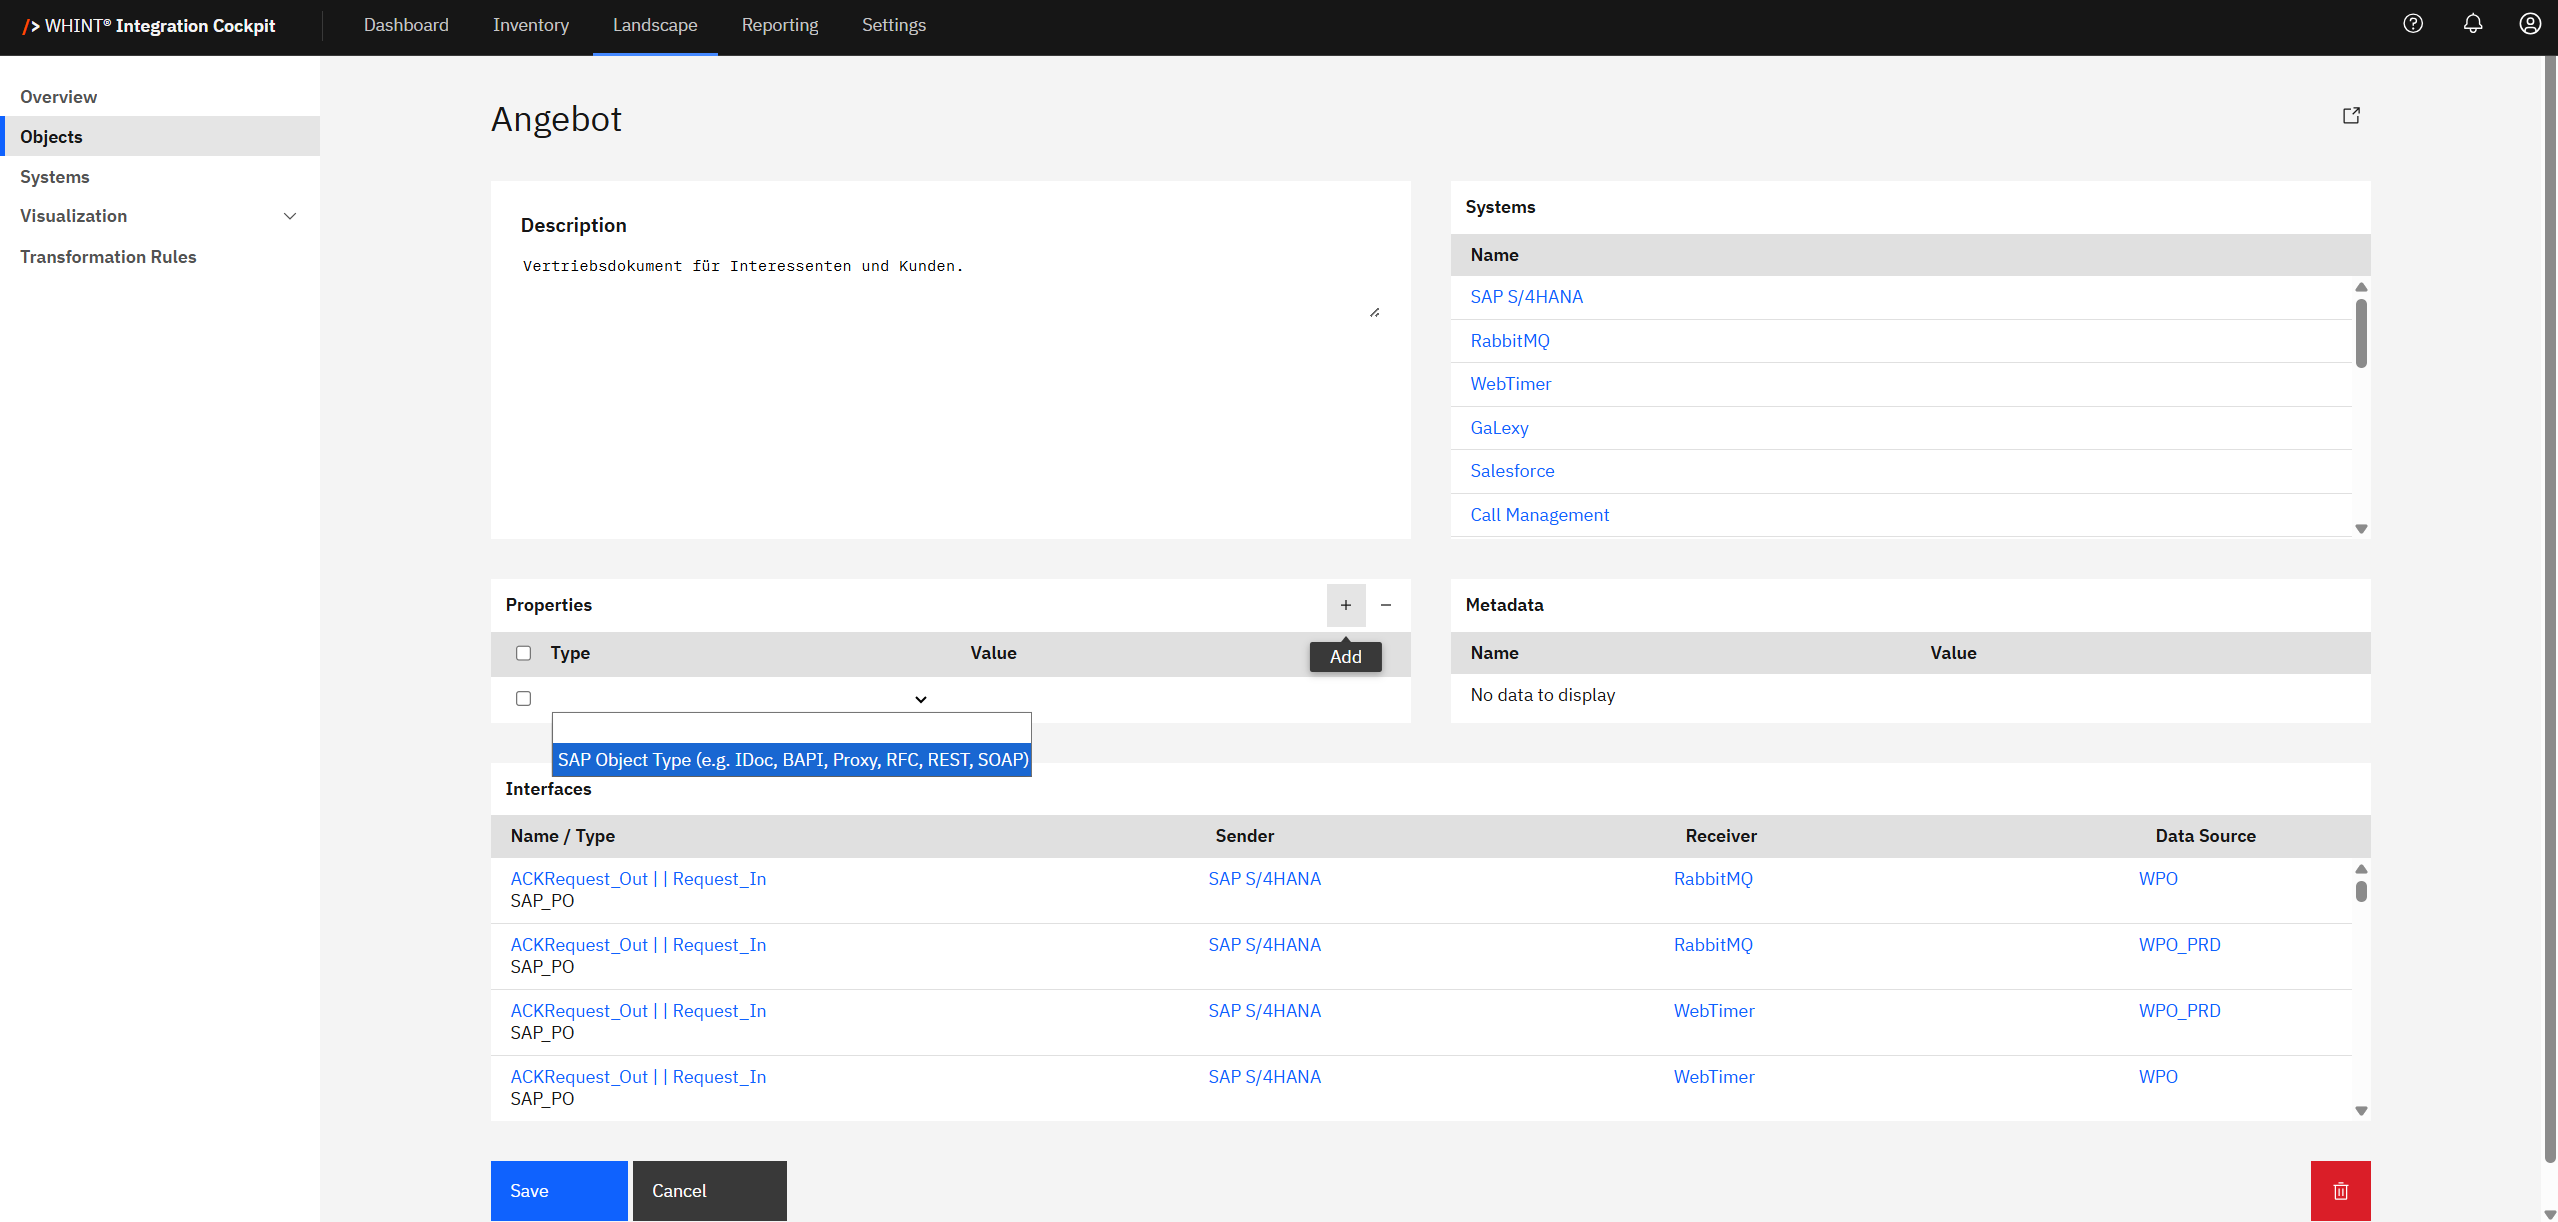
Systems and Objects must exist before creating transformation rules that reference them.
3.2 Create System Mapping
Navigate to Landscape → Transformation Rules and click the Systems tab.
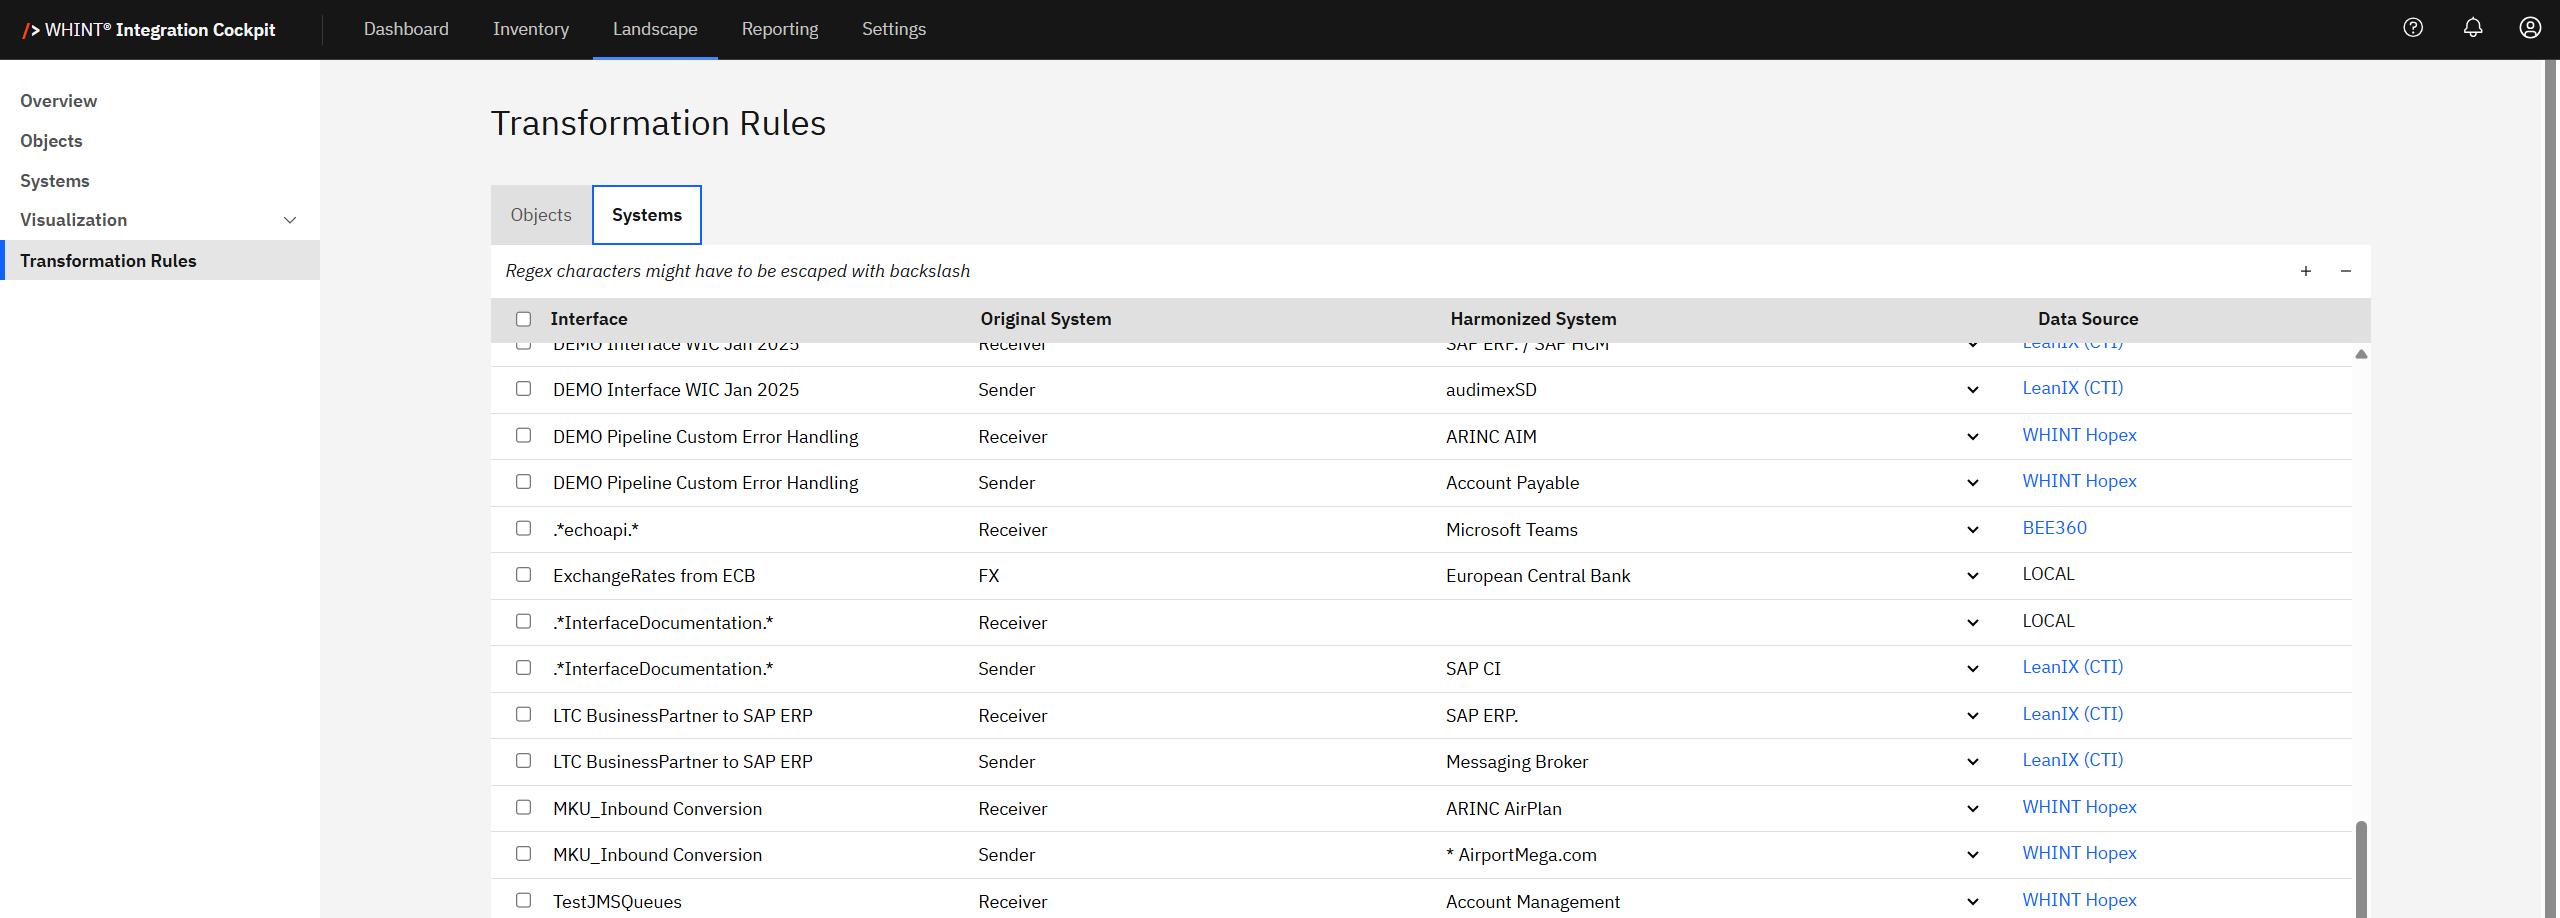
The System Mapping is used to harmonize Interfaces over different systems. For the determination of a harmonized system, the first rule which is matching the Regular Expression (regex) is applied.
Add System Mapping Rules
-
Add a system mapping: Click the "+" button on the top right of the table
-
Fill out the fields:
-
Interface: Enter interface pattern (use
.*as wildcard) -
Original System: Enter the raw system name from your data sources
-
Harmonized System: Select harmonized system from dropdown list
-
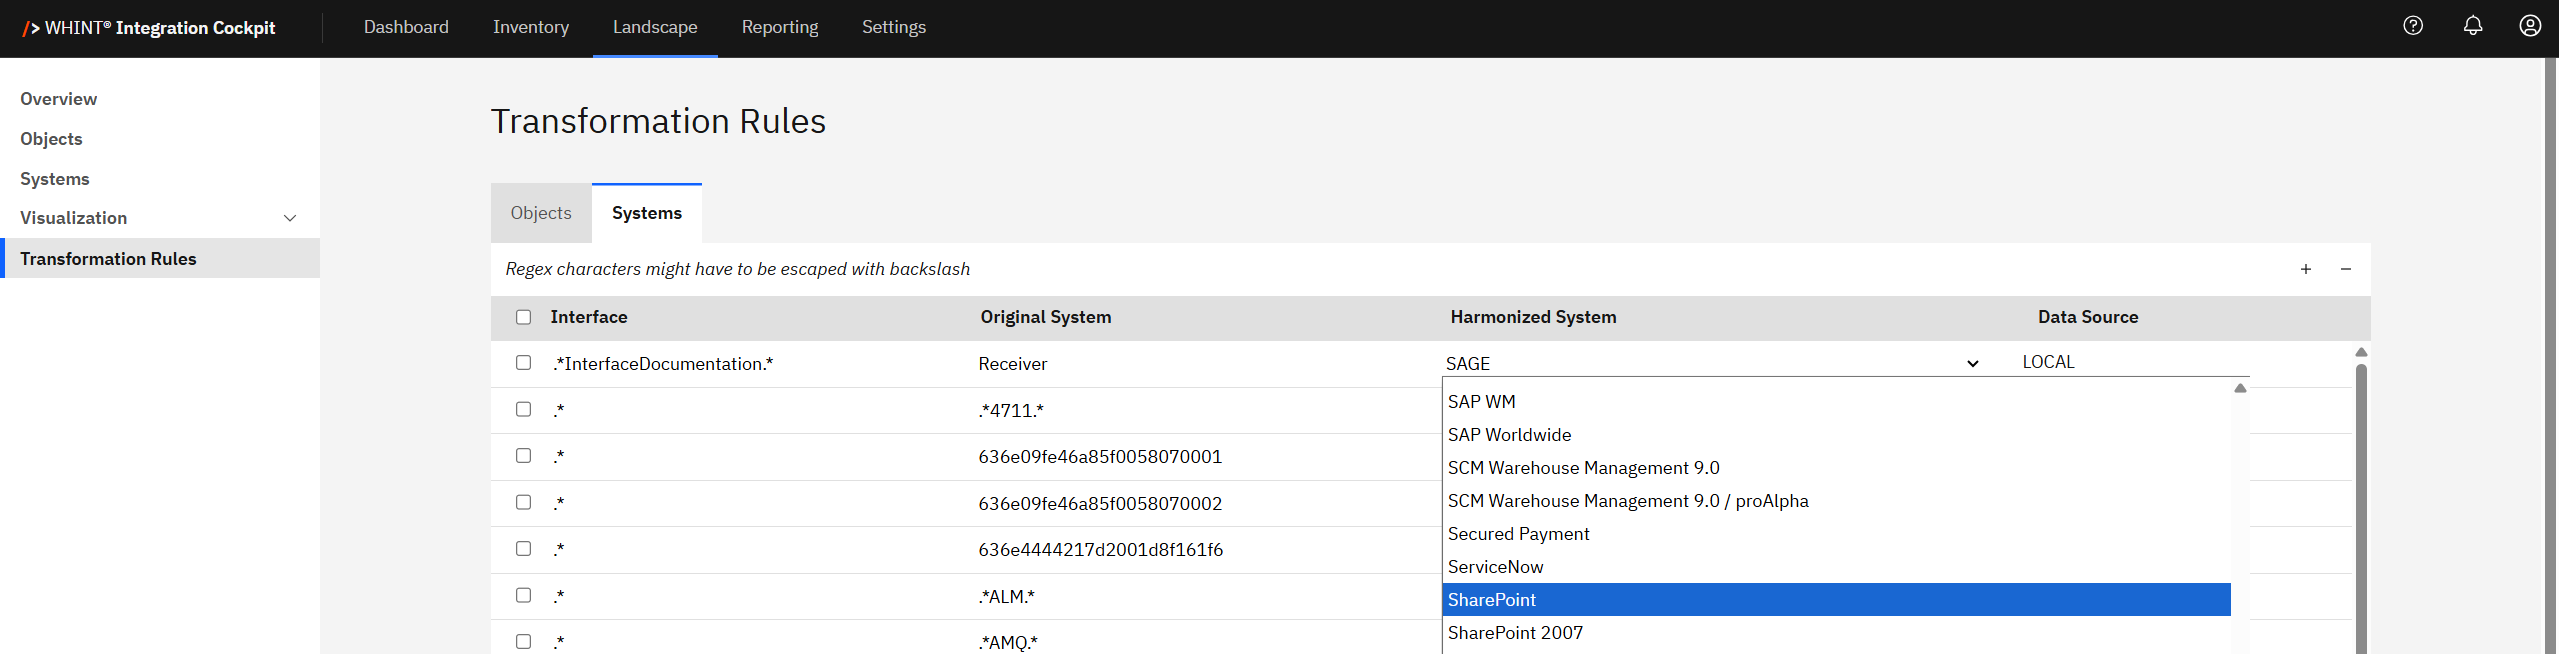
-
Enable the rule: Check the checkbox to activate the transformation rule
Example System Mappings
Option 1: By System
-
“SFTP” is transformed into “File Server (xChange)” for any interface (.*)


Option 2: By Interface
-
All interfaces containing “DeletedMessage” and system name ending with “RabbitMQ” is transformed into “Messaging Broker”


Option 3: By Interface w/out Sender & Receiver
-
Interface “Application_Autoscaler_custom_metrics_API” is mapped with Sender = “” and Receiver = “”


-
Save configuration: Click on "Save"
-
Update inventory: Click on "Update Inventory" on the right side to update the data in the inventory
You can use RegEx in the Interface field. .* = Wildcard for matching any string. For system transformation, the first matching rule wins.
3.3 Create Object Mapping
Click the Objects tab to assign business objects to interfaces. Unlike system rules, all matching object rules are applied.
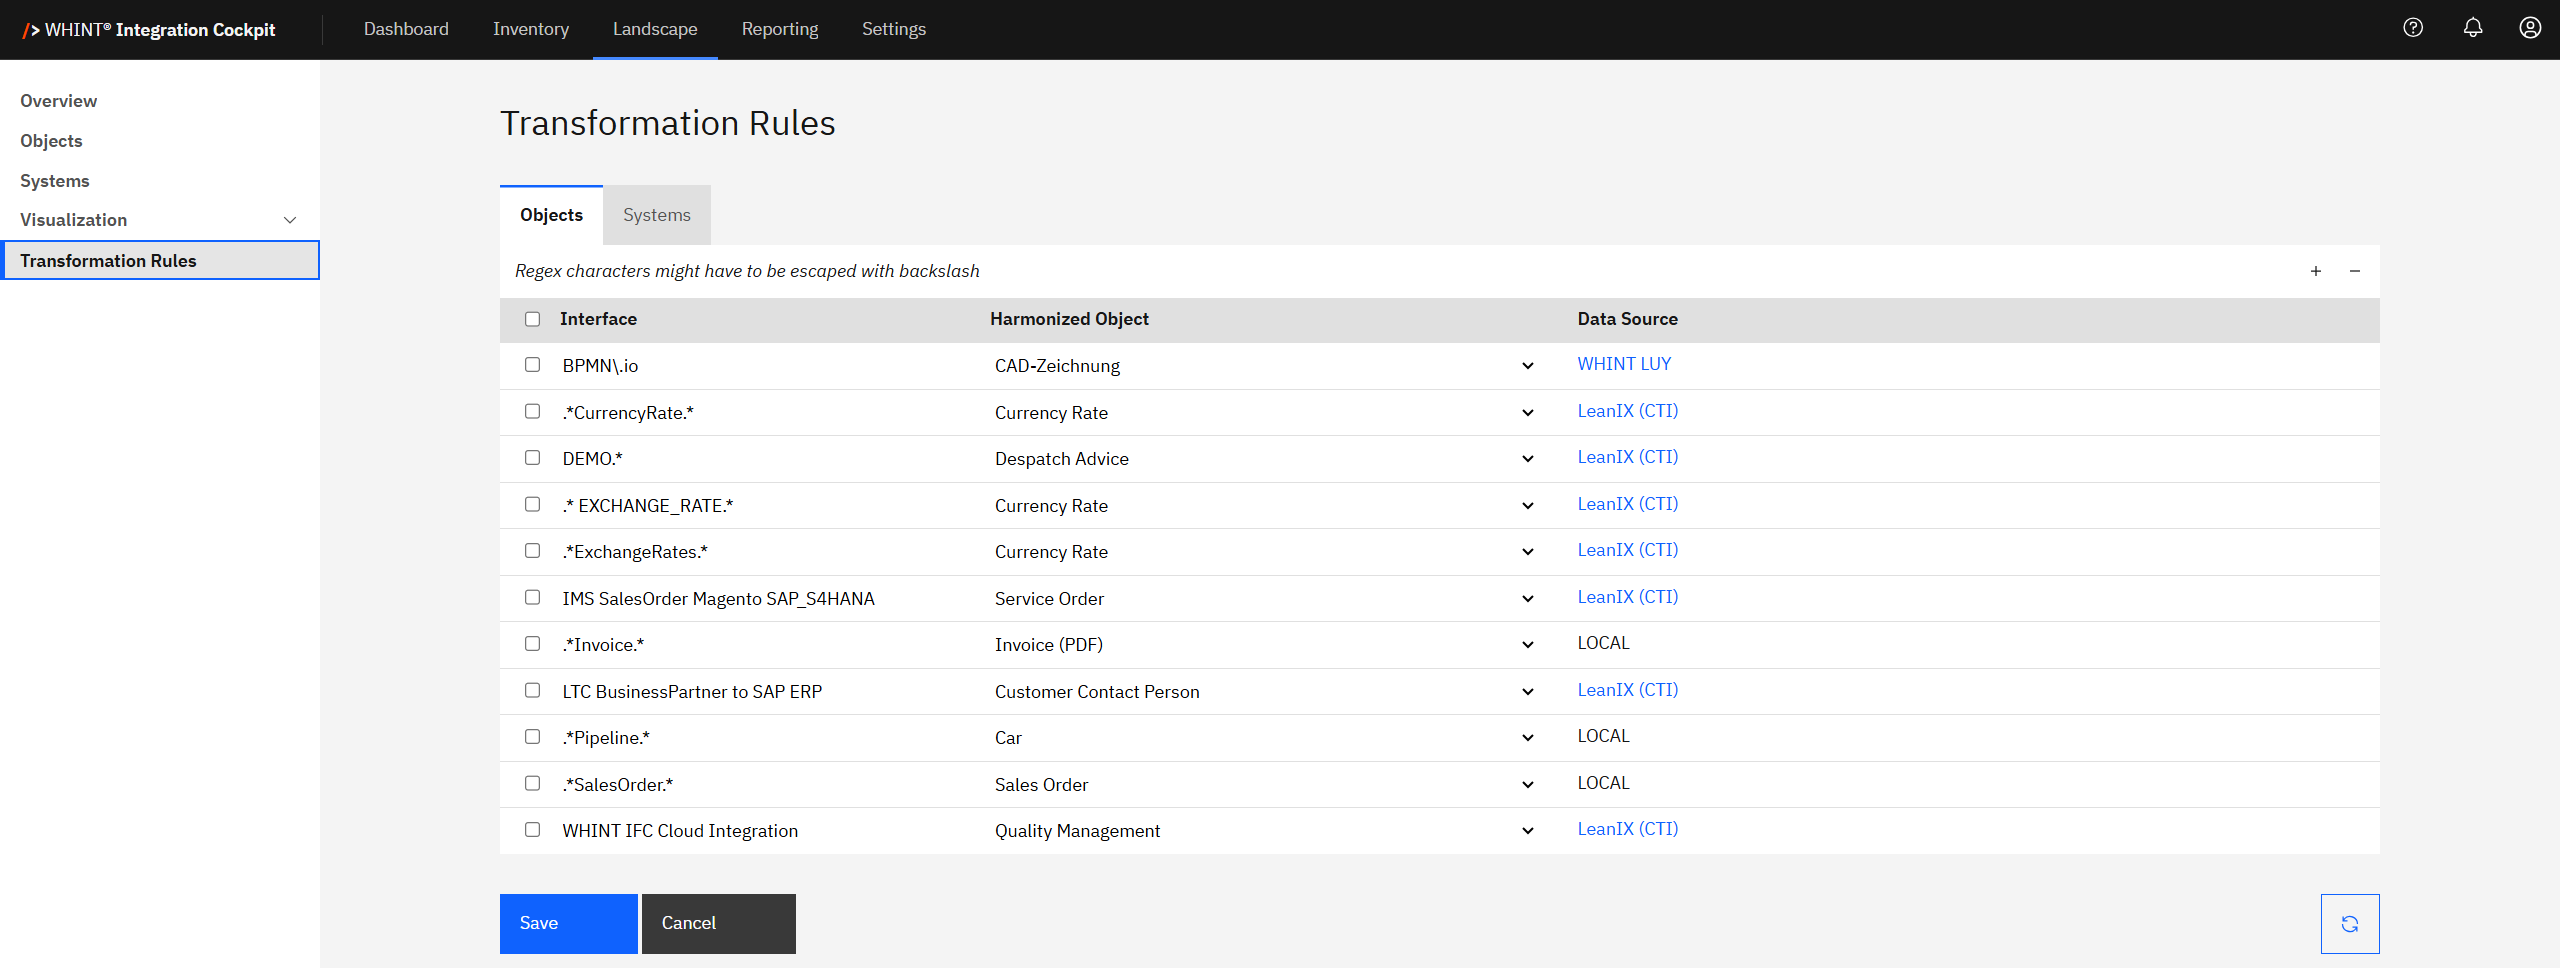
Add Object Rules:
-
Click the "+" button to add object rules
-
Configure:
-
Interface: Enter interface name pattern (regex)
-
Harmonized Object: Select business object from dropdown
-
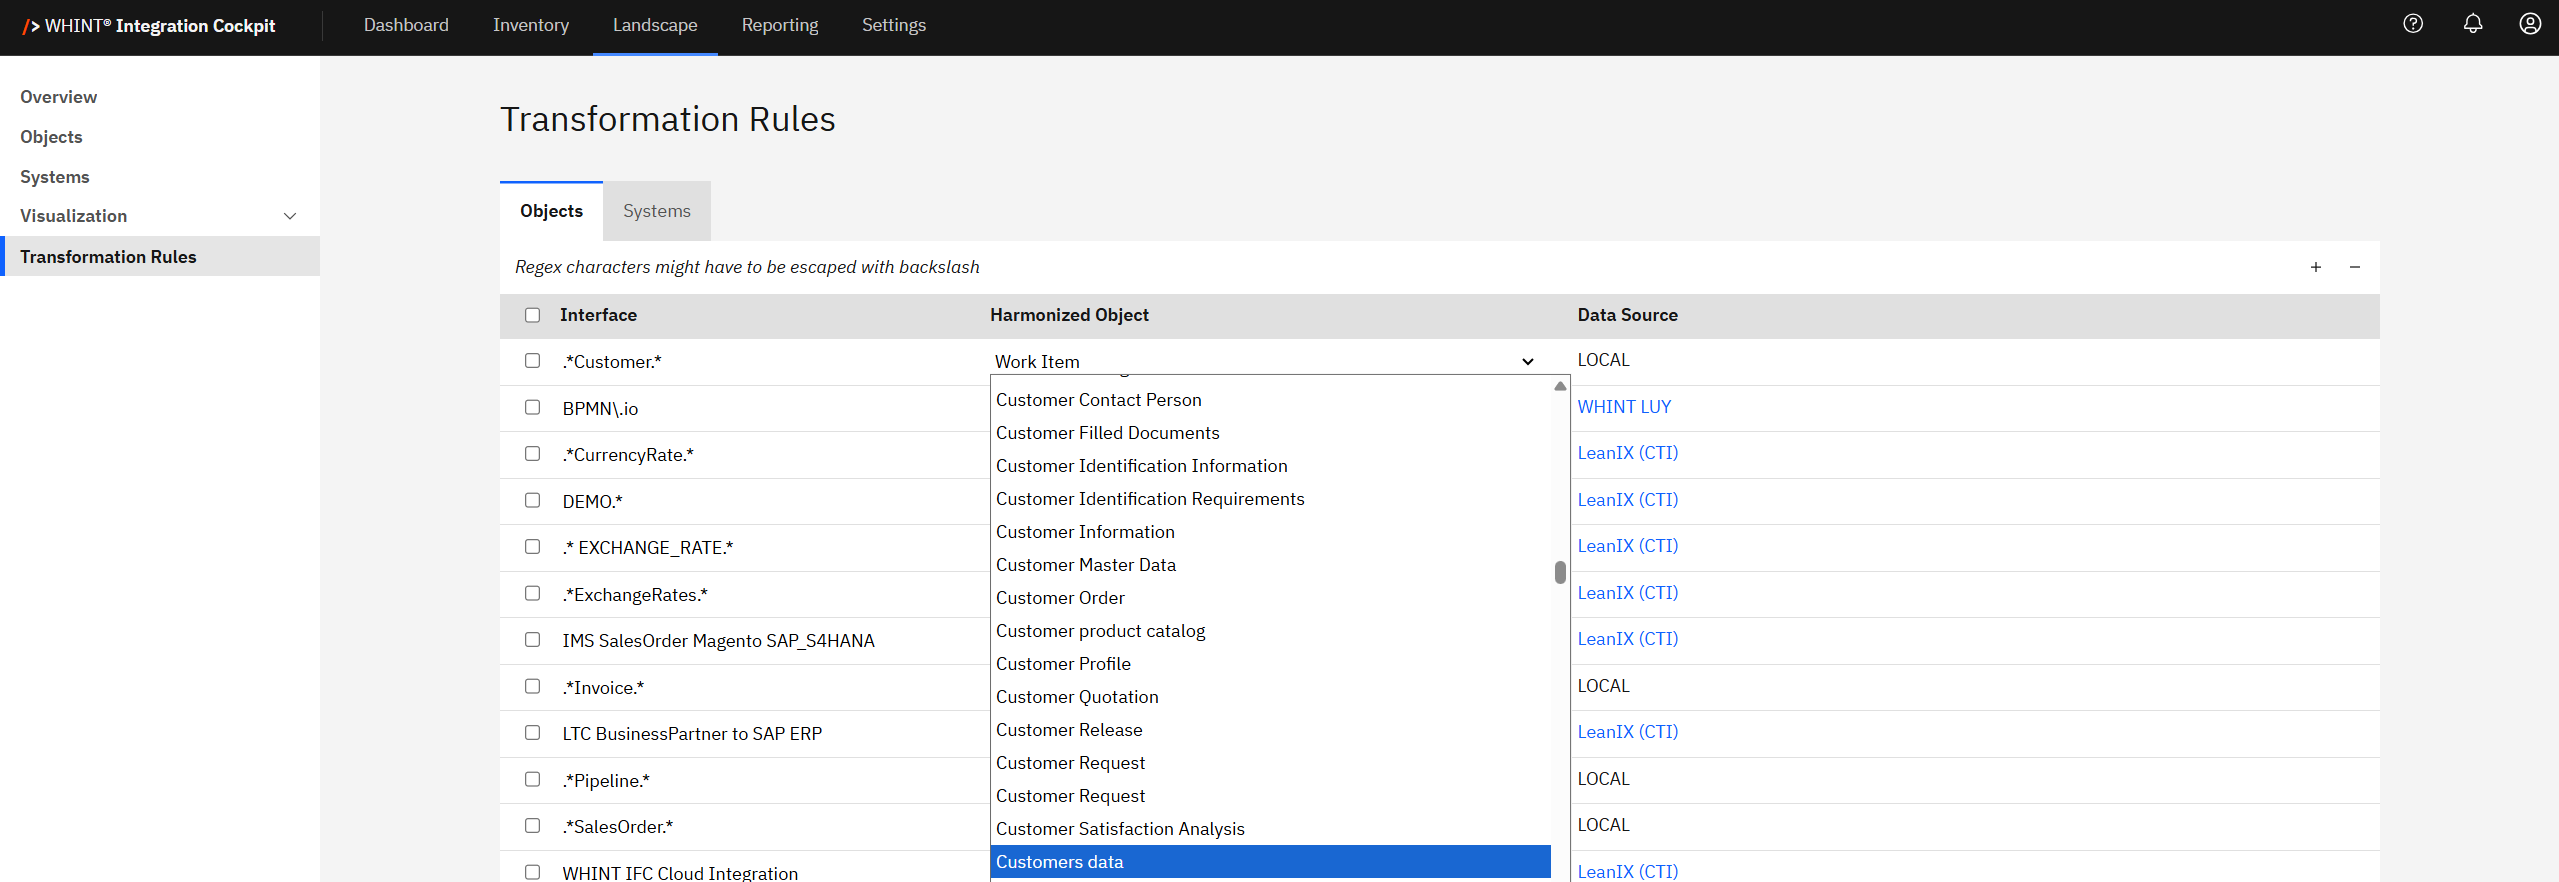
-
Enable the rule: Check the checkbox to activate
-
Save changes: Click "Save" under the table
Multiple Objects: Unlike system rules (first-match-wins), object rules allow multiple matches - interfaces can have several assigned objects.
3.4 Apply and Validate
-
Update inventory: Click "Update Inventory" on the right side to apply transformation rules to existing data
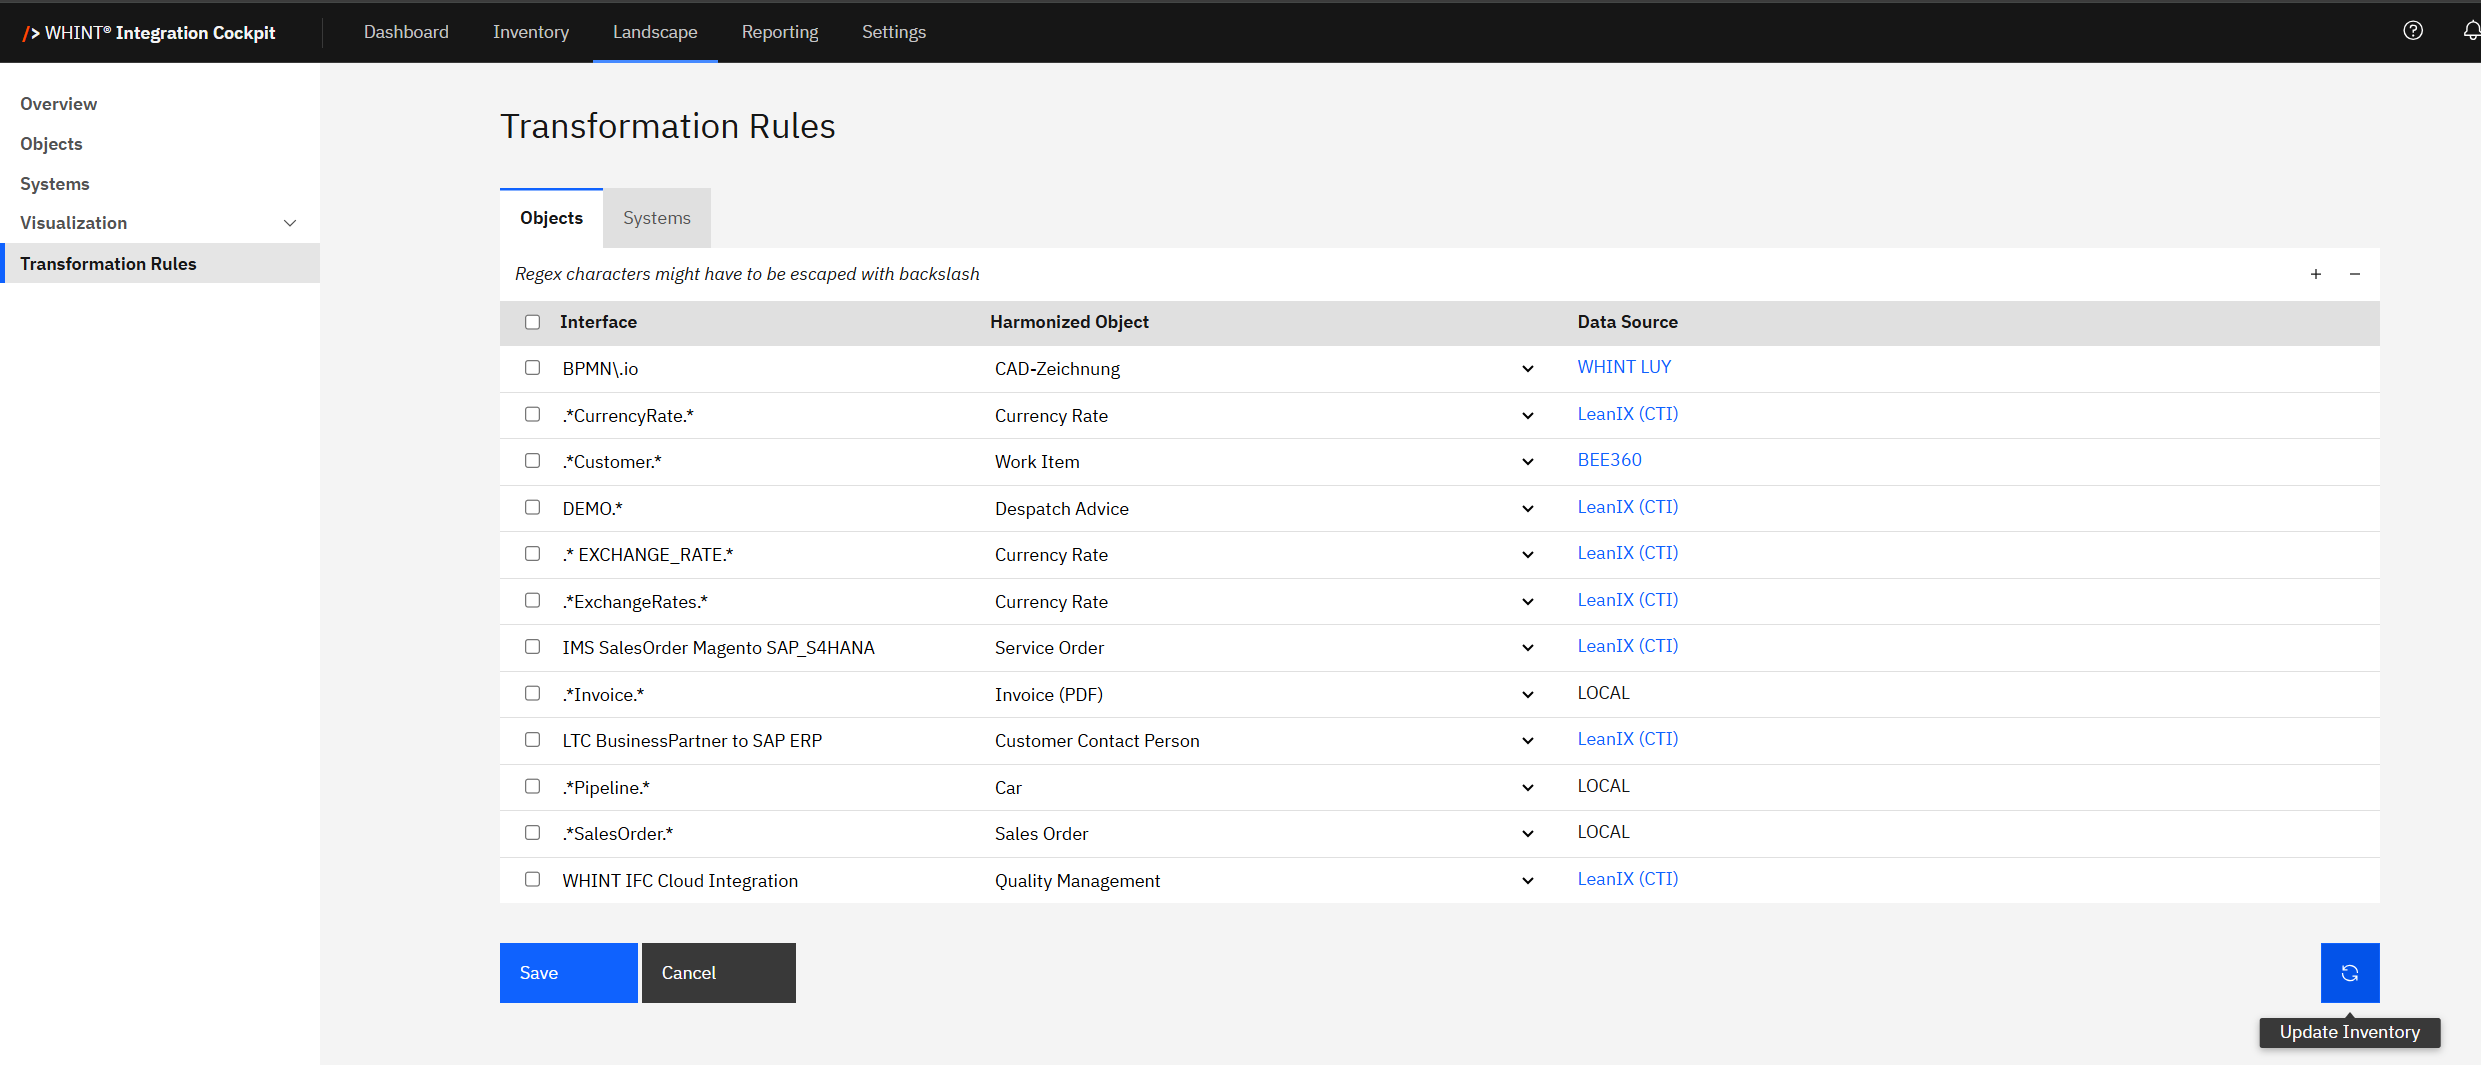
When the rule was successfully executed, your Inventory interface will have a Sender and/or Receiver System and/or Object assigned. You can verify this if the system is clickable (through a hyperlink).
-
Verify success: Navigate to Inventory → Interfaces → Catalog
-
Successful mapping: Sender and Receiver columns show harmonized system names (e.g. "SAP Solution Manager", "B2B Supplier")
-
Tags populated: Business objects appear in Tags column
-
Clickable systems: System names appear as blue hyperlinks
-
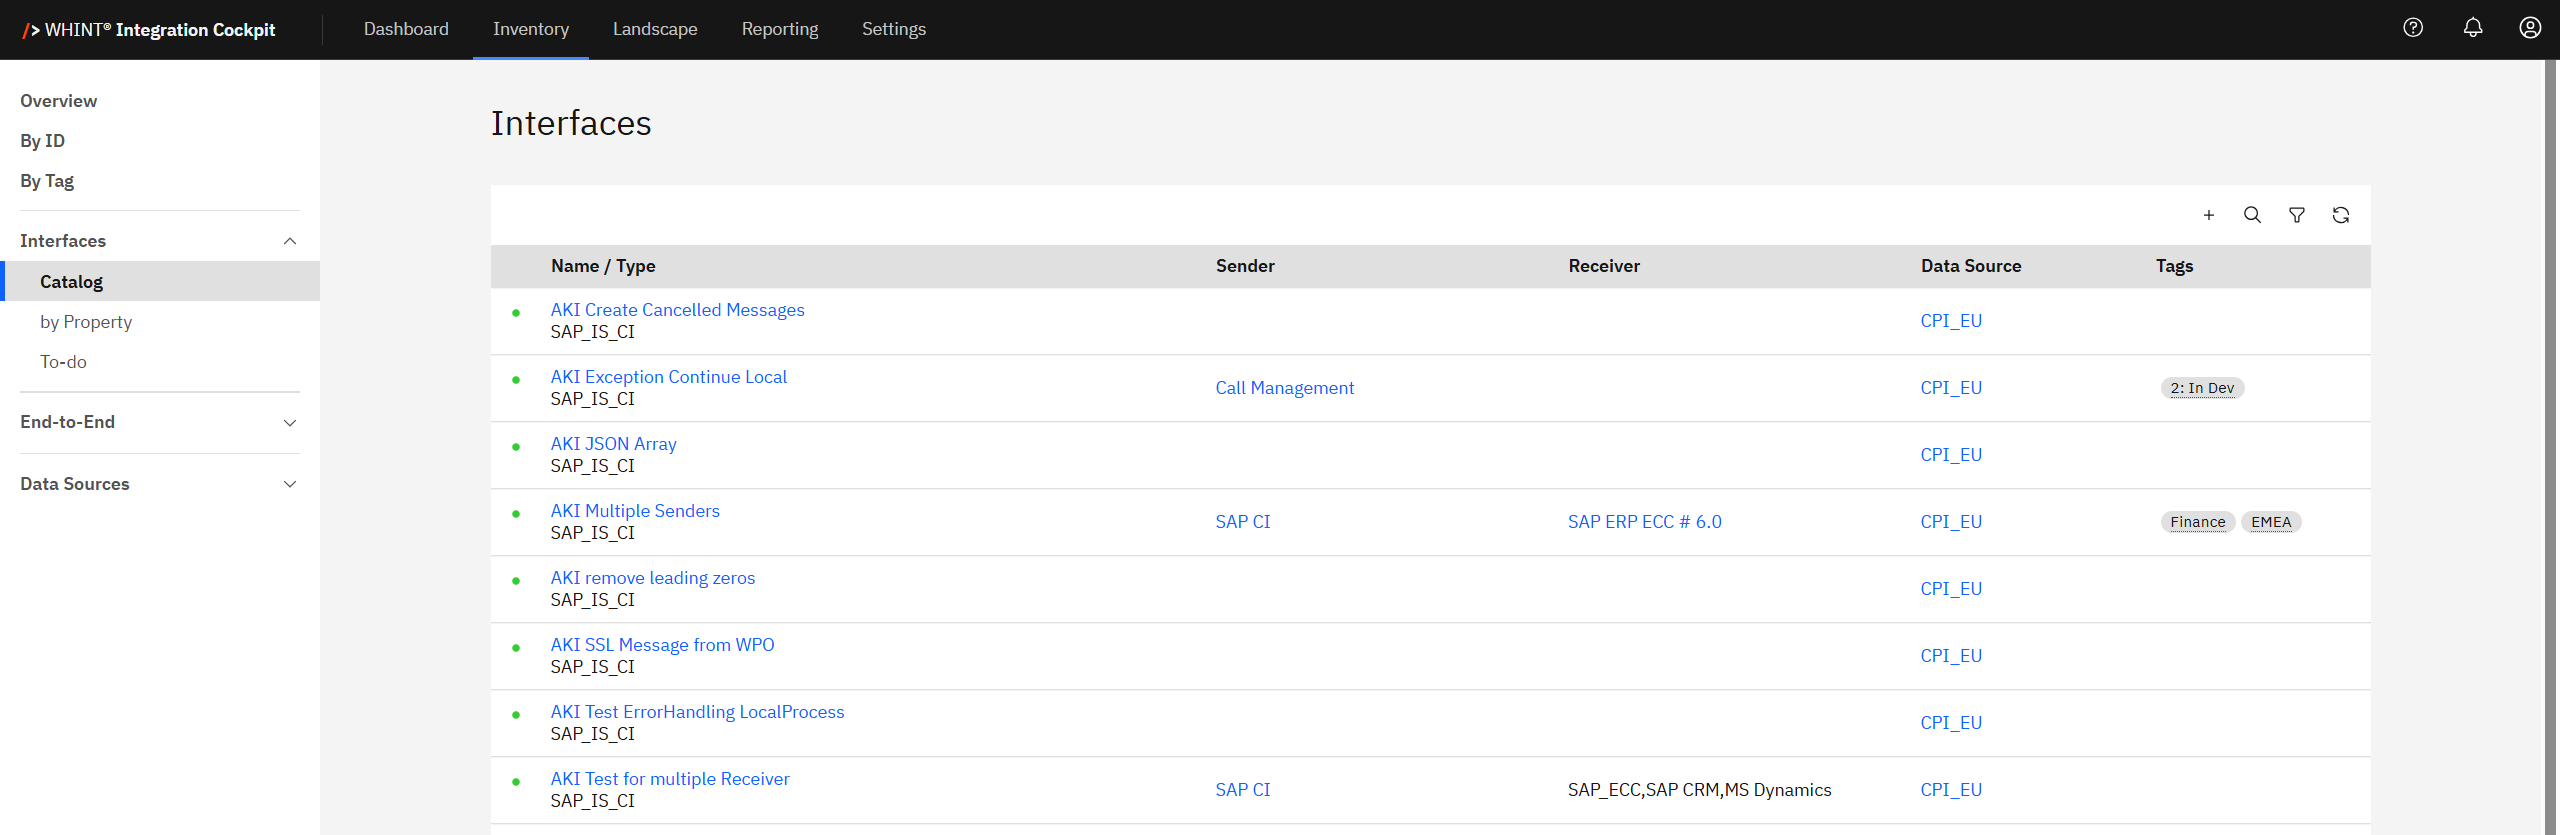
-
Review incomplete items: Navigate to Inventory → To-do for interfaces requiring additional rules
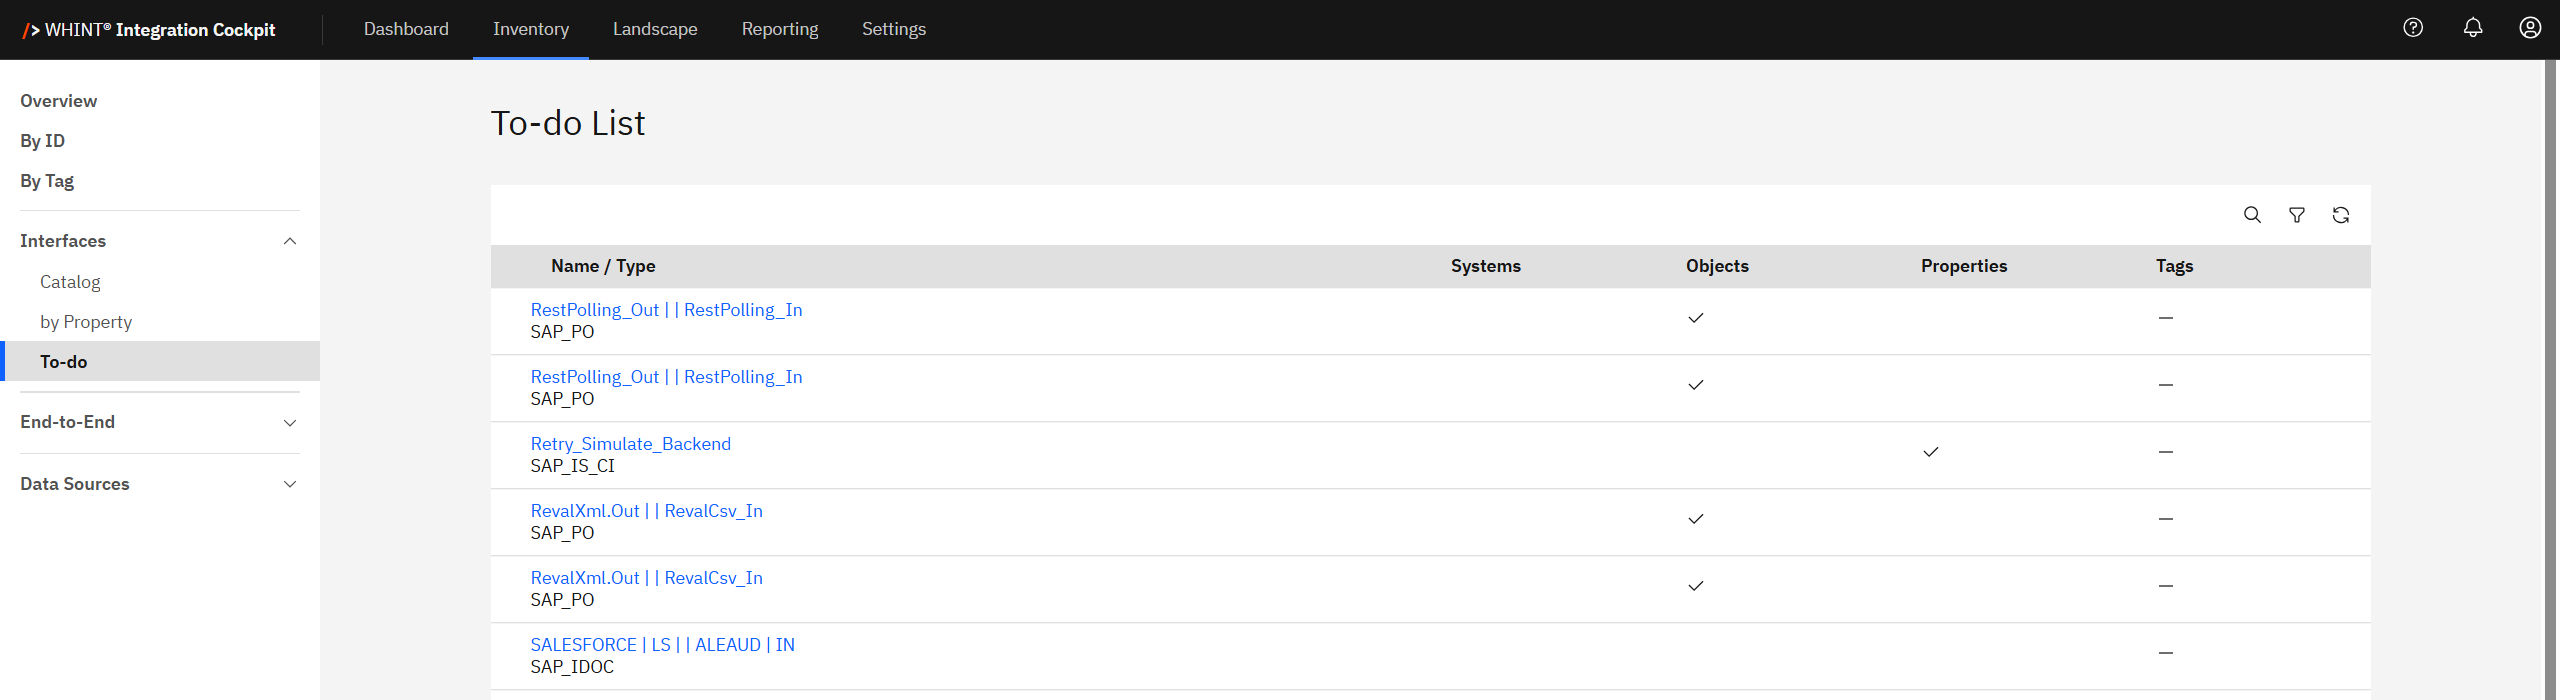
Validation Indicators:
-
Successful mapping: System names are clickable hyperlinks (blue text) - this is the key verification method
-
Object assignment: Business objects appear in interface details
-
Incomplete mapping: Interfaces appear in Inventory → To-do area
Incomplete transformations appear in Inventory → To-do for manual enrichment. Interfaces with complete transformations show populated Sender/Receiver columns in the Interfaces Catalog.
Best Practices:
-
Keep naming conventions consistent with your organization's integration standards
-
Use prefixes or tags only if meaningful (API_, IDOC_, etc.)
-
Document each rule's purpose using the Description field
-
Order system rules from most specific to most general (first-match-wins logic)
Learn more:
Step 4: Map End-to-End Integrations
End-to-end integrations in the Integration Cockpit allow you to model complete integration flows that span multiple interfaces across different integration components. This provides complete visibility of your integration landscape from application to application, including complex sequences that run across API gateways, brokers and cloud integration platforms.
4.1 Create End-to-End Integrations
Follow these steps to create end-to-end integrations manually:
-
Navigate to Inventory → End-to-End Integrations
-
Click “+” to create a new integration
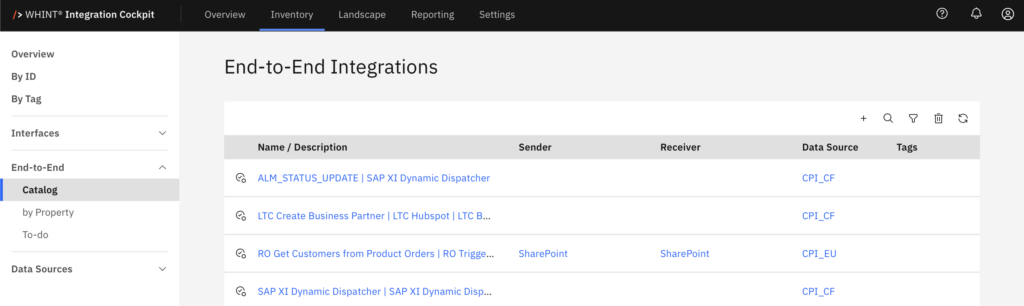
-
In the Add Interfaces dialog:
-
Search for interfaces using the search field
-
Filter by Data Source if needed
-
Select checkboxes for interfaces in your integration flow
-
Click “Add”
-
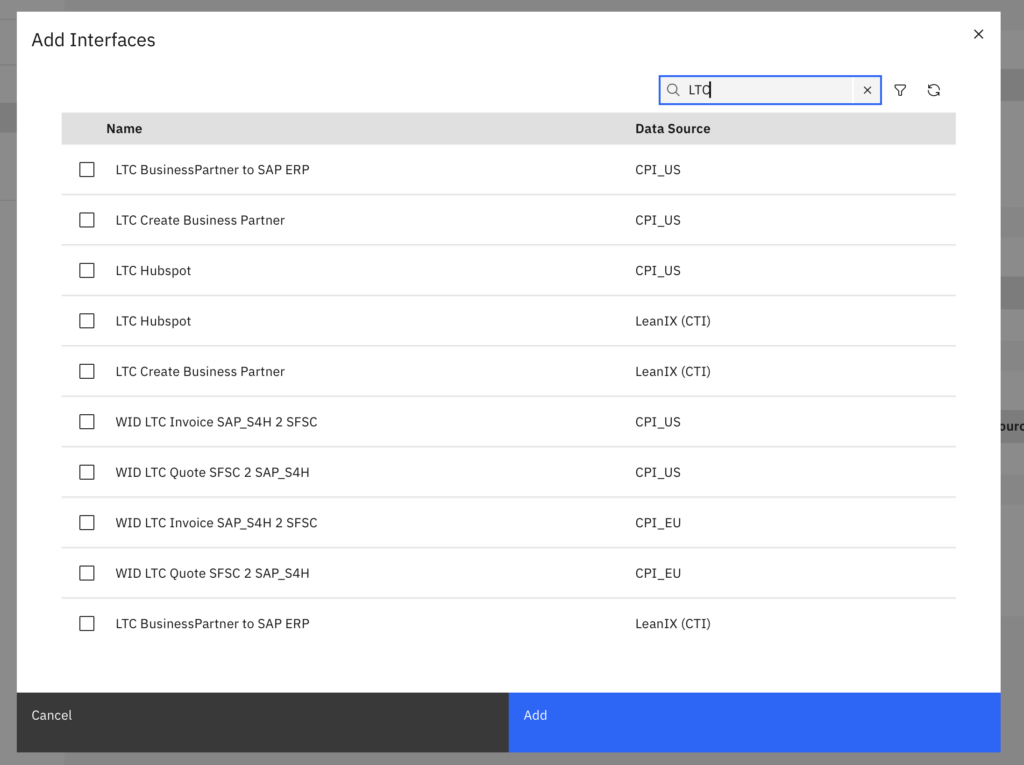
-
Configure integration details:
-
Name/Description: Provide clear business name
-
Sender: Select originating system
-
Receiver: Select destination system
-
Sequence: Drag interfaces in # column to correct order
-
-
Add Tags and Properties as needed
-
Click “Save”
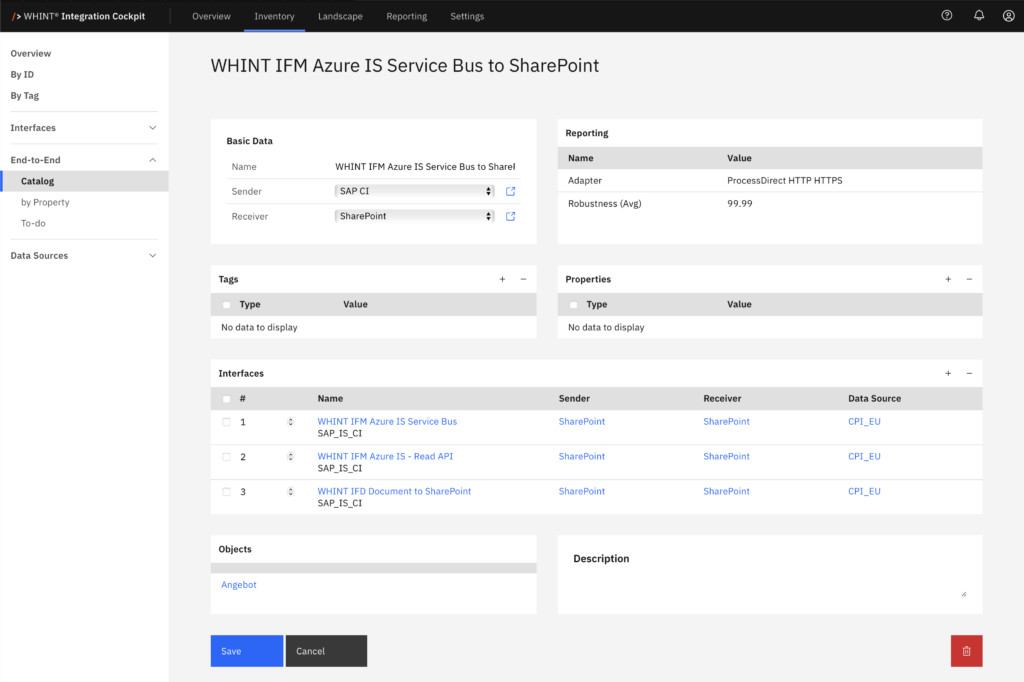
Quick Tip: Environment and reporting data are automatically inherited from the selected interfaces.
4.2 Auto-Generated Proposals
For SAP Integration Suite: Cloud Integration interfaces, the system automatically generates end-to-end integration proposals based on message traffic analysis (correlations).
-
Review proposals marked with the proposal symbol in the list
-
Validate the suggested interface sequence and relationships
-
Add missing Tags, Properties or Description
-
Click “Save” to convert proposal to permanent integration
Verify Interface Context
Check your end-to-end integrations from individual interface perspectives:
-
Open any interface that's part of an end-to-end integration
-
Review the End-to-End Integration section showing:
-
Predecessor: Previous interface in sequence
-
Successor: Next interface in sequence
-
Integration Name: Link to full integration
-
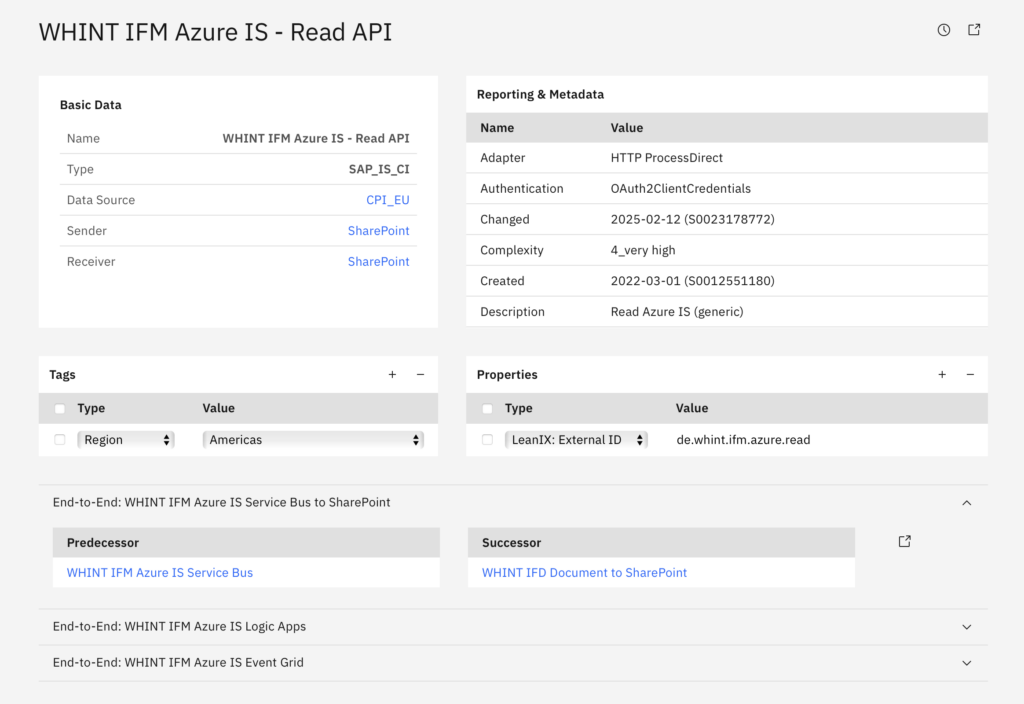
Visualization
End-to-end integrations can be visualized by system through Visualization → End-to-End when sender and receiver systems are properly assigned.
Step 5: Add & Manage Users
Manage platform access and permissions in the Settings → Operations → Users section.
This section covers user creation, role assignment and access control for your Integration Cockpit.

5.1 User Roles and Permissions
Before adding users, understand the available access levels:
|
Role |
Permissions |
|---|---|
|
USER |
Read-only access to Inventory, Landscape, Reporting |
|
CONFIGURATOR |
Same as USER, plus edit rights for Inventory, Landscape, Reporting |
|
ADMINISTRATOR |
Full access including Settings, User Management and Platform Configuration
|
Users with the USER role cannot access the Settings section and have no write permissions.
5.2 Authentication Requirements
User authentication is based on your deployment model:
Microsoft (Azure / Entra ID):
-
Users must be invited by WHINT
SAP (BTP / S-User):
-
Users must be added to the subaccount via WHINT Support Portal.
Authentication method depends on your Integration Cockpit deployment configuration and cannot be changed by individual users.
5.3 Add New Users
-
Follow these steps to create new user accounts:
-
Navigate to Settings → Operations → Users.
-
Click "+" Add.
-
Enter user details:
-
E-Mail Address - User's authentication email
-
Role - Select from USER, CONFIGURATOR, or ADMINISTRATOR
-
Active - Enable user access (checkbox)
-
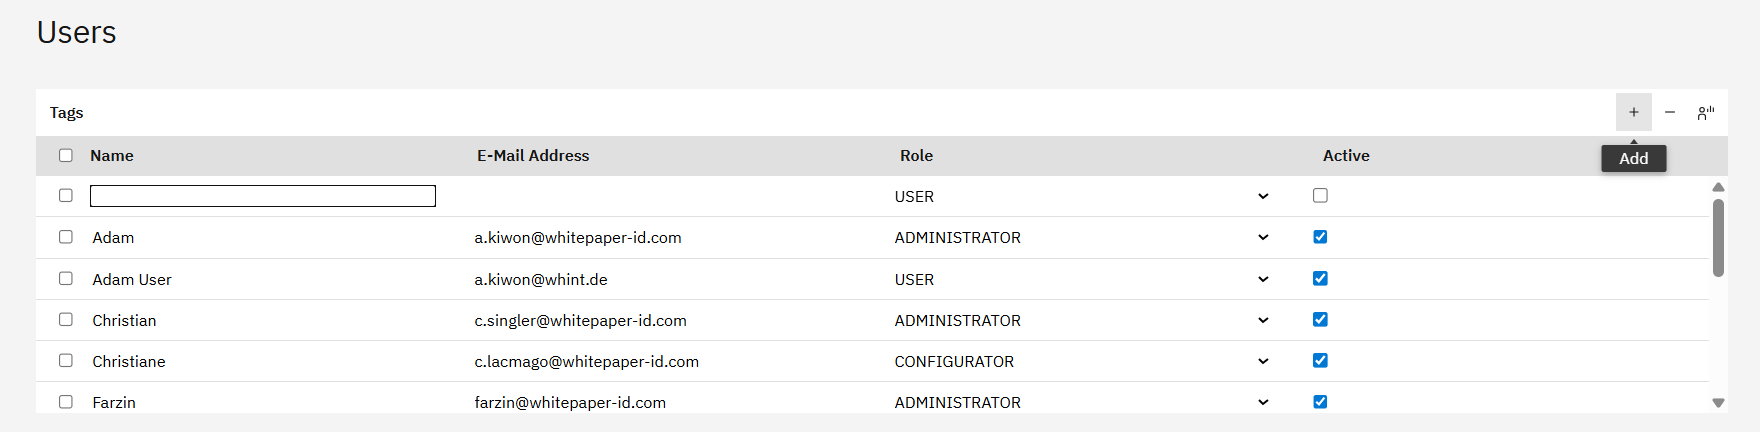
-
Click "Save" to create the user.
Quick Tip
To revoke access without deleting a user, uncheck “Active”
5.4 Manage Existing Users
Follow these steps to manage users and their access to the Integration Cockpit:
-
Navigate to Settings → Operations → Users.

-
Review the user overview which displays:
-
Name - User display name
-
E-Mail Address - User's authentication email
-
Role (USER, CONFIGURATOR, ADMINISTRATOR)
-
Active - Enable/disable user access
-
-
Manage existing users:
-
Activate/Deactivate: Toggle the Active checkbox to enable/disable access
-
Change Role: Modify user permissions by updating the Role assignment
-
-
Click "Save" to apply any changes.
5.5 User Personas Reference
Common user types and their typical role assignments:
|
Persona |
Description |
Typical Role |
|---|---|---|
|
IT / Business User |
People who want to access (read) data about interfaces from other IT departments or business departments (key users) |
USER |
|
Citizen Integrator |
IT Staff from other IT departments with deeper understanding and focus on integration |
CONFIGURATOR |
|
External User |
IT Experts working for the integration department who also need to enrich interfaces and configure integrations |
CONFIGURATOR |
|
Integration Architect / Expert |
IT Staff from the Enterprise Integration department with full access to the integration cockpit (read, change, configure) |
ADMINISTRATOR |
Use this reference to match user types to appropriate role assignments when adding new users.
Last Updated: Jun 25, 2026